Create a cluster
Creating a cluster provisions the control plane and your first Worker Group in one flow, so you can go from a blank account to a running GPU cluster without any separate infrastructure steps.
-
Open the create form.
Go to AI infrastructure → Managed GPU cluster, then select Create managed GPU cluster.
-
Fill in Basics information.
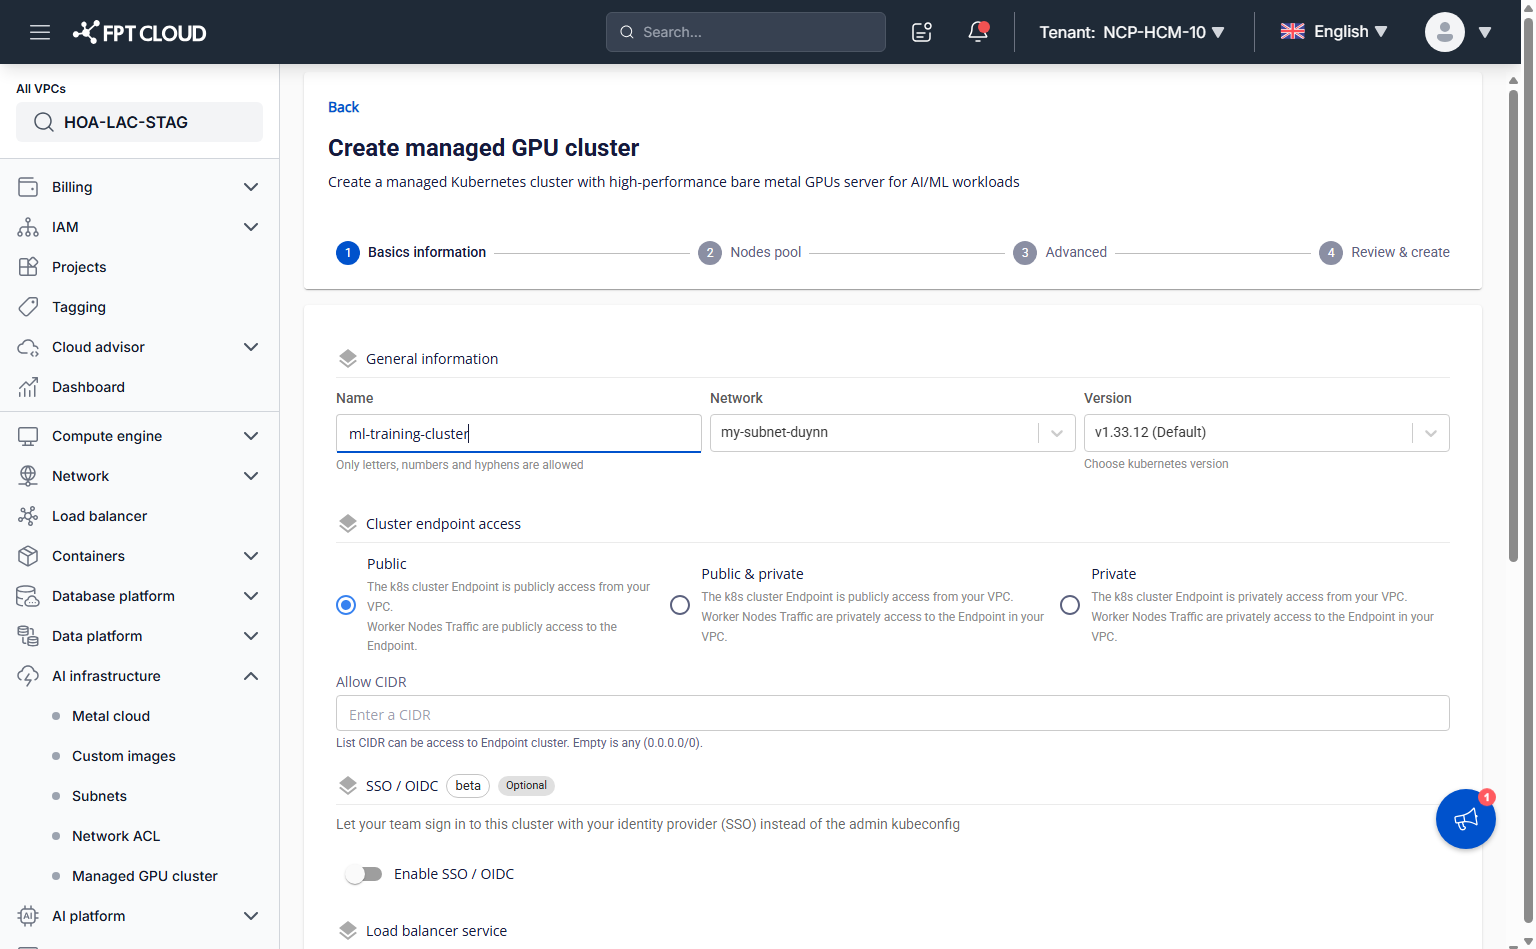
- Name: a unique cluster name, letters/numbers/hyphens only.
- Network: the subnet you created for the bare metal GPU workers (see Initial setup).
- Version: the Kubernetes version — defaults to the latest supported version.
- Cluster endpoint access: Public, Public & private, or Private — same trade-offs as any FPT Kubernetes Engine cluster. Allow CIDR restricts which CIDR ranges can reach the endpoint (empty allows any).
- SSO / OIDC (beta, optional): connect the cluster to your identity provider at creation time instead of after — see Configure OIDC authentication for the field reference.
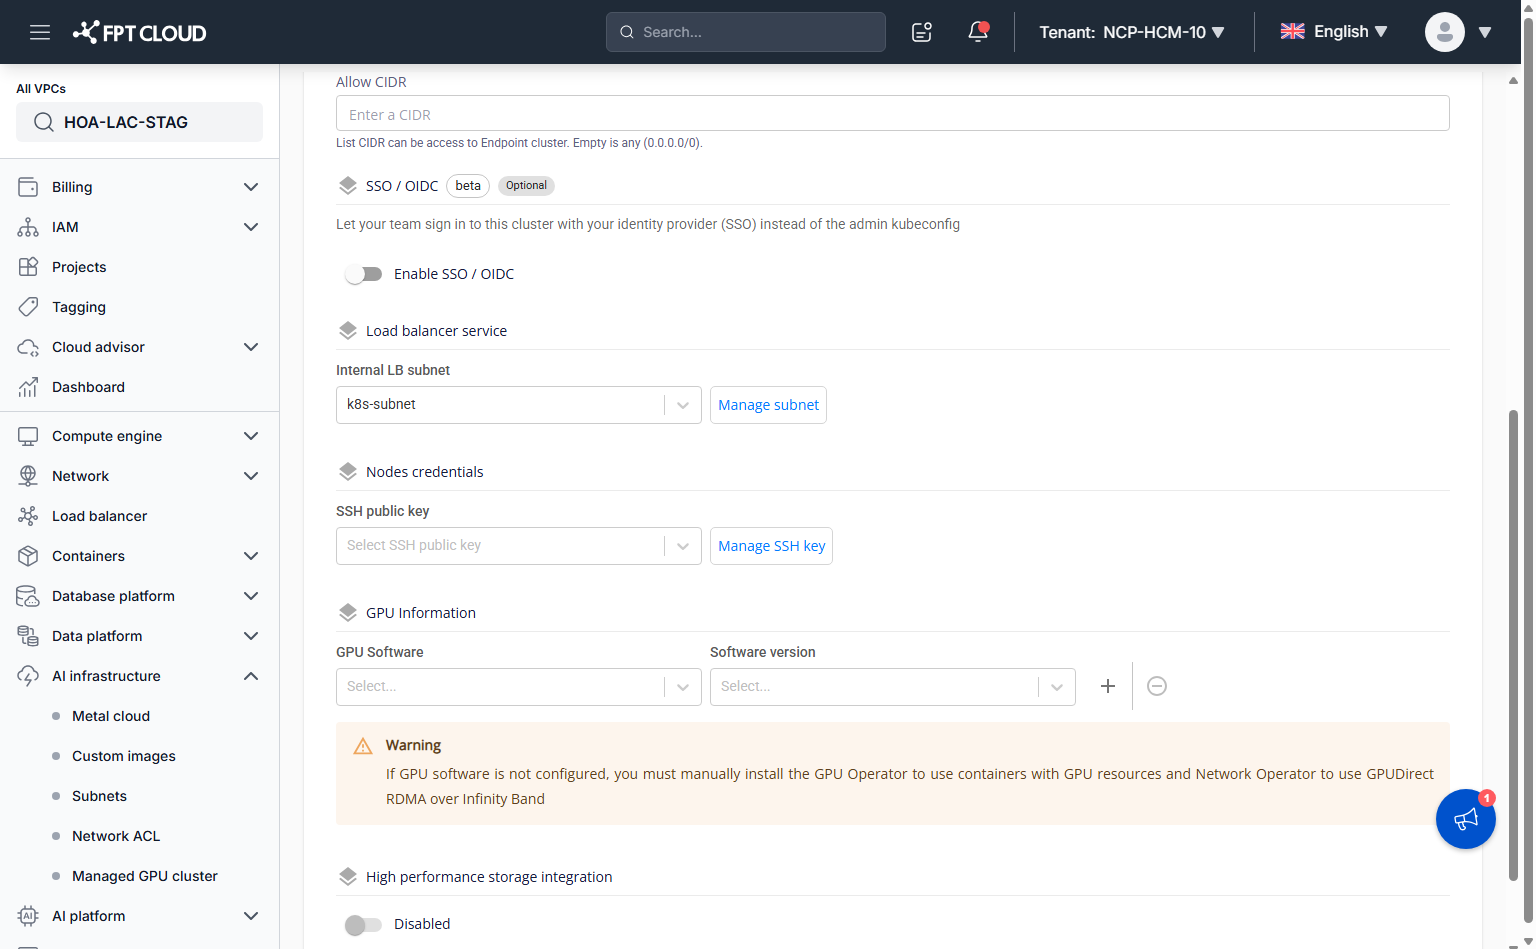
- Internal LB subnet: the Load Balancer subnet you created in Initial setup.
- SSH public key: the key used to SSH into worker nodes — select an existing one or select Manage SSH key to add one first.
- GPU Software: install GPU management software cluster-wide. Options are GPU Operator, Network Operator, Slurm Operator, and vGPU Scheduler. Choosing a software also fills in a default Software version and, for GPU Operator, a Cluster mig strategy.
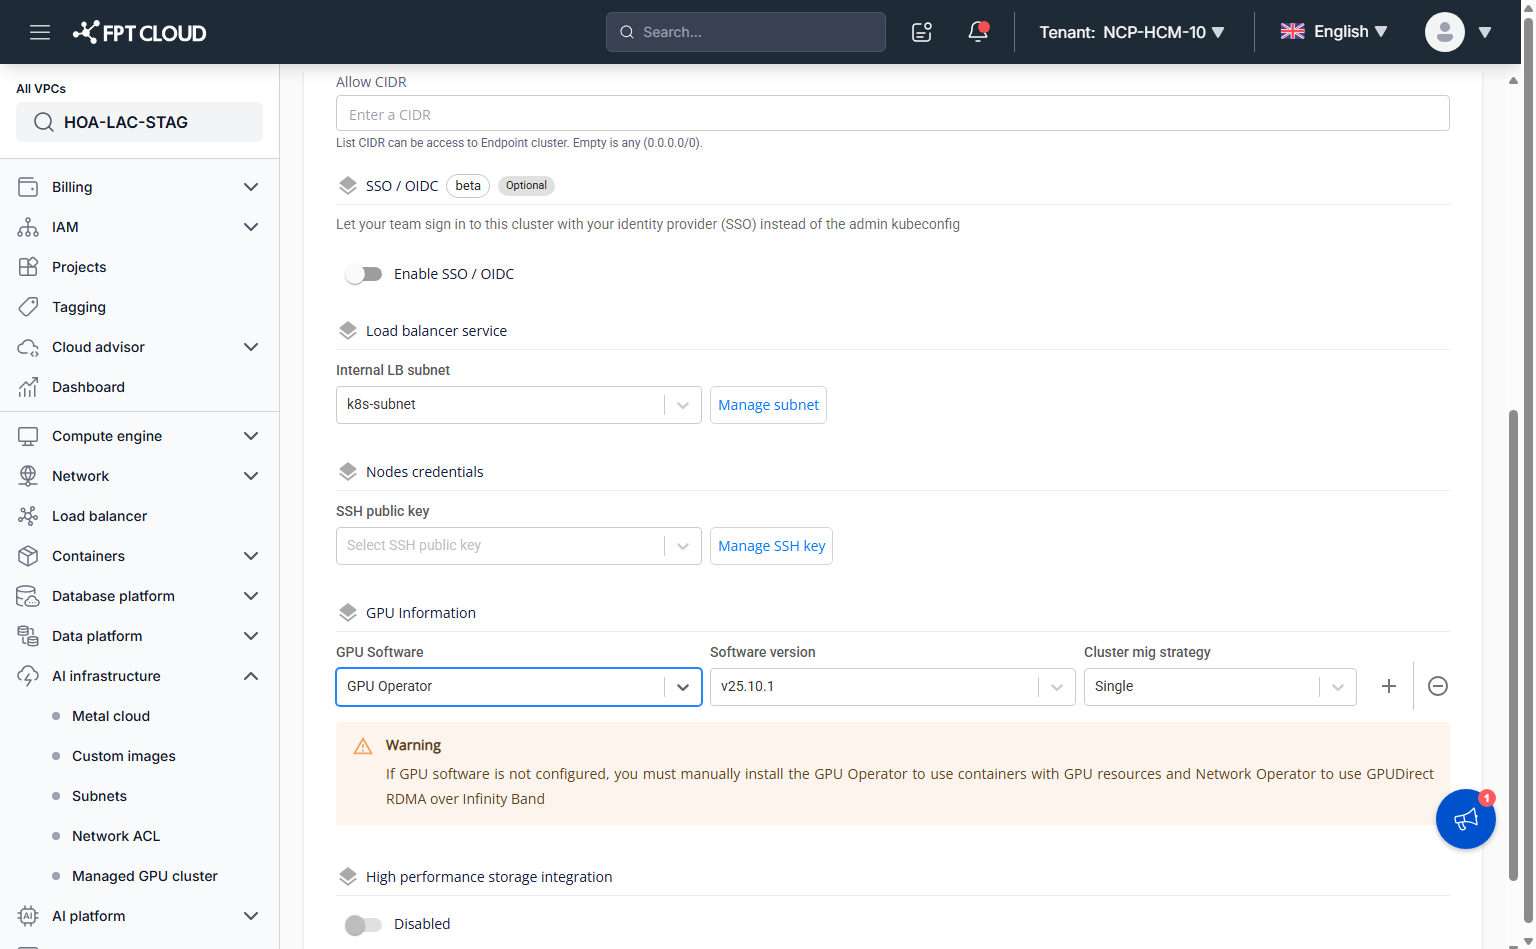 warning
If you don't configure GPU software here, you must manually install the GPU Operator afterward to use containers with GPU resources, and the Network Operator to use GPUDirect RDMA over InfiniBand.
- High performance storage integration: only available if FPT High Performance Storage is already activated for your account.
-
Configure the Nodes pool.
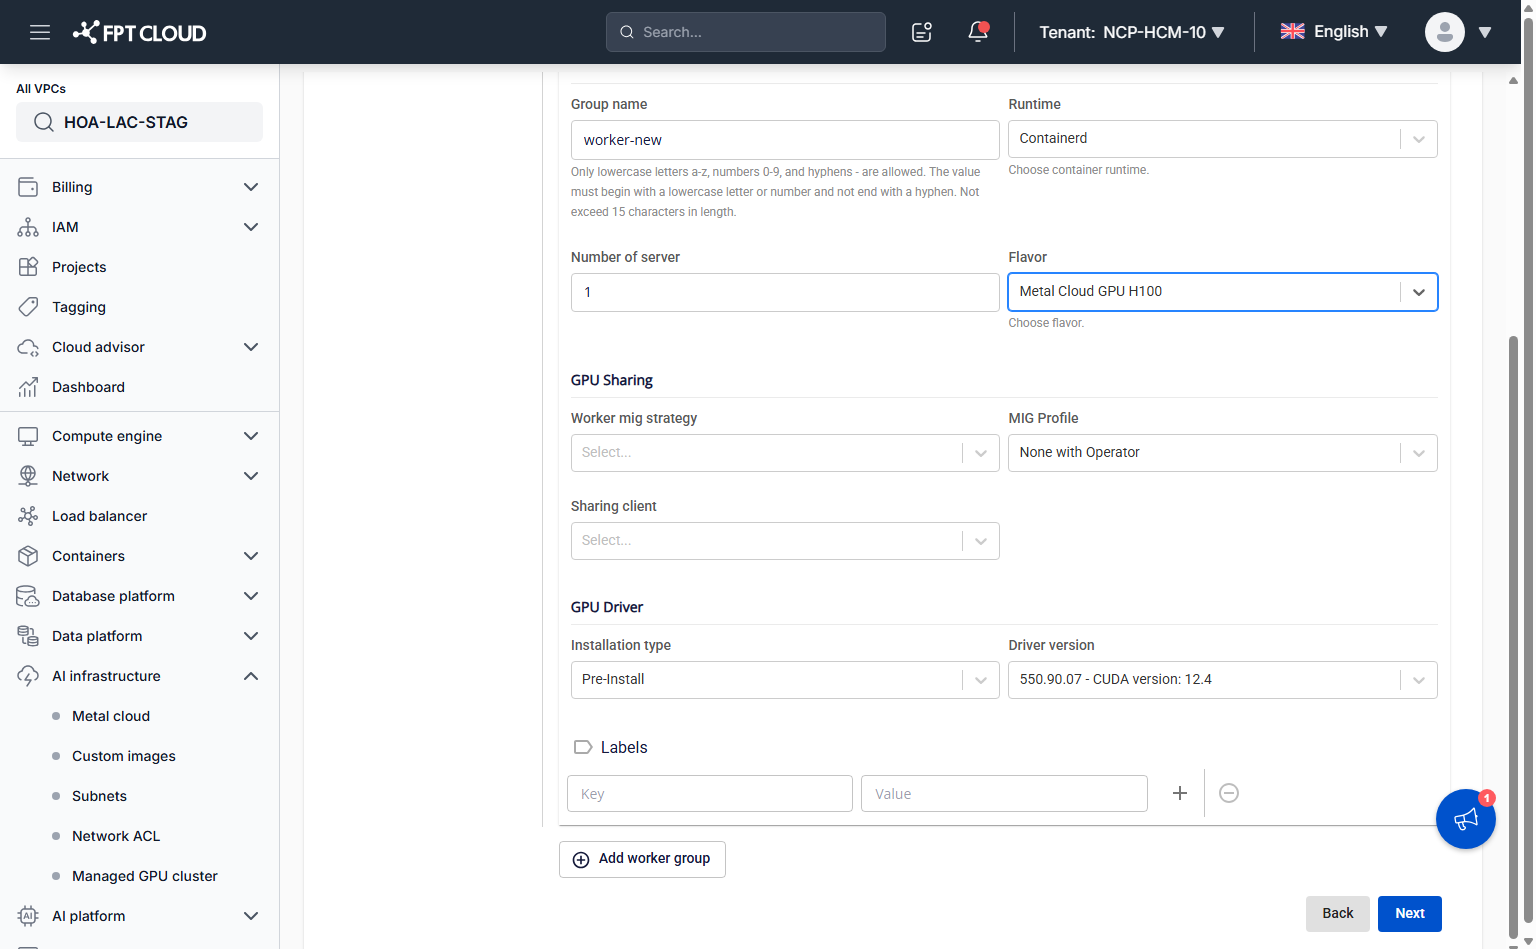
Every cluster needs at least one Worker Group — the first one is the Base group, which you can't delete. Add more groups later with Add worker group for workloads that need different sizing or GPU settings.
- Group name: lowercase letters, numbers, and hyphens, up to 15 characters.
- Runtime: currently Containerd only.
- Number of server: how many bare metal GPU servers to provision for this group.
- Flavor: the GPU server model — currently Metal Cloud GPU H100 or Metal Cloud GPU B300. Available flavors depend on real-time capacity in your region; if a flavor shows "has no more usable space," pick another flavor or region, or contact support.
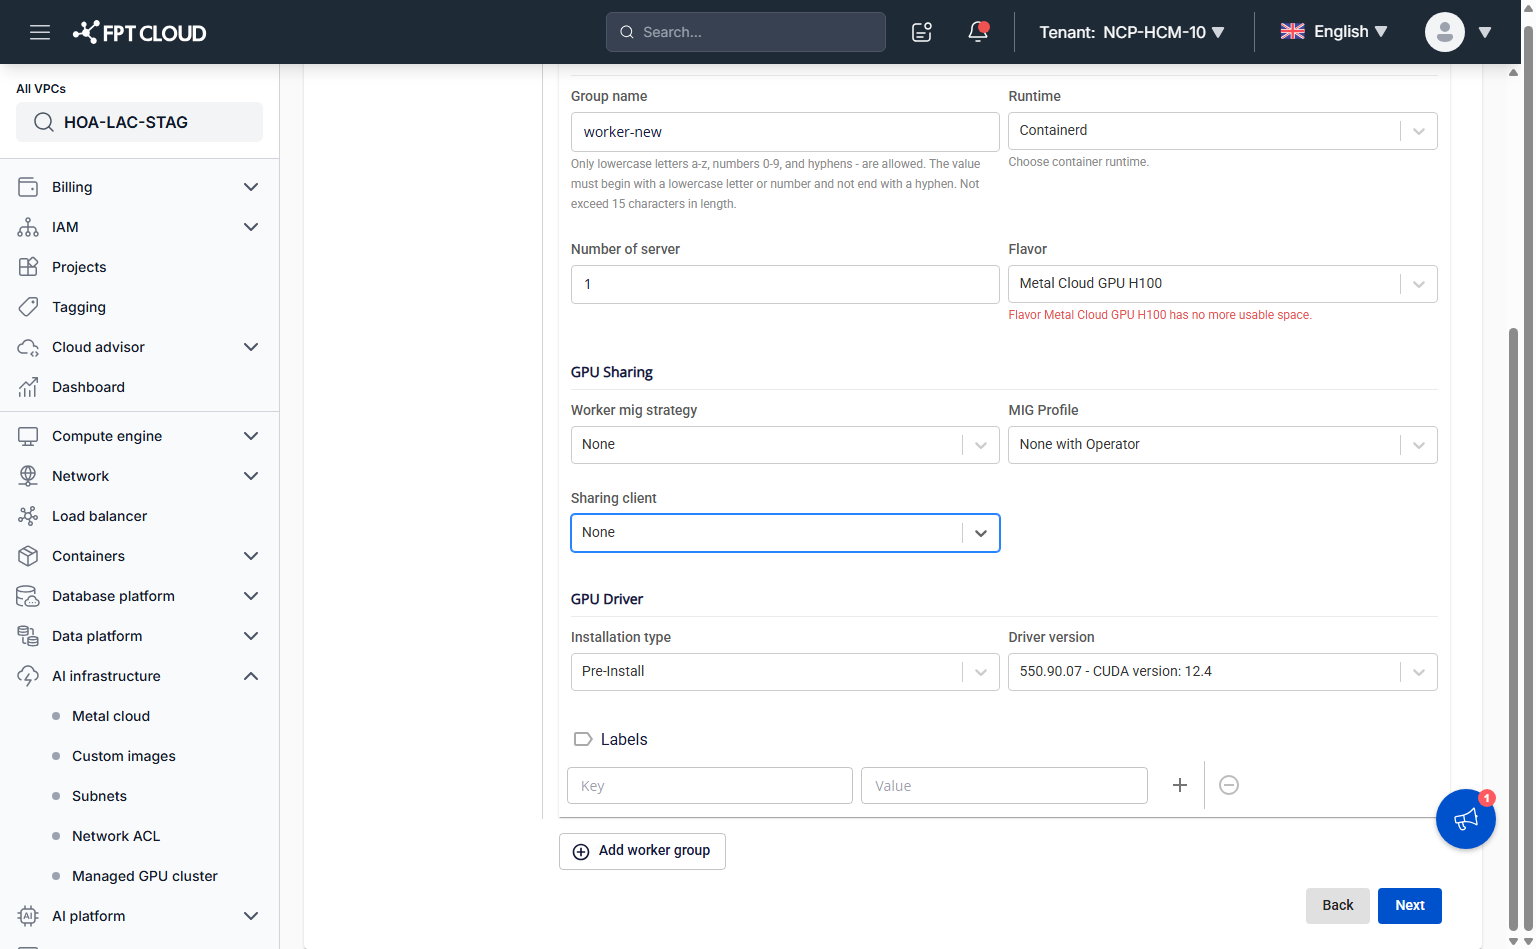
Under GPU Sharing, choose how this group's GPUs are shared between workloads:
- Worker mig strategy: None (a Pod uses a whole physical GPU) or Single (split the GPU into fixed-size instances using MIG — Multi-Instance GPU).
- MIG Profile (when Worker mig strategy is Single): the split size —
MIG-single-7x1g.10gb,MIG-single-4x1g.20gb,MIG-single-3x2g.20gb,MIG-single-2x3g.40gb,MIG-single-1x4g.40gb, orMIG-single-1x7g.80gb. Available profiles depend on the flavor you picked. - Sharing client: None, MPS, or Time Slice — an alternative, non-MIG way to share a GPU across multiple Pods. Available options depend on the Worker mig strategy you selected.
Under GPU Driver:
- Installation type: Pre-Install — FPT Cloud pre-installs the NVIDIA driver on the server.
- Driver version: the supported driver/CUDA combination, for example
550.90.07 - CUDA version: 12.4.
Optionally add Labels (key/value pairs applied to every worker node in the group) — useful for targeting workloads at a specific Worker Group with a node selector.
-
Review the Advanced settings.
This step covers cluster-wide networking: the Pod network and Service network CIDRs, and the Network Node Prefix (which determines how many Pods each node can run). The CNI installed is fixed to Calico. Change these only if you know you need non-default ranges — the defaults work for most clusters.
-
Select Review & create, confirm the summary, then select Create managed GPU cluster.
The system checks whether your bare metal GPU quota covers the request before creating the cluster. Once submitted, find your cluster in the list at AI infrastructure → Managed GPU cluster, showing Name, Version, Worker group, Status, Created at, and Actions.
Common issues
| Issue | Cause / fix |
|---|---|
| A Flavor shows "has no more usable space" | Real-time GPU server capacity is exhausted for that flavor in this region — try another flavor, another region, or contact support to check capacity. |
| "Worker mig strategy is required" / "Sharing client is required" | Both fields are required even though they show as "Select..." — pick a value (None if you don't need GPU sharing) before moving to the next step. |
| MIG Profile shows "No options" | The selected flavor doesn't expose MIG profiles for the current Worker mig strategy — switch flavor, or set Worker mig strategy to None. |
Next steps
- Access a cluster — get the kubeconfig and review your cluster's configuration.
- Configure OIDC authentication — let team members log in with their own SSO account instead of sharing the admin kubeconfig.