Set up and configure
This guide takes you from a computer without Terraform to a configuration that can read a VPC on FPT Cloud. The whole process takes about 10 minutes.
Prerequisites
- ✅ An FPT Cloud account with access to at least one VPC.
- ✅ A Role that allows the operations you plan to perform. Terraform uses your account permissions, so it cannot do more than you can do on Portal.
- ✅ A computer running Linux, macOS, or Windows, with an Internet connection.
Install Terraform
Choose the installation method for your operating system.
macOS (Homebrew):
brew tap hashicorp/tap
brew install hashicorp/tap/terraform
Ubuntu and Debian:
wget -O- https://apt.releases.hashicorp.com/gpg | sudo gpg --dearmor -o /usr/share/keyrings/hashicorp-archive-keyring.gpg
echo "deb [signed-by=/usr/share/keyrings/hashicorp-archive-keyring.gpg] https://apt.releases.hashicorp.com $(lsb_release -cs) main" | sudo tee /etc/apt/sources.list.d/hashicorp.list
sudo apt update && sudo apt install terraform
Windows: download the package from the Terraform installation page, extract terraform.exe, and add the folder that contains the file to the PATH environment variable.
Check the installation:
terraform -version
The command prints the Terraform version, for example Terraform v1.10.5. The examples in this section require Terraform 1.5 or later.
Create a Token
The Token lets Terraform call the FPT Cloud API on your behalf.
-
Sign in to FPT Cloud Portal.
-
Select Token in the left menu.
-
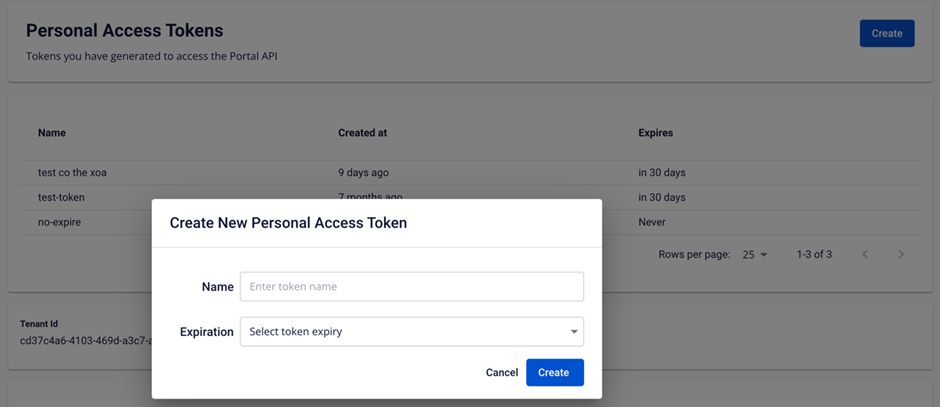
Select Create.
-
Enter a Name and select an Expiration for the token.
-
Select Create.
-
Copy the token and store it in a safe place, for example a password manager.

The Token has the same permissions as your account. Do not write the token in a .tf file, do not commit it to Git, and do not send it over chat.
Prepare the connection information
In addition to the token, the provider needs two pieces of information:
| Information | Where to find it |
|---|---|
| Tenant name | The name of the tenant you select at the top of Portal. |
| Region | The Region that contains your VPC, looked up in the table below. |
| Region | region value |
|---|---|
| Hanoi | VN/HAN |
| Hanoi 2 | VN/HAN2 |
| Ho Chi Minh City | VN/SGN |
| Ho Chi Minh City 2 | VN/SGN2 |
| Japan (Tokyo) | JP/JCSI2 |
Declare the connection information
The recommended method is environment variables, so that the token never appears in your source code.
Linux and macOS:
export FPTCLOUD_TOKEN="YOUR_API_TOKEN"
export FPTCLOUD_TENANT_NAME="YOUR_TENANT_NAME"
export FPTCLOUD_REGION="VN/HAN"
Windows PowerShell:
$env:FPTCLOUD_TOKEN = "YOUR_API_TOKEN"
$env:FPTCLOUD_TENANT_NAME = "YOUR_TENANT_NAME"
$env:FPTCLOUD_REGION = "VN/HAN"
Environment variables apply only to the current terminal window. When you open a new terminal, declare them again.
For the JP/JCSI2 Region, also declare FPTCLOUD_API_URL="https://console-api.fptcloud.jp/api".
Configure the provider
-
Create a new folder for the project, for example
fptcloud-demo. -
Create a
versions.tffile in that folder:terraform {required_version = ">= 1.5"required_providers {fptcloud = {source = "fpt-corp/fptcloud"version = "~> 0.3"}}}provider "fptcloud" {} -
Download the provider:
terraform init
The output ends with the line Terraform has been successfully initialized!.
The provider "fptcloud" {} block is empty because the provider reads the token, tenant, and Region from the environment variables. If you declare them in the provider block, the values in the block take precedence over the environment variables.
Provider arguments
| Argument | Environment variable | Required | Description |
|---|---|---|---|
token | FPTCLOUD_TOKEN | Yes | The Token created on the Token page. |
tenant_name | FPTCLOUD_TENANT_NAME | Yes | The name of the tenant that holds the resources. |
region | FPTCLOUD_REGION | Yes | The Region of the VPC, taken from the Region table above. |
api_endpoint | FPTCLOUD_API_URL | No | Defaults to https://console-api.fptcloud.com/api. For Japan, use https://console-api.fptcloud.jp/api. |
timeout | FPTCLOUD_TIMEOUT | No | The number of minutes Terraform waits for an operation to finish. Defaults to 15. |
When you create a large Instance or the system is busy, an operation can take longer than 15 minutes. In that case, increase timeout:
provider "fptcloud" {
  timeout = 30
}
Check the connection
-
Create a
main.tffile that reads the VPC information. Replaceexample-vpcwith the name of your VPC:data "fptcloud_vpc" "example" {name = "example-vpc"}output "vpc_id" {value = data.fptcloud_vpc.example.id} -
Run the command:
terraform apply -
Enter
yesto confirm.
Terraform prints the vpc_id of the VPC. A data source only reads data, so this command does not create any resource. If you get an error, see Troubleshooting.