Create a new Kubernetes cluster
Create a Kubernetes cluster by configuring its network access, Worker Groups, and advanced networking settings, then review and confirm.
Before you start, make sure you have:
- Enough CPU, RAM, Storage, and Instance quota for the Cluster configuration you want.
- 1 available Public IP with Public & Private Controlplane Access mode, to expose the cluster's apiserver endpoint.
- 1 VM Subnet for the Kubernetes Nodes, created with a Static IP Pool.
Create a cluster in a VPC that already supports Private Cluster
-
On the FPT Portal menu, select Containers → Kubernetes → Create a Kubernetes Engine.

-
Enter the cluster's basic information, then select Next.
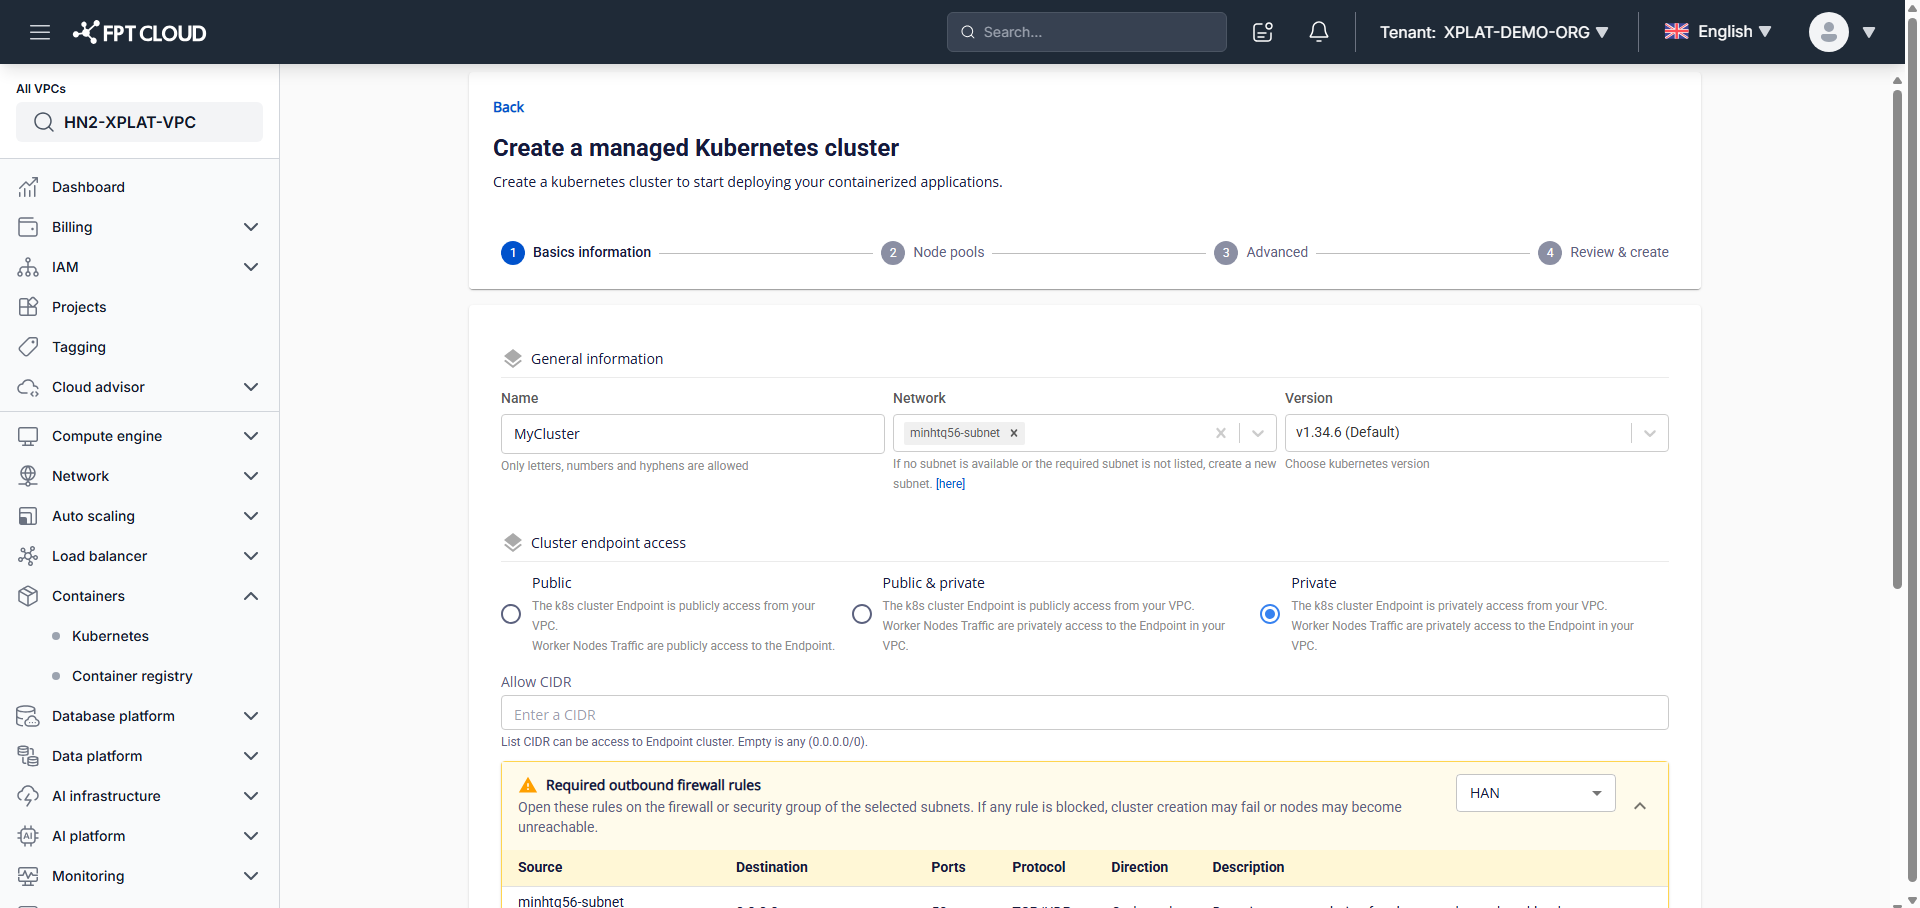
- Name: the Cluster name.
- Network: the Subnet used to deploy the Kubernetes Cluster's VMs.
- Version: the Kubernetes Cluster version.
- Cluster Endpoint Access: access options for the Cluster Endpoint.
Cluster Endpoint Access modes:
- Public: the apiserver endpoint is reachable from the public network; Worker Nodes also reach the apiserver over the public network.
- Public & Private: the apiserver endpoint is reachable from the public network; Worker Nodes reach the apiserver over the private network.
- Private: the apiserver endpoint is reachable only from inside the VPC; Worker Nodes reach the apiserver over the private network.
Choosing the right Cluster Endpoint Access:
- Public — you need to reach the Kubernetes API Endpoint from outside the VPC.
- Public & Private — you need a publicly reachable Endpoint but want to whitelist which IPs can reach it.
- Private — you only need to reach the Endpoint from inside the VPC.

Allow CIDR: the IP range allowed to reach the Kubernetes API Endpoint (CIDR — Classless Inter-Domain Routing). Leave it empty to default to
0.0.0.0/0(any IP). Enter a specific range (for example192.168.1.0/24) to restrict access to that range only.note- Choose the Cluster Endpoint Access mode that fits your security requirements and network architecture. For higher security, restrict the CIDR to internal IP ranges instead of
0.0.0.0/0. - Selecting Public & Private or Private adds an Allow CIDR field for the list of IP ranges permitted to reach the Cluster Endpoint.
- For Public or Public & Private mode, add the SNAT IP of every Worker (when the VPC uses an external firewall, or a Worker has a Floating IP attached) to the CIDR list that can reach the control plane.
Example: if the Worker subnet is SNATed to
103.174.214.26, add103.174.214.26/32to the CIDR allowlist. If a Worker has Floating IP103.174.215.27attached, add103.174.215.27/32. -
Configure Node Pools to fit your needs, then select Next.


M-FKE manages Worker Nodes through Worker Groups — groups of Worker Nodes sharing the same configuration. Split Worker Groups across applications as needed. Every cluster requires at least 1 base Worker Group, which you cannot remove.
You can assign Labels to any Worker Group; they apply to every Worker Node in that group. Add, remove, or edit Labels freely — this makes it easier to target applications at specific Worker Groups.
Worker Group 1 (base):
- Instance Type: CPU or GPU instance type for the Worker Nodes.
- Type: CPU and memory configuration for the Worker Nodes.
- Container Runtime: select Containerd.
- Storage Policy: the Storage Policy (maps to IOPS) for the Worker Node disk.
- Disk (GB): root disk size for the Worker Nodes.
- Network: the Subnet used to deploy the Cluster's VMs.
- Scale min: minimum Worker Node count for the cluster. 3 or more Nodes is recommended for production.
- Scale max: maximum Worker Node count for this Worker Group.
- Label: label for the Worker Group.
Additional Worker Groups: select ADD WORKER GROUP to add more.

From Worker Group 2 onward, you can also configure Taints to schedule applications onto specific Worker Nodes. Taints can be added, removed, and edited like Labels.
noteLabels and Taints configured on a Worker Group through the Unify Portal can't be removed via
kubectl— the system re-applies them automatically to match the Unify Portal configuration. Remove Label/Taint configuration through the Unify Portal instead. -
Review the Advanced tab. Leave the defaults unless you need to customize these settings.

- Pod Network: the network used for Pods in the cluster.
- Service Network: the network used for Services in the cluster.
- Network Node Prefix: the Subnet prefix for Pods on a Node.
- Max Pod per Node: the maximum Pods allowed per Node.
- Internal subnet Load Balancer (CIDR): the CIDR used to allocate IPs for internal Load Balancers. Leave empty to let the system allocate IPs from any subnet.
- Internal Classic Loadbalancer IP Range (Deprecated): IP range for Classic Load Balancers (LBv1). Allocation stops after April 19, 2025.
Configuring a valid internal subnet Load Balancer CIDR: the CIDR you set here must not overlap any subnet CIDR under Network → Subnets.

-
On Review & Create, check the cluster configuration and resource usage (RAM, CPU, Storage) the system calculated.

Once the resource check passes, select Create a Kubernetes to create the cluster.