2.1 PostgreSQL source connector
Create a connector: Type is source, Database is PostgreSQL
Pre-condition: CDC service status is Healthy.
Configuring PostgreSQL
1. pgoutput requires changing the Postgres cluster's wal_level configuration to logical, and CDC must be performed on the primary rather than hot or warm* replicas.
- To check the configuration:
SHOW wal_level;
- To change the configuration, run the following command on Postgres and restart the service after changing the configuration:
ALTER SYSTEM SET wal_level = 'logical';
2. The PostgreSQL source connector requires at least the REPLICATION role.
- If you are using a user that is a SuperUser, proceed to step 5.
- To check whether a user is a SuperUser:
SELECT rolsuper FROM pg_roles WHERE rolname = '<USER_NAME>';
- Otherwise, you can create a user with the REPLICATION role:
CREATE USER <USER_NAME> WITH REPLICATION LOGIN PASSWORD '<PASSWORD>';
3. Create a Publication:
- Note: perform the operations below with superuser privileges. For the
<PUBLICATION_NAME>value, FPTCloud only accepts strings containing lowercase letters.- Create a Publication for all tables:
CREATE PUBLICATION <PUBLICATION_NAME> FOR ALL TABLES;
- Check the existing Publications:
SELECT * FROM pg_publication;
- Create a Publication for specific tables:
CREATE PUBLICATION <PUBLICATION_NAME> FOR TABLE <SCHEMA1>.<TABLE1>, <SCHEMA2>.<TABLE2>, ...;
- Add tables to a publication:
ALTER PUBLICATION <PUBLICATION_NAME> ADD TABLE <SCHEMA1>.<TABLE1>, <SCHEMA2>.<TABLE2>, ...;
- Remove tables from a publication:
ALTER PUBLICATION <PUBLICATION_NAME> DROP TABLE <SCHEMA1>.<TABLE1>, <SCHEMA2>.<TABLE2>, ...;
- Drop a Publication:
DROP PUBLICATION <PUBLICATION_NAME>;
4. Grant SELECT permission on the tables for the user being used:
- Grant SELECT permission on a single table:
GRANT SELECT ON TABLE '<SCHEMA_NAME>.<TABLE_NAME>' TO <USER_NAME>;
- Or grant permission for all tables in a schema:
DO $$
 DECLARE
 table_record RECORD;
 BEGIN
 FOR table_record IN
 SELECT table_name
 FROM information_schema.tables
 WHERE table_schema = '<SCHEMA_NAME>' AND table_type = 'BASE TABLE'
 LOOP
 EXECUTE 'GRANT SELECT ON TABLE <SCHEMA_NAME>."' || table_record.table_name || '" TO <USER_NAME>;';
 END LOOP;
 END $$;
5. Change the REPLICA IDENTITY level of the tables that need Capture Data Change.
- Changing this configuration ensures that data change events contain sufficient information both before and after the change:
ALTER TABLE your_schema_name.your_table_name REPLICA IDENTITY FULL;
- Or change it for all tables in a schema:
DO $$
 DECLARE
 table_record RECORD;
 BEGIN
 FOR table_record IN
 SELECT table_name
 FROM information_schema.tables
 WHERE table_schema = '<SCHEMA_NAME>' AND table_type = 'BASE TABLE'
 LOOP
 EXECUTE 'ALTER TABLE <SCHEMA_NAME>."' || table_record.table_name || '" REPLICA IDENTITY FULL;';
 END LOOP;
 END $$;
6. The Connector will automatically create, or reuse an existing, replication_slot with the slot.name value entered from the UI, to listen for changes from the wal_log (write-ahead log).
- Check the maximum number of replication_slots:
show max_replication_slots;
- Check the current replication_slots:
SELECT slot_name, plugin, slot_type, database, active FROM pg_replication_slots;
- To remove an inactive replication_slot:
SELECT pg_drop_replication_slot('<REPLICATION_SLOT_NAME>');
7. When deleting a connector, you need to remove its replication_slot and publication:
- Remove the replication_slot:
SELECT pg_drop_replication_slot('<REPLICATION_SLOT_NAME>');
- Remove the publication:
DROP PUBLICATION <PUBLICATION_NAME>;
8. If you want to change the max_replication_slots configuration, change this setting in the postgres.conf file.
9. Create the heartbeat table (Only applicable for PostgreSQL)
-
Before creating the PostgreSQL Source Connector and configuring the Heartbeat Interval, you need to create the heartbeat table in the source database using the following statement:
-
This table is used to store heartbeat information for monitoring and maintaining the connector's running state.
CREATE TABLE IF NOT EXISTS public.cdc_heartbeat (
    id integer PRIMARY KEY,
    last_heartbeat timestamptz NOT NULL
);
Steps to create a connector:
To create a connector, follow these steps:
Step 1: In the menu bar, select Data Platform > Workspace Management > Workspace name.
Step 2: In the My services section, select CDC service
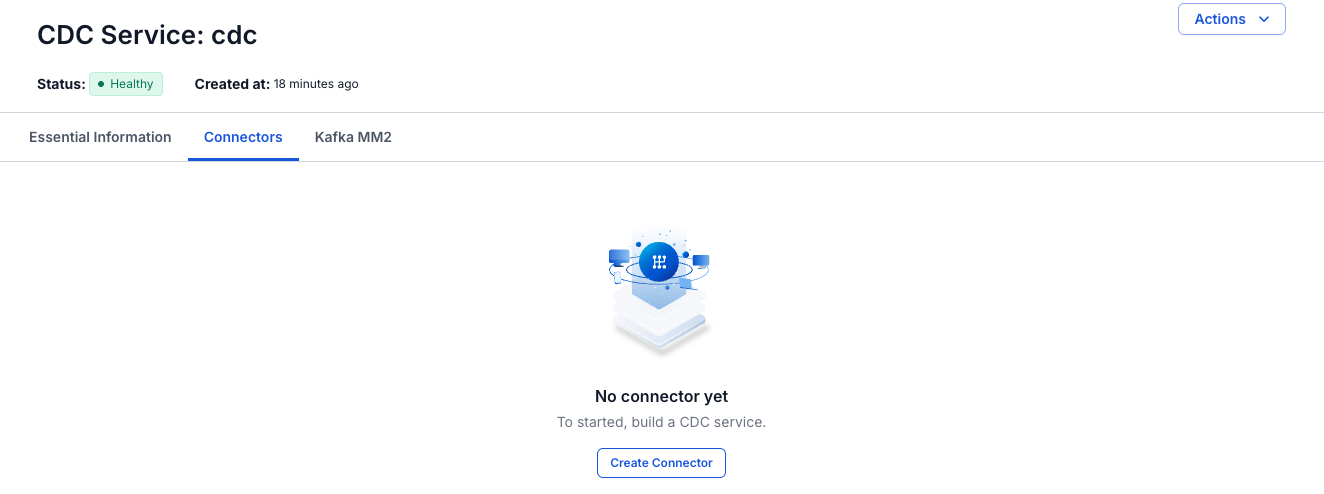
Step 3. On the CDC service detail screen, select the Connectors tab and click Create a connector.
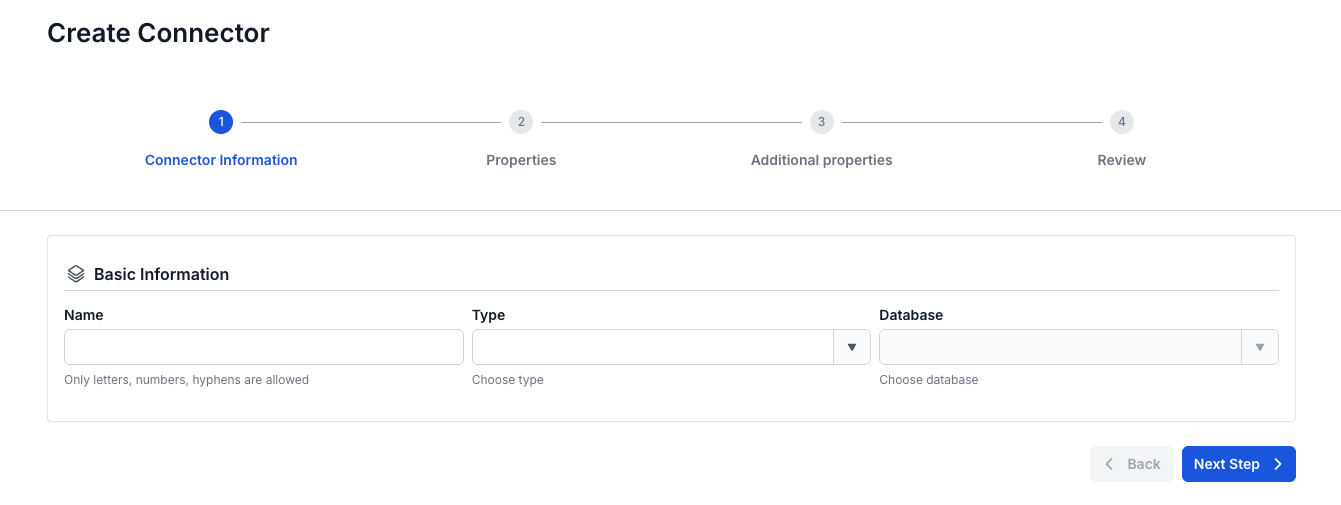
Step 4 Enter the information on the Connector Information screen:
- Name (required): Connector name. Note: The connector name can contain lowercase letters a-z or digits 0-9. In particular, spaces are not allowed — you can replace spaces with "-".
- Type (required): Select source.
- Database (required): Select PostgreSQL.
Step 5: Click Next to proceed to the Properties screen and enter the following information:
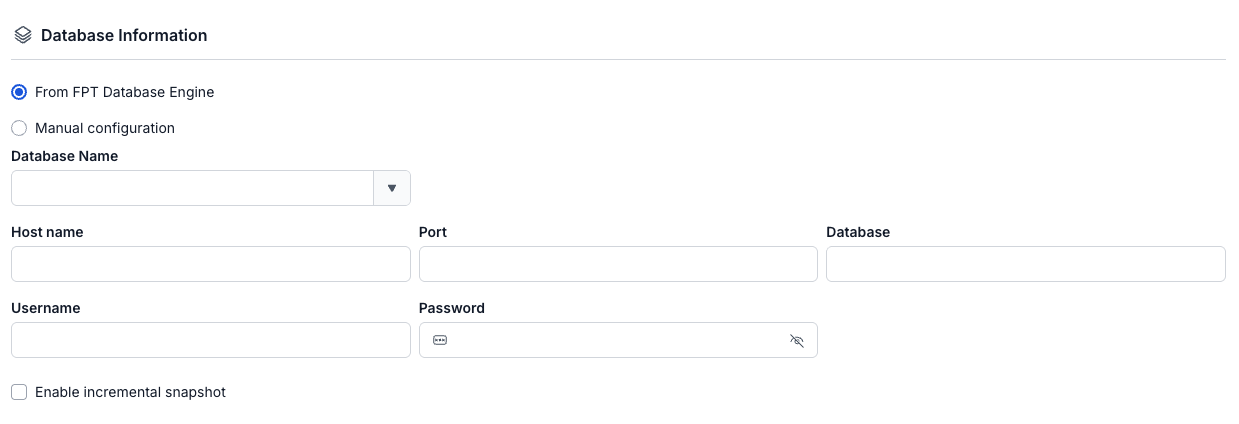
- If you select From FPT Database Engine - fill in the following information:
- Database (required): Select the Database.
- Host Name (required): Hostname or IP of the Postgres server.
- Port (required): Postgres server port, default is 5432.
- Database name (required): The database the Connector will listen for data changes on.
- Username (required): Postgres user used by the Connector.
- Password (required): Password.
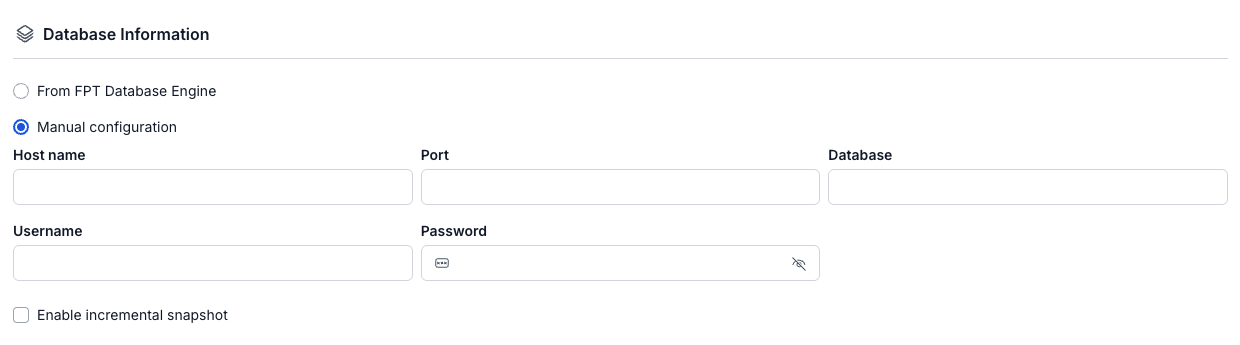
- If you select Manual configuration - fill in the following information:
- Host Name (required): Hostname or IP of the Postgres server
- Port (required): Postgres server port, default is 5432
- Database name (required): The database the Connector will listen for data changes on
- Username (required): Postgres user used by the Connector
- Password (required): password
-
Enable incremental snapshot (optional): Checkbox to enable the incremental snapshot feature for the Connector
- Only displayed for source connectors: MySQL, MariaDB, PostgreSQL
- When this checkbox is checked and "Test connection" is clicked, the system will check:
- Whether the database has sufficient permissions to perform a snapshot (INSERT, CREATE TABLE permissions are required for PostgreSQL/MySQL)
- If the database lacks permissions, a detailed error message will be displayed
- If the database has sufficient permissions, "Test connection successfully" will be displayed
- After the Connector has been successfully created with this checkbox checked:
- The Connector will have incremental snapshot management functionality
- The List Connector screen will display a "Snapshot Status" column
- The following operations can be performed: Execute, Pause, Resume, Stop snapshot via the Actions menu
-
Kafka Topic prefix (required): When data changes, change events will be produced to Kafka topics; the topic names will follow the format [topic.prefix].[schema_name].[table_name]. Example: topic prefix: syncdata, schema inventory, tables: customer, order, item. The Connector will record data changes to the following Kafka topics: syncdata.inventory.customer, syncdata.inventory.order, syncdata.inventory.item

- Replication - Slot (required): The replication slot used by the connector; the value can only contain lowercase letters
- Replication - Publication (required): The publication used by the connector; the value can only contain lowercase letters

Click Test connection to verify the connection from the Workspace to the entered Database
Step 6: Click Next to proceed to the Additional Properties screen and enter the following information:
- Mode (required): The Connector's behavior. Select one of the following modes:
- Initial (default): The Connector will snapshot all existing data in the tables, then continue to capture data changes on those tables
- Initial_only: The Connector will only snapshot all existing data in the tables, then not listen for data change events on the tables
- No_data: The Connector will not snapshot existing data in the tables and will only listen for data change events on the tables

Click the '+' to retrieve schema and table information:
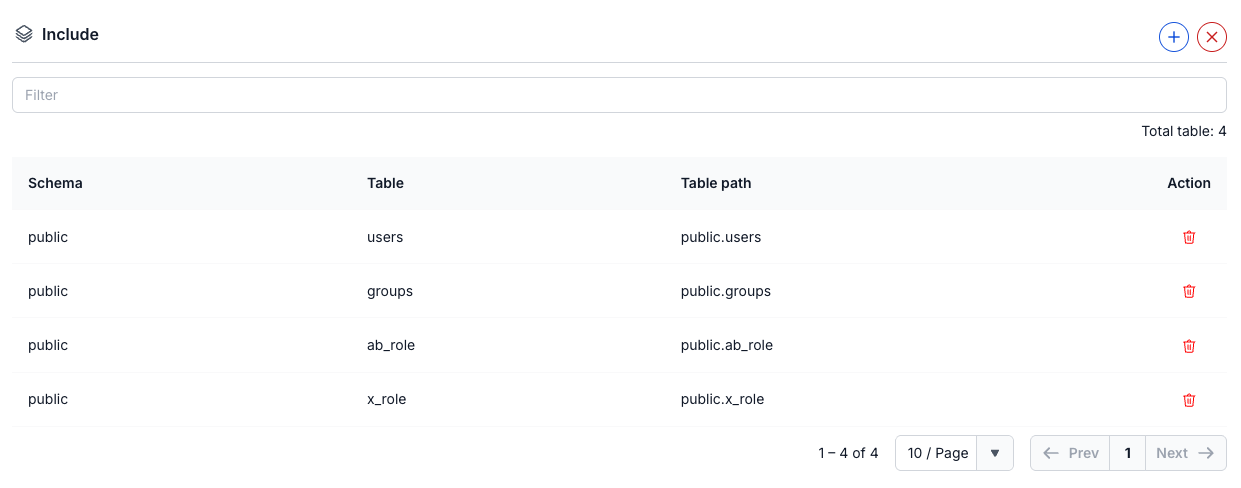
The maximum selection limit is 100 tables
-
Heartbeat (optional): Configure the interval (in milliseconds) between heartbeat messages sent by the connector to maintain its running state and update the offset when there are no data changes from the source.
- Default value:
0 - Valid value range:
0-30000 - Only applies to the following Source Connectors: PostgreSQL, MariaDB, MySQL, and SQL Server.
- For PostgreSQL, you need to create the heartbeat table in the source database before using this feature.
- Examples:
0: No heartbeat is sent.1000: A heartbeat is sent every 1 second.5000: A heartbeat is sent every 5 seconds.
- Default value:

Step 7: Click Next to proceed to the Review screen and verify the information.
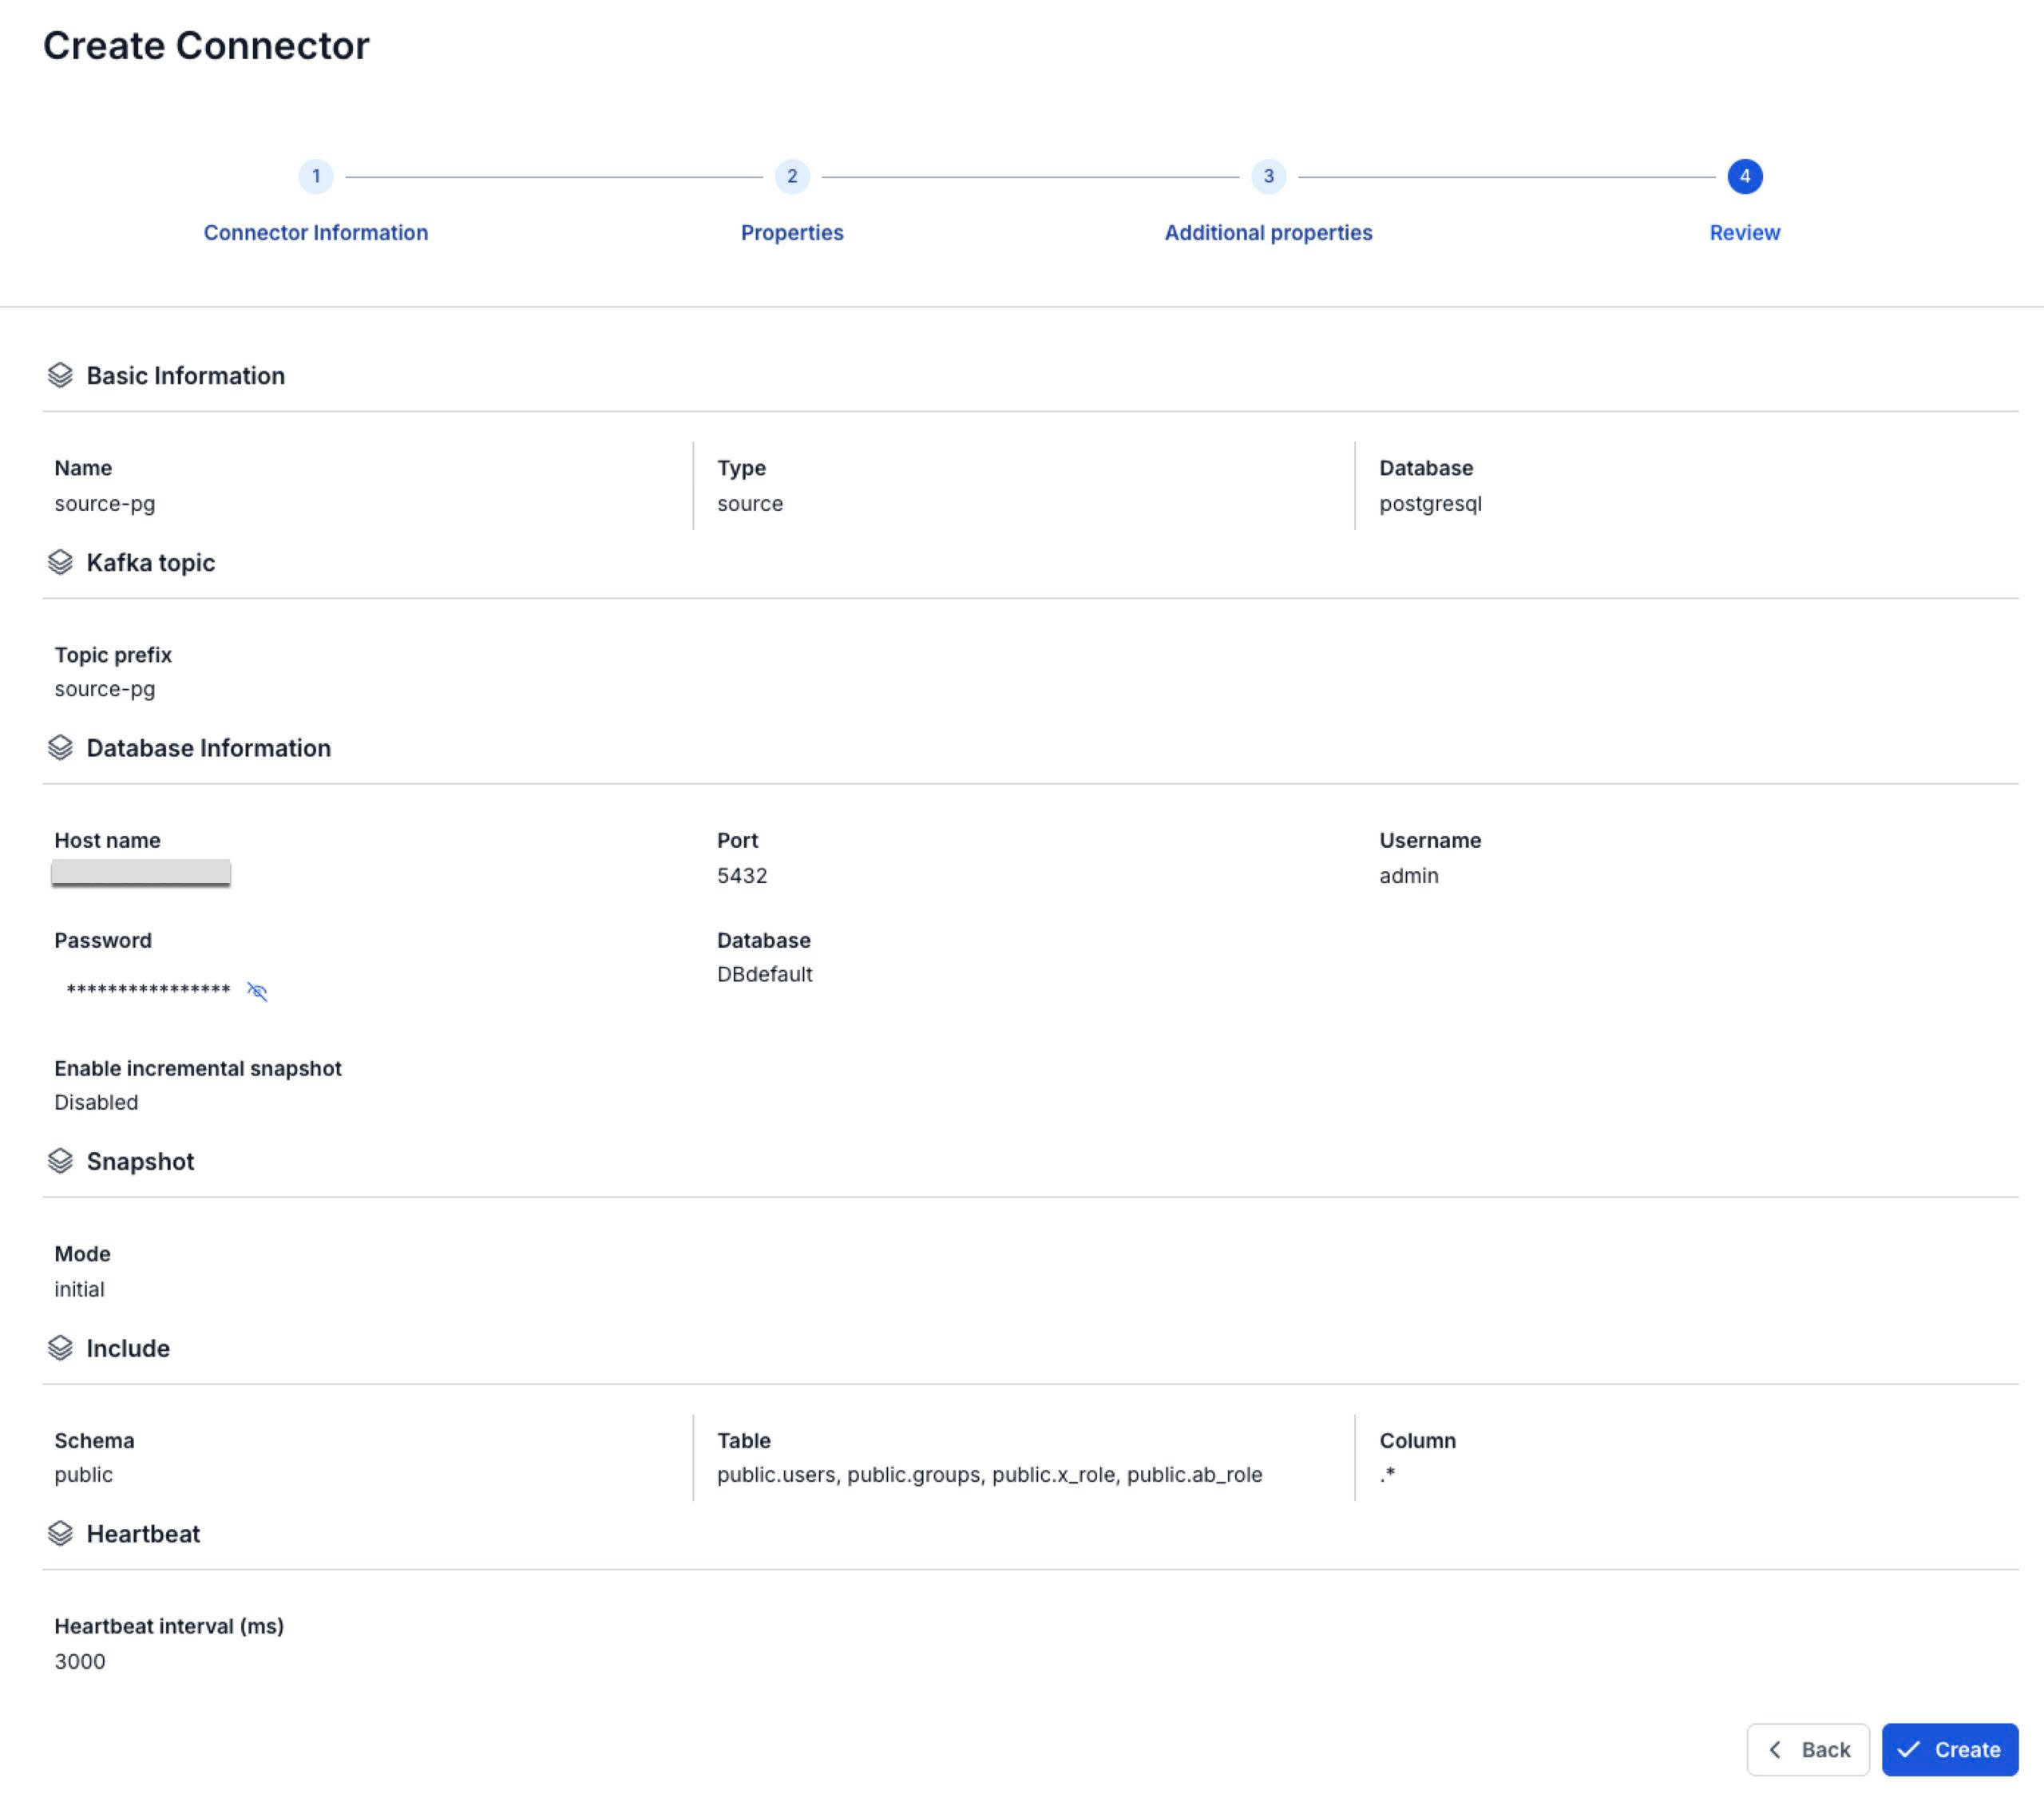
Step 8: Review the information and click the Create button to finish creating the connector.