Manage Compute Images
The Prepulling Image feature allows users to manage Docker images pulled into the workspace from different registries. Prepulling images helps optimize container startup time and ensures images are ready to use when needed.
Benefits:
- Reduces container startup time
- Centralized management of images needed for compute
- Supports both public and private registries
- Real-time monitoring of image pull status
Limit: Each Processing Service can have a maximum of 5 computes.
1. View the Compute Image List
To view the list of images that have been prepulled to a compute, follow these steps:
Step 1: On the Processing services screen > select the Compute tab
Step 2: Click on the compute whose image list you want to view
Step 3: Select the Images tab
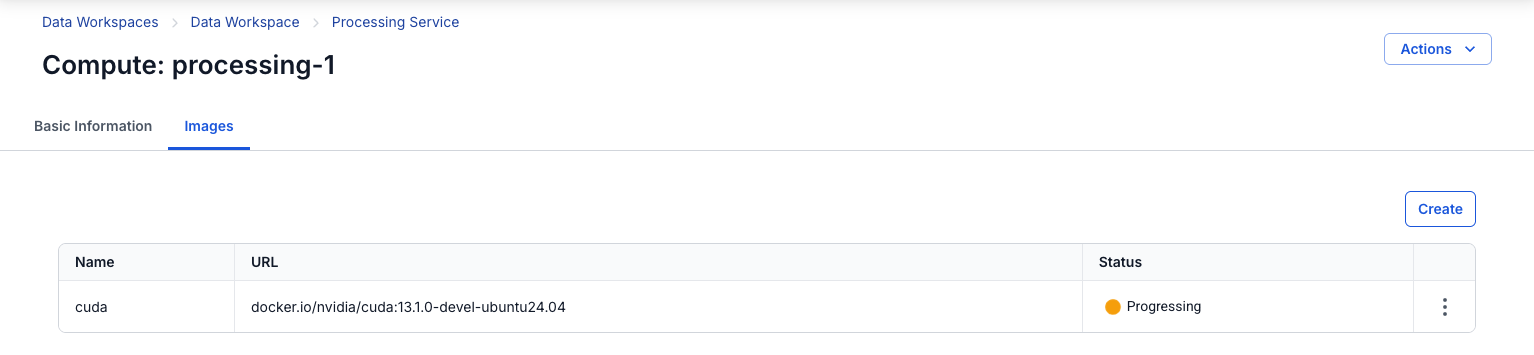
Result: The list of images added to the compute is displayed with the following information:
- Name: Identifier name of the image
- URL: Full path to the image registry
(e.g.
docker.io/nvidia/cuda:13.1.0-devel-ubuntu24.04) - Status: Current status of the image
- Ready: Image is ready to use
- Progressing: Image pull is in progress
- Processing: Processing
- Failed: Image pull failed
- Degraded: Image has an issue (an icon is available to view detailed logs)
- Unknown: Unknown status
- Actions: Menu of actions for the image (Update, Retry, Delete)
Note: If there are no images yet, the screen will display the message "No image yet" with a Create button to add a new image.
2. Add a New Image
Add an Image from a Public Registry (no authentication required)
Step 1: On the Images tab of the Compute, click the Create button
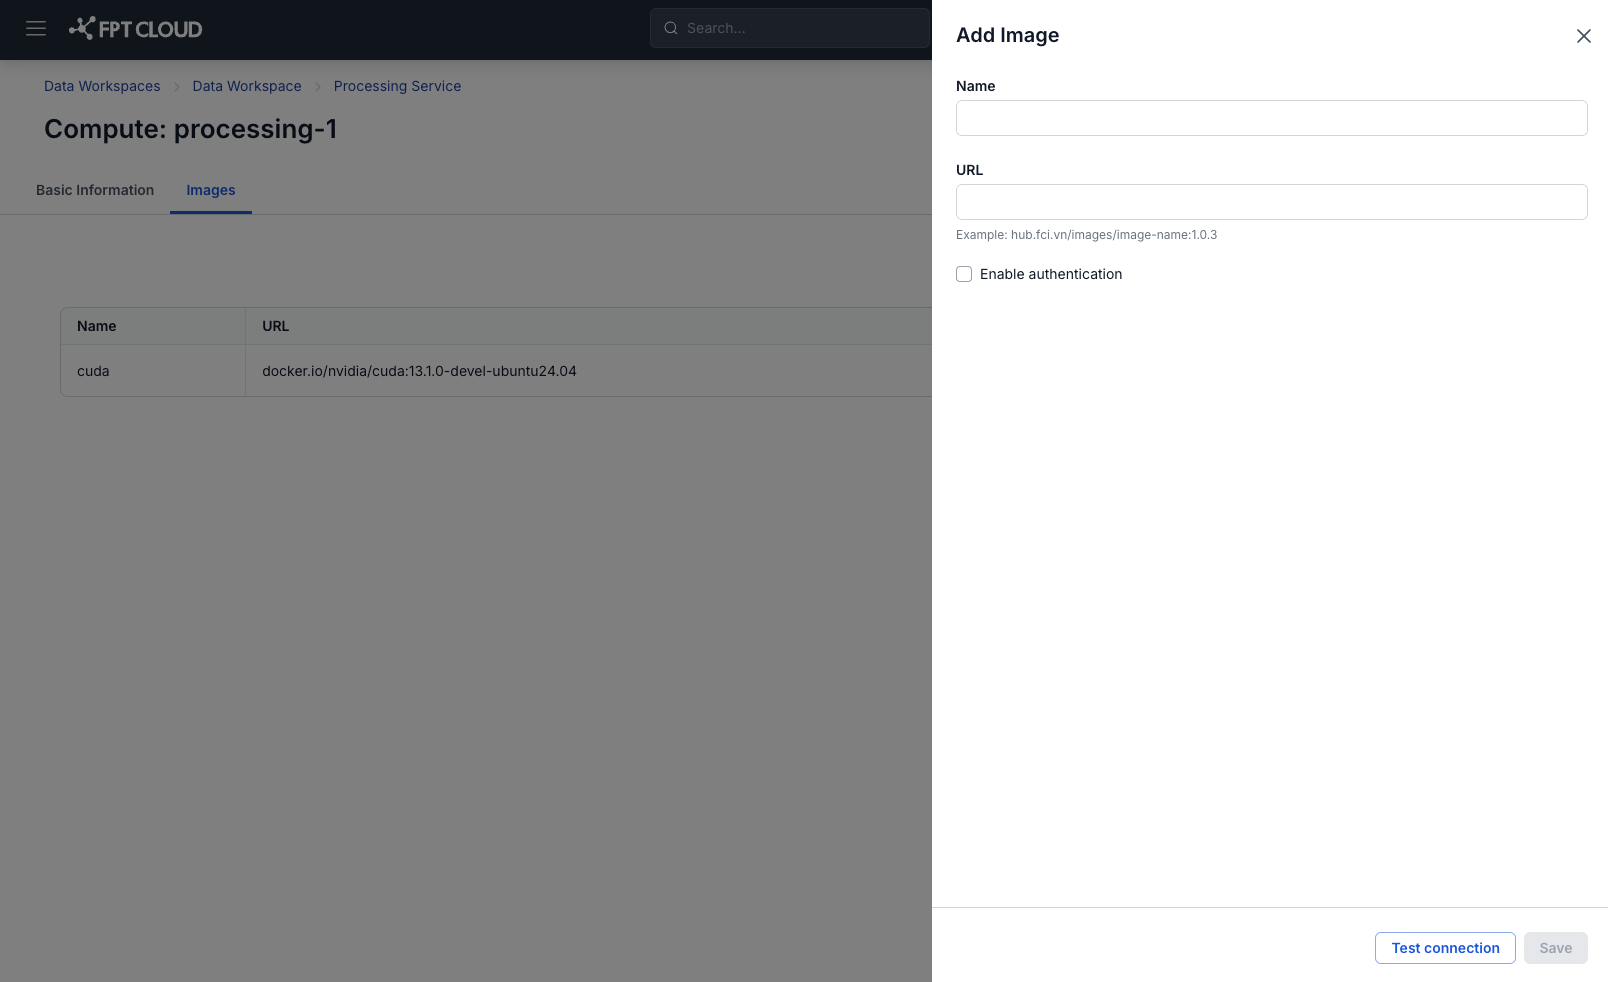
Step 2: In the Add Image popup, enter the following information:
- Name: Identifier name for the image (required)
- Only letters, numbers, and hyphens (-) are accepted
- Maximum 30 characters
- Example:
nginx-latest,cuda-13-1-0
- URL: Path to the image (required)
- Format: registry/repository/image-name:tag
- Example: docker.io/library/nginx:latest
- Example: hub.fci.vn/images/image-name:1.0.3
Step 3: Make sure the Enable authentication checkbox is not selected (for public images)
Step 4: Click the Test connection button to check the connection to the registry
- If successful: The message "Success - Test connection successfully" is displayed
- If it fails: A detailed error message is displayed
Step 5: After the test connection succeeds, the Save button will be enabled
Step 6: Click the Save button
Result:
- The message "Success - Add successfully" is displayed
- The new image appears in the list with Progressing status
- After the pull completes, the status changes to Ready
Add an Image from a Private Registry (with authentication)
Step 1: On the Images tab of the Compute, click the Create button
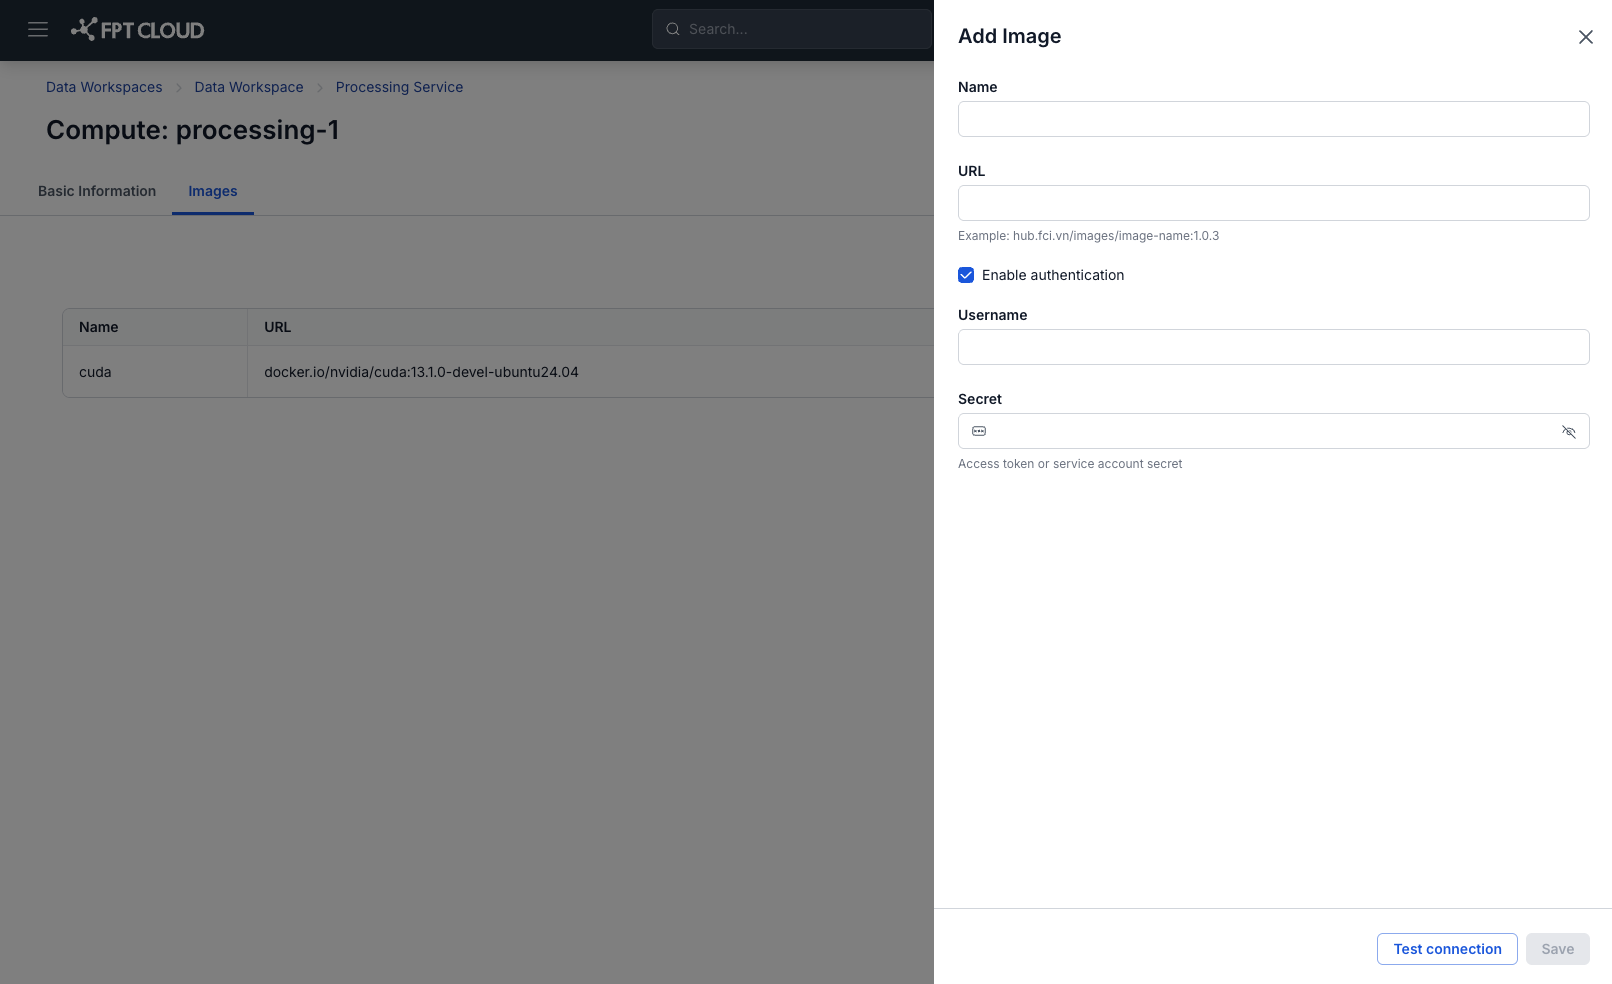
Step 2: In the Add Image popup, enter the following information:
- Name: Identifier name for the image
- URL: Path to the private image
Step 3: Check the Enable authentication checkbox
Step 4: Enter the authentication information:
- Username: Username or service account (required)
- Secret: Access token or password (required)
- Click the view icon to show/hide the password
Step 5: Click the Test connection button to check the connection
Step 6: After the test connection succeeds, click the Save button
Result: The image is added to the list and the pull process starts with the provided authentication.
3. Update an Image
Users can update information for an existing image (name, URL, authentication). When updating, the system will automatically re-pull the image with the new information.
Step 1: In the Images list, click the ⋮ icon (three vertical dots) in the Actions column of the image you want to update
Step 2: Select Update from the dropdown menu
Step 3: In the Update Image popup, the fields will display the image's current information
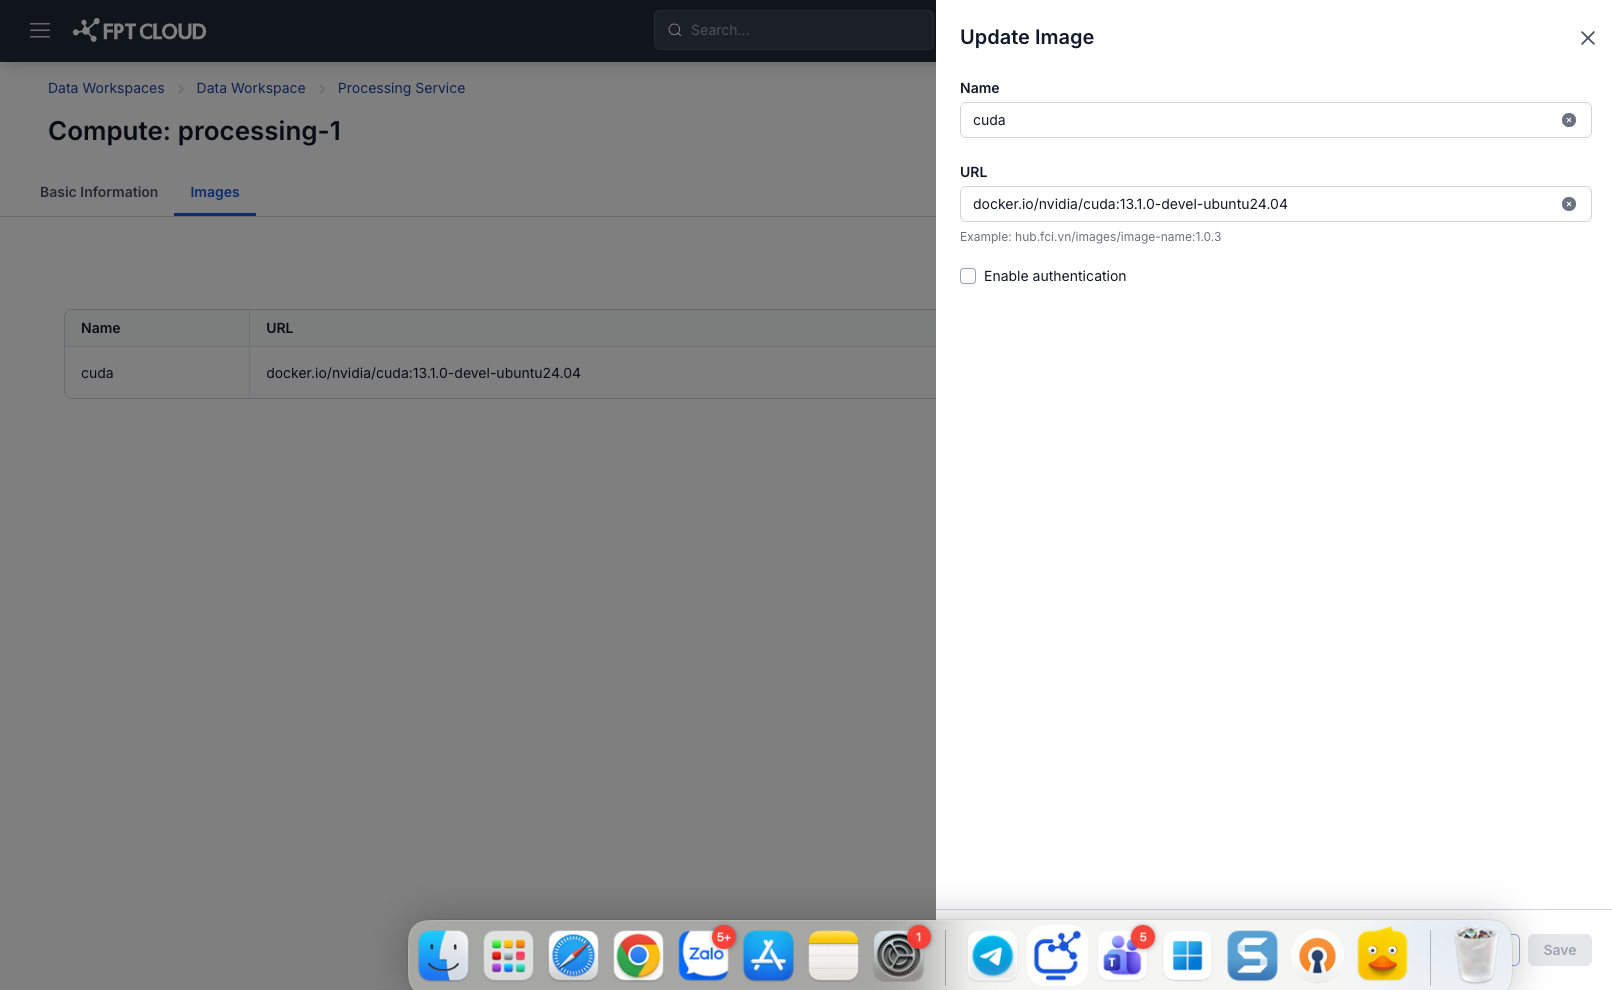
Step 4: Edit the necessary information:
- Change the Name (following the rules: letters, numbers, hyphens, max 30 characters)
- Change the URL
- Enable/Disable authentication:
- If enabled: Enter the new Username and Secret
- If disabled: Remove the authentication (for public images)
Step 5: Click the Test connection button to check the new configuration
Step 6: After the test succeeds, click the Save button
4. Retry an Image
When an image has Failed or Degraded status, users can retry it to pull the image again.
Step 1: In the Images list, click the ⋮ icon of the image with Failed/Degraded status
Step 2: Select Retry from the dropdown menu
Step 3: In the Retry compute image popup, confirm the information:

Step 4: Click the Confirm button to confirm the retry
5. Delete an Image
Users can remove images that are no longer in use from the compute.
Step 1: In the Images list, click the ⋮ icon of the image you want to delete
Step 2: Select Delete (in red) from the dropdown menu
Step 3: In the Delete Compute Image popup, read the warning:
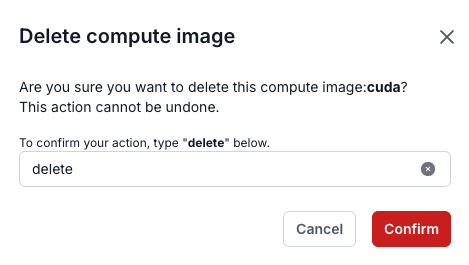
Step 4: To confirm the deletion, enter the exact text delete (lowercase) in the input field
Step 5: The Confirm button will be enabled once entered correctly
Step 6: Click the Confirm button
6. View Image Logs
When an image has Degraded status, users can view detailed logs to troubleshoot the issue.
Step 1: In the Images list, find the image with Degraded status (with an icon next to it)
Step 2: Click the ⓘ (information) icon
Step 3: The Logs popup will display the detailed log content
Example log: [2020-07-07 15:04:29,334] DEBUG Progress event: TRANSFER_PART_COMPLETED_EVENT, bytes: 0 (io.confluent.connect.s3.storage.S3OutputStream:286)
Step 4: Read and analyze the log to identify the cause of the error
Step 5: Click the X icon to close the log popup
Result: The popup closes and returns to the Images list screen