Trino - Query UI
Query UI is the interface that lets users connect to Trino, browse catalogs/schemas/tables, write and run SQL queries, view results, export data, manage query history / saved queries, and use quick actions on tables.
Connect to Trino
Displays the connection screen for connecting to Trino before using the Query UI, for cases where the user does not have an active session or needs to reconnect.
Connect to the Query UI
- Step 1: On the Trino Dashboard > Query Editor screen, enter your Username and Password.
- Step 2: Click Connect to establish the connection.
- Step 3: Once connected successfully, the system switches to the Query Editor screen.
Query Editor
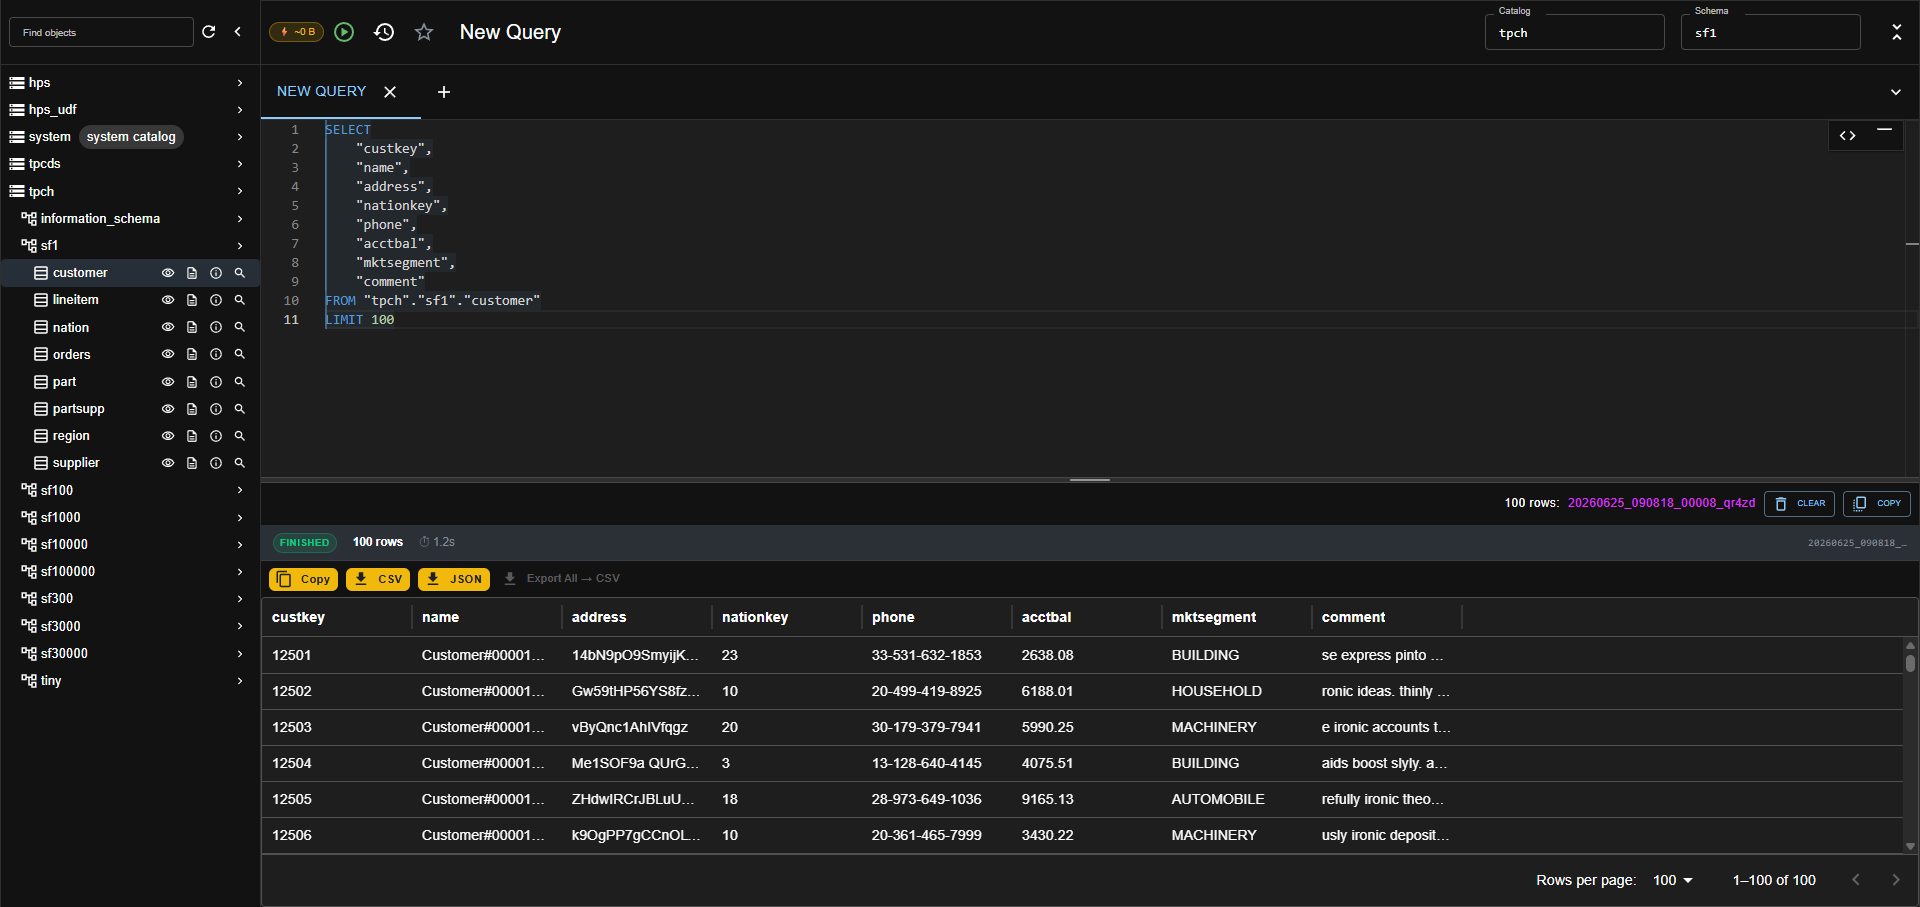
Displays the main working screen of the Query UI, consisting of a toolbar, catalog drawer, SQL editor, and result panel. Users can enter SQL, format the query, run the query, and manage multiple query tabs.
Write and Run a Query
- Step 1: On the Query Editor screen, enter your SQL statement in the editor area.
- Step 2: Click Format SQL if you need to reformat the query.
- Step 3: Click Run query to send the query to the Trino backend.
- Step 4: Track the execution status in the Result Panel.
Note: If the editor is empty, the system will not run the query and will instead display a validation message. A valid query returns a FINISHED status.
Manage Query Tabs
- Step 1: Click Add tab to create a new query tab.
- Step 2: Select the tab you want to work with to switch the editor content/query context.
- Step 3: Click Close tab if you want to close the current tab.
Note: Each tab should keep its own query content and results within the scope of the current session. If a tab has unsaved content, users should check before closing it.
Catalog Drawer
Displays the list of catalogs, schemas, tables, and columns the user has access to. Users can search for objects, refresh metadata, open/close the drawer, and select quick actions on tables.
Browse Metadata
- Step 1: Open the Catalog Drawer on the left side of the screen.
- Step 2: Select the catalog you want to view, for example tpch.
- Step 3: Open the schema you want to view, for example tiny.
- Step 4: Open the table you want to view to display its list of columns and data types.
Search for an Object
- Step 1: Enter a keyword in the Find objects box, for example nation.
- Step 2: The system filters the tree while keeping the parent context, such as the catalog/schema, so users can locate the object.
- Step 3: Clear the keyword to return to the full list or the previous state.
Refresh Metadata and Open/Close the Drawer
- Step 1: Click Refresh to reload the metadata.
- Step 2: Click Close drawer to hide the catalog panel.
- Step 3: Reopen the drawer when you need to continue browsing catalogs/schemas/tables.
Note: If loading the metadata fails, the system displays an error in the Catalog Drawer and users can click Refresh to try again.
Table Actions
For each table in the Catalog Drawer, users can use quick actions to preview data, generate a DDL script, view the schema/statistics, or generate a SELECT statement.
Preview First 100 Rows
- Step 1: In the Catalog Drawer, hover over or select the table you want to preview.
- Step 2: Click Preview first 100 rows. The system runs a query of the form
SELECT * FROM <table> LIMIT 100and shows the results in the Result Panel.
Generate a CREATE TABLE Script
- Step 1: For the table whose DDL you want to view, click Generate CREATE TABLE script.
- Step 2: The system displays the CREATE TABLE script, including the table name and the list of columns/types.
- Step 3: You can use Copy to copy the script if the UI supports it.
View Schema Structure and Column Statistics
- Step 1: For the table you want to view, click View schema and column statistics.
- Step 2: The Schema tab shows the list of columns and data types.
- Step 3: The Details tab shows the estimated row count and null percentage if provided by the backend.
Note: If no statistics are available, the system displays an empty state such as
No statistics availableinstead of an unclear error.
Generate a SELECT Statement
- Step 1: For the table you want to generate a query for, click Generate SELECT query for this table.
- Step 2: The system inserts a SELECT statement into the editor, including the specific list of columns if the metadata is available.
- Step 3: Check the default LIMIT before clicking Run query.
Note: A generated SELECT statement should include a default LIMIT to avoid overly large queries.
Result Panel
The Result Panel displays the status and results of query execution, including the query ID, status, duration, row count, result grid/code block, and copy/export buttons.
View Query Results
- Step 1: After the query runs successfully, check the FINISHED status in the Result Panel.
- Step 2: Check the Query ID, duration, and row count.
- Step 3: View the data in the result grid; you can change the number of rows per page or move between pages if pagination is available.
- Step 4: Click Clear to clear the results from the UI.
Copy/Export Results
- Step 1: Click Copy or Export Copy to copy the results as TSV.
- Step 2: Click CSV to download the results as CSV with a column header row.
- Step 3: Click JSON to download the results as a JSON array.
- Step 4: If you need to export all of the result data and the feature is available, select Export All -> CSV.
Note: On some platforms, the Export All -> CSV button may be disabled; hover over it to see why. If the clipboard/download is blocked by the browser, the system displays an appropriate error message.
Query History
Query History lets users view recently run queries as well as saved queries. The drawer has two tabs: Recent and Saved.
View Recent Queries
- Step 1: Click Query History on the toolbar.
- Step 2: Select the Recent tab.
- Step 3: Click the query you want to reuse to load its content into the editor.
Note: The row count shown in the history should be interpreted according to the system's display label — result rows, processed rows, or another definition if provided.
Saved Query
Saved Query lets users save the current query, reload a saved query, rename it, or delete a saved query.
Save a Query
- Step 1: Enter the SQL you want to save in the editor.
- Step 2: Click Save this query on the toolbar.
- Step 3: In the Save Query dialog, enter the query name in the Name field.
- Step 4: Click Save to save, or click Cancel to abort.
Note: A name is required for a saved query. If the name is empty, the system will not allow saving and will display a validation message or disable the Save button.
Reload a Saved Query
- Step 1: Open Query History and select the Saved tab.
- Step 2: Click the saved query you want to reuse.
- Step 3: The system loads the SQL content into the editor for the user to run or edit.
Rename a Saved Query
- Step 1: On the Saved tab, select Rename for the query you want to update.
- Step 2: Enter the new name in the Rename Saved Query dialog.
- Step 3: Click Rename to save, or click Cancel to abort.
Delete a Saved Query
- Step 1: On the Saved tab, select Delete for the query you want to remove.
- Step 2: Confirm the deletion if the system shows a confirm dialog.
- Step 3: Once confirmed, the saved query is removed from the list.
Note: Double-check before deleting to avoid losing an important query.