Keystore Management
Keystore Management in Workspace allows users to store and manage keys/secrets (keys, tokens, credentials) used by services in the system.
A keystore can reside within the Workspace or be integrated with an external key storage service (e.g., HashiCorp Vault).
1. Keystore List
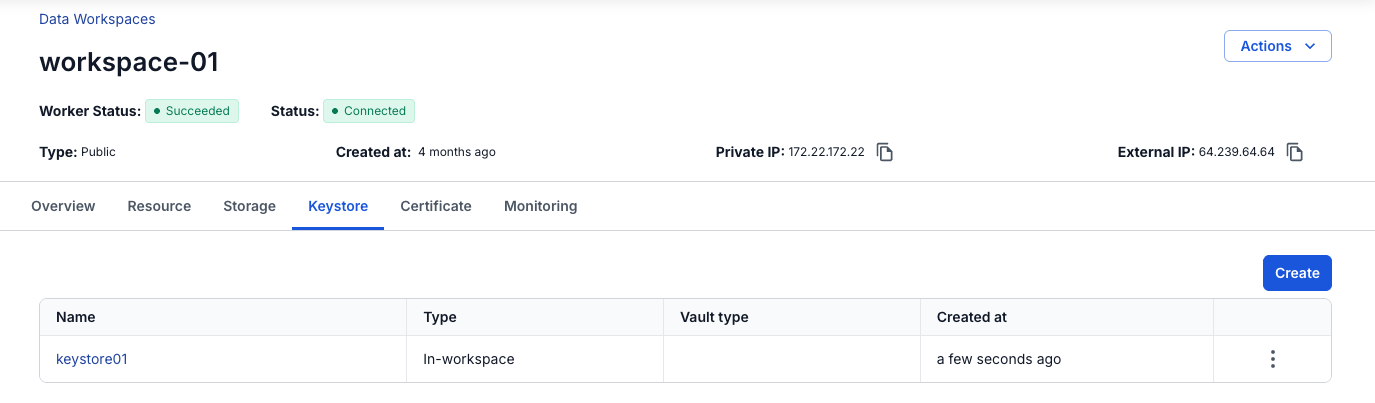
Purpose: Displays all keystores that have been created.
Access: Data Platform > Workspace Management > Keystore
Screen displays:
- Name – Keystore identifier name.
- Type – Keystore type:
- Integration (external integration, e.g., HashiCorp Vault).
- In-workspace (internal storage).
- Vault type – The vault type when using external integration (e.g., HashiCorp).
- Created at – Time the keystore was created.
- Action – Action menu (Update, Delete).
2. Create a New Keystore
Step 1: Go to Data Platform > Workspace Management > Keystore.
Step 2: Click Create to open the Create keystore popup.
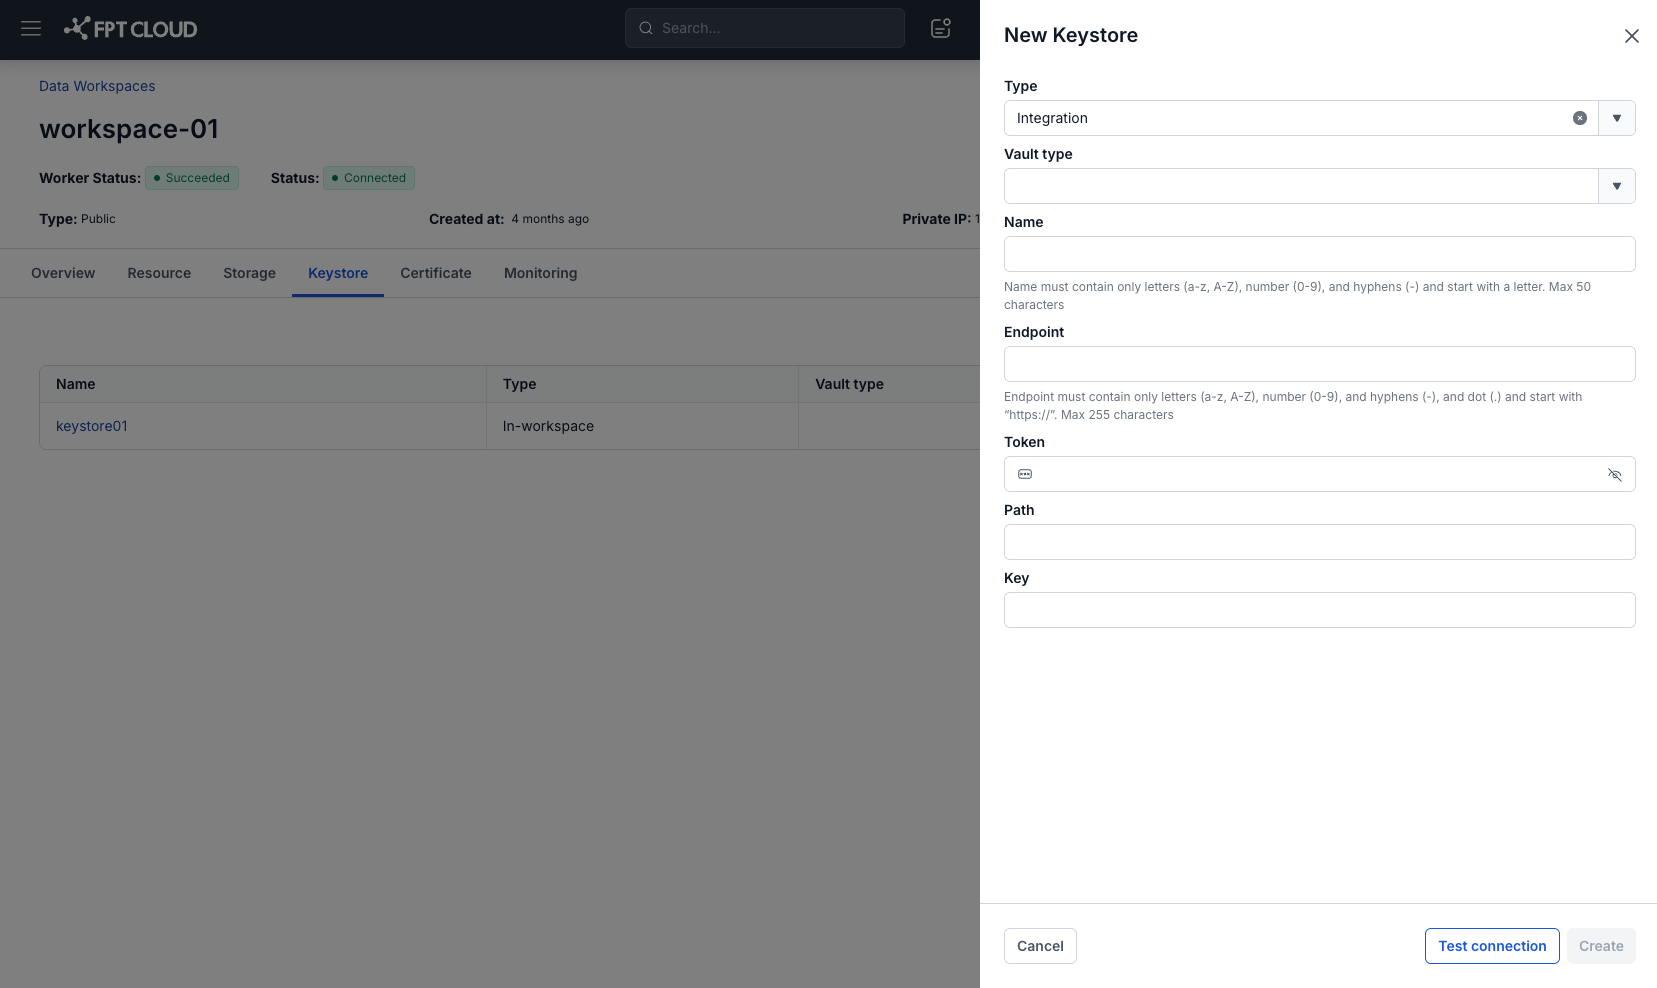
Case: Type = Integration (connect to an external Vault, e.g., HashiCorp)
Step 3: In the Type field, select Integration.
Step 4: In Vault type, select the system you are using (typically HashiCorp).
Step 5: Enter the Name (identifier name):
- Only letters a–z, A–Z, digits 0–9, and hyphens "-" are allowed; must start with a letter; maximum 50 characters.
- It's recommended to follow a purpose-environment naming convention (e.g., s3-prod).
Step 6: Enter the Endpoint (Vault URL):
- Must start with https://; maximum 255 characters.
- Only letters, digits, "-", and "." are allowed (per the rule shown on the form).
- Example: https://vault.example.com.
Step 7: Enter the Token:
- The Vault access token (characters are hidden while typing; can be toggled to view).
- Make sure to use a token that has not expired; when the token changes later, you will Update it.
Step 8: Enter the Path and Key:
- Path: The path to the secret in Vault (min 1, max 255 characters).
- Key: The secret/key name within the path (min 1, max 255 characters).
- Example: Path data/lakehouse/s3-key — Key sse-c-key.
Step 9: Click Test connection:
- If OK → the Save button is enabled.
- If Fail → check the Endpoint/Token/Path/Key again (common causes: incorrect access permissions, expired token, path/key does not exist, or the endpoint does not use HTTPS).
Step 10: Click Save to create it, or Cancel to discard.
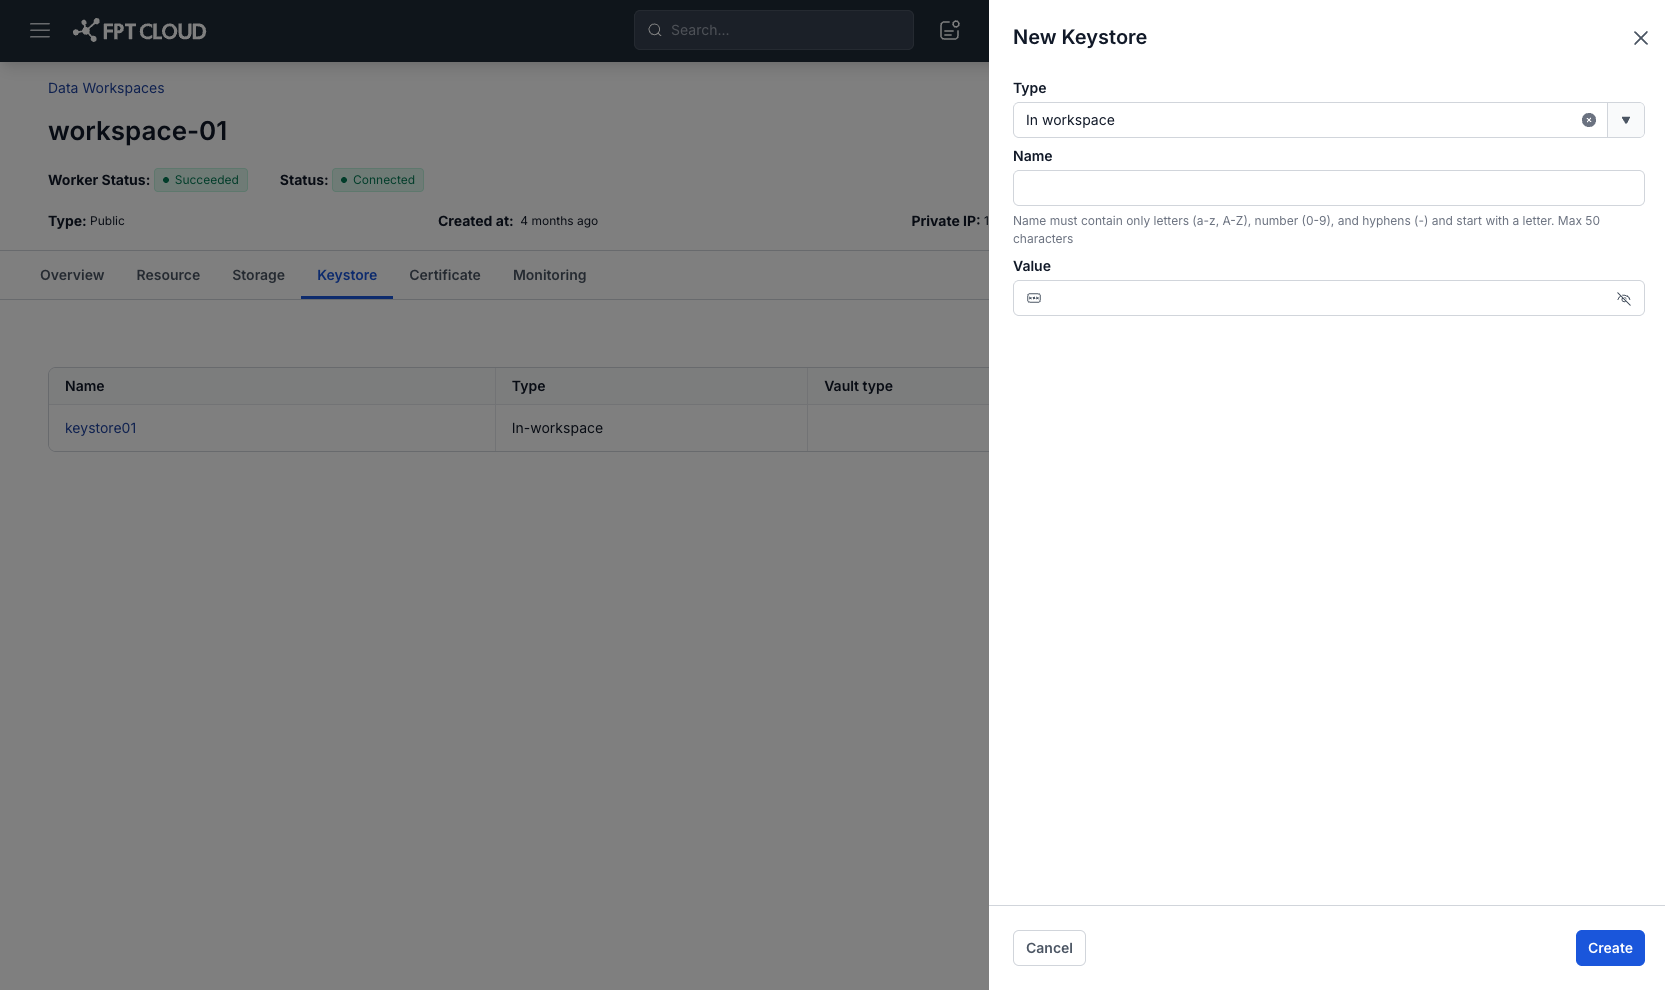
Case: Type = In‑workspace (store the secret directly within the Workspace)
Step 3: In the Type field, select In‑workspace.
Step 4: Enter the Name:
- Same rules as above: a–z, A–Z, 0–9, "-"; must start with a letter; maximum 50 characters.
Step 5: Enter the Value:
- The secret value (password, token, connection string, etc.), maximum 255 characters, special characters are allowed (there's an icon to
3. Update Keystore
Purpose: Allows changing the configuration information or secret value of a keystore when the endpoint, token, path, or value content changes.
On the Keystore List screen, select the Action icon (three-dot menu) of the keystore you want to edit → Update.
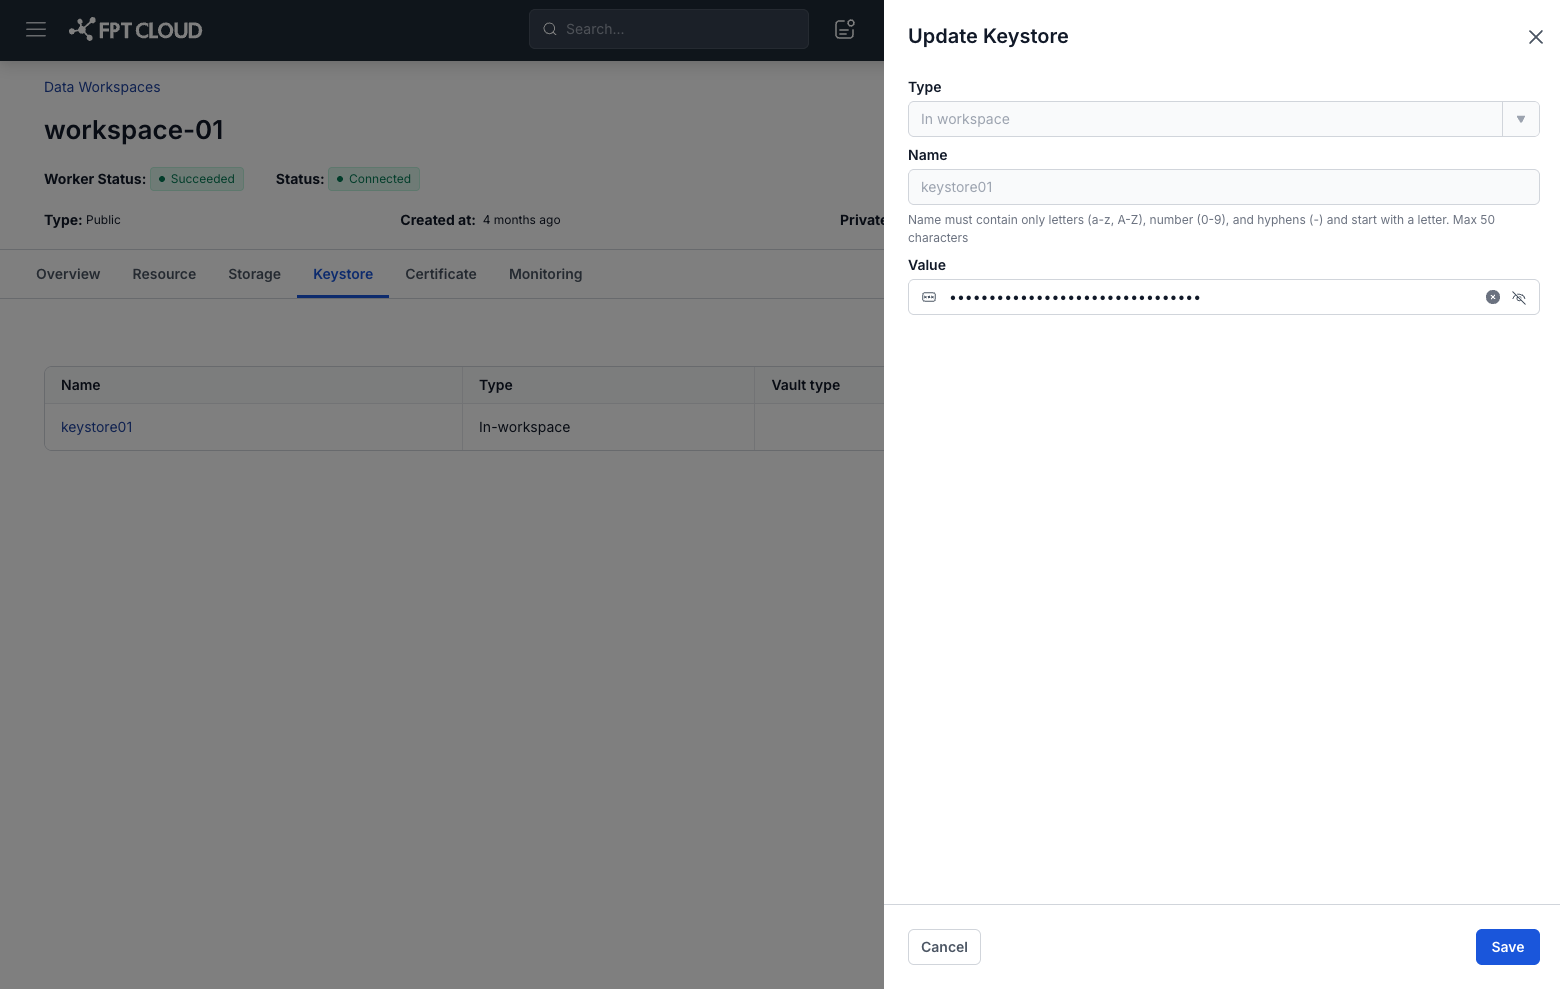
Case 1 – Type = In-workspace
Steps:
Step 1: On the Keystore List screen, click the Actions button (three-dot menu) of the keystore you want to edit → select Update.
Step 2: The Update Keystore window appears with the following fields:
- Type: Fixed as In-workspace, cannot be changed.
- Name: The keystore identifier name, read-only, cannot be edited.
- Value: The secret value to store (maximum 255 characters, special characters allowed).
Step 3: Enter the new Value. You can click the icon to view the value being entered.
Step 4: Click Save to save the changes, or Cancel to discard.
Case 2 – Type = Integration
Steps:
Step 1: On the Keystore List screen, click the Actions button of the keystore you want to edit → select Update.
Step 2: The Update Keystore window appears with the following fields:
- Type: Always Integration, cannot be changed.
- Vault type: The vault type (e.g., HashiCorp), fixed, cannot be edited.
- Name: The identifier name, read-only.
- Endpoint: The new endpoint URL of the vault (must start with https://, maximum 255 characters).
- Path: The path containing the key in the vault.
- Key: The key name in the vault.
Step 3: Fill in or update the Endpoint, Path, and Key fields according to the new configuration requirements.
Step 4: Click Test connection to verify the connection to the vault.
- If successful → the Save button will be enabled.
- If it fails → check the entered information again.
Step 5: Click Save to save the changes, or Cancel to discard.
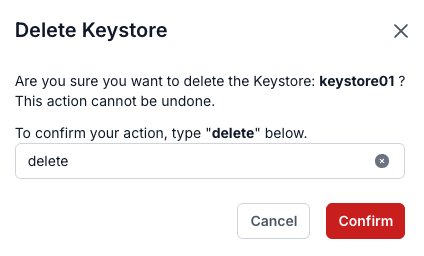
4. Delete Keystore
How to open: Click Action > Delete on the keystore.
Steps:
-
The system displays a confirmation popup.
-
Enter the keyword delete in the confirmation field.
-
Click Confirm to delete.
Conditions:
- If the keystore is currently being used by a service, the system displays an error:
"The keystore is in use by: {service_name}" and does not allow deletion.