Provision a database cluster
This is the complete field reference for provisioning a MongoDB Enterprise cluster. If this is your first cluster, Create your first database walks the same wizard with more context and covers service activation.
The wizard has three steps: database configuration, additional services, then review.
Step 1 — Database configuration
Open the Database cluster list and select Create a Database Engine or Create.
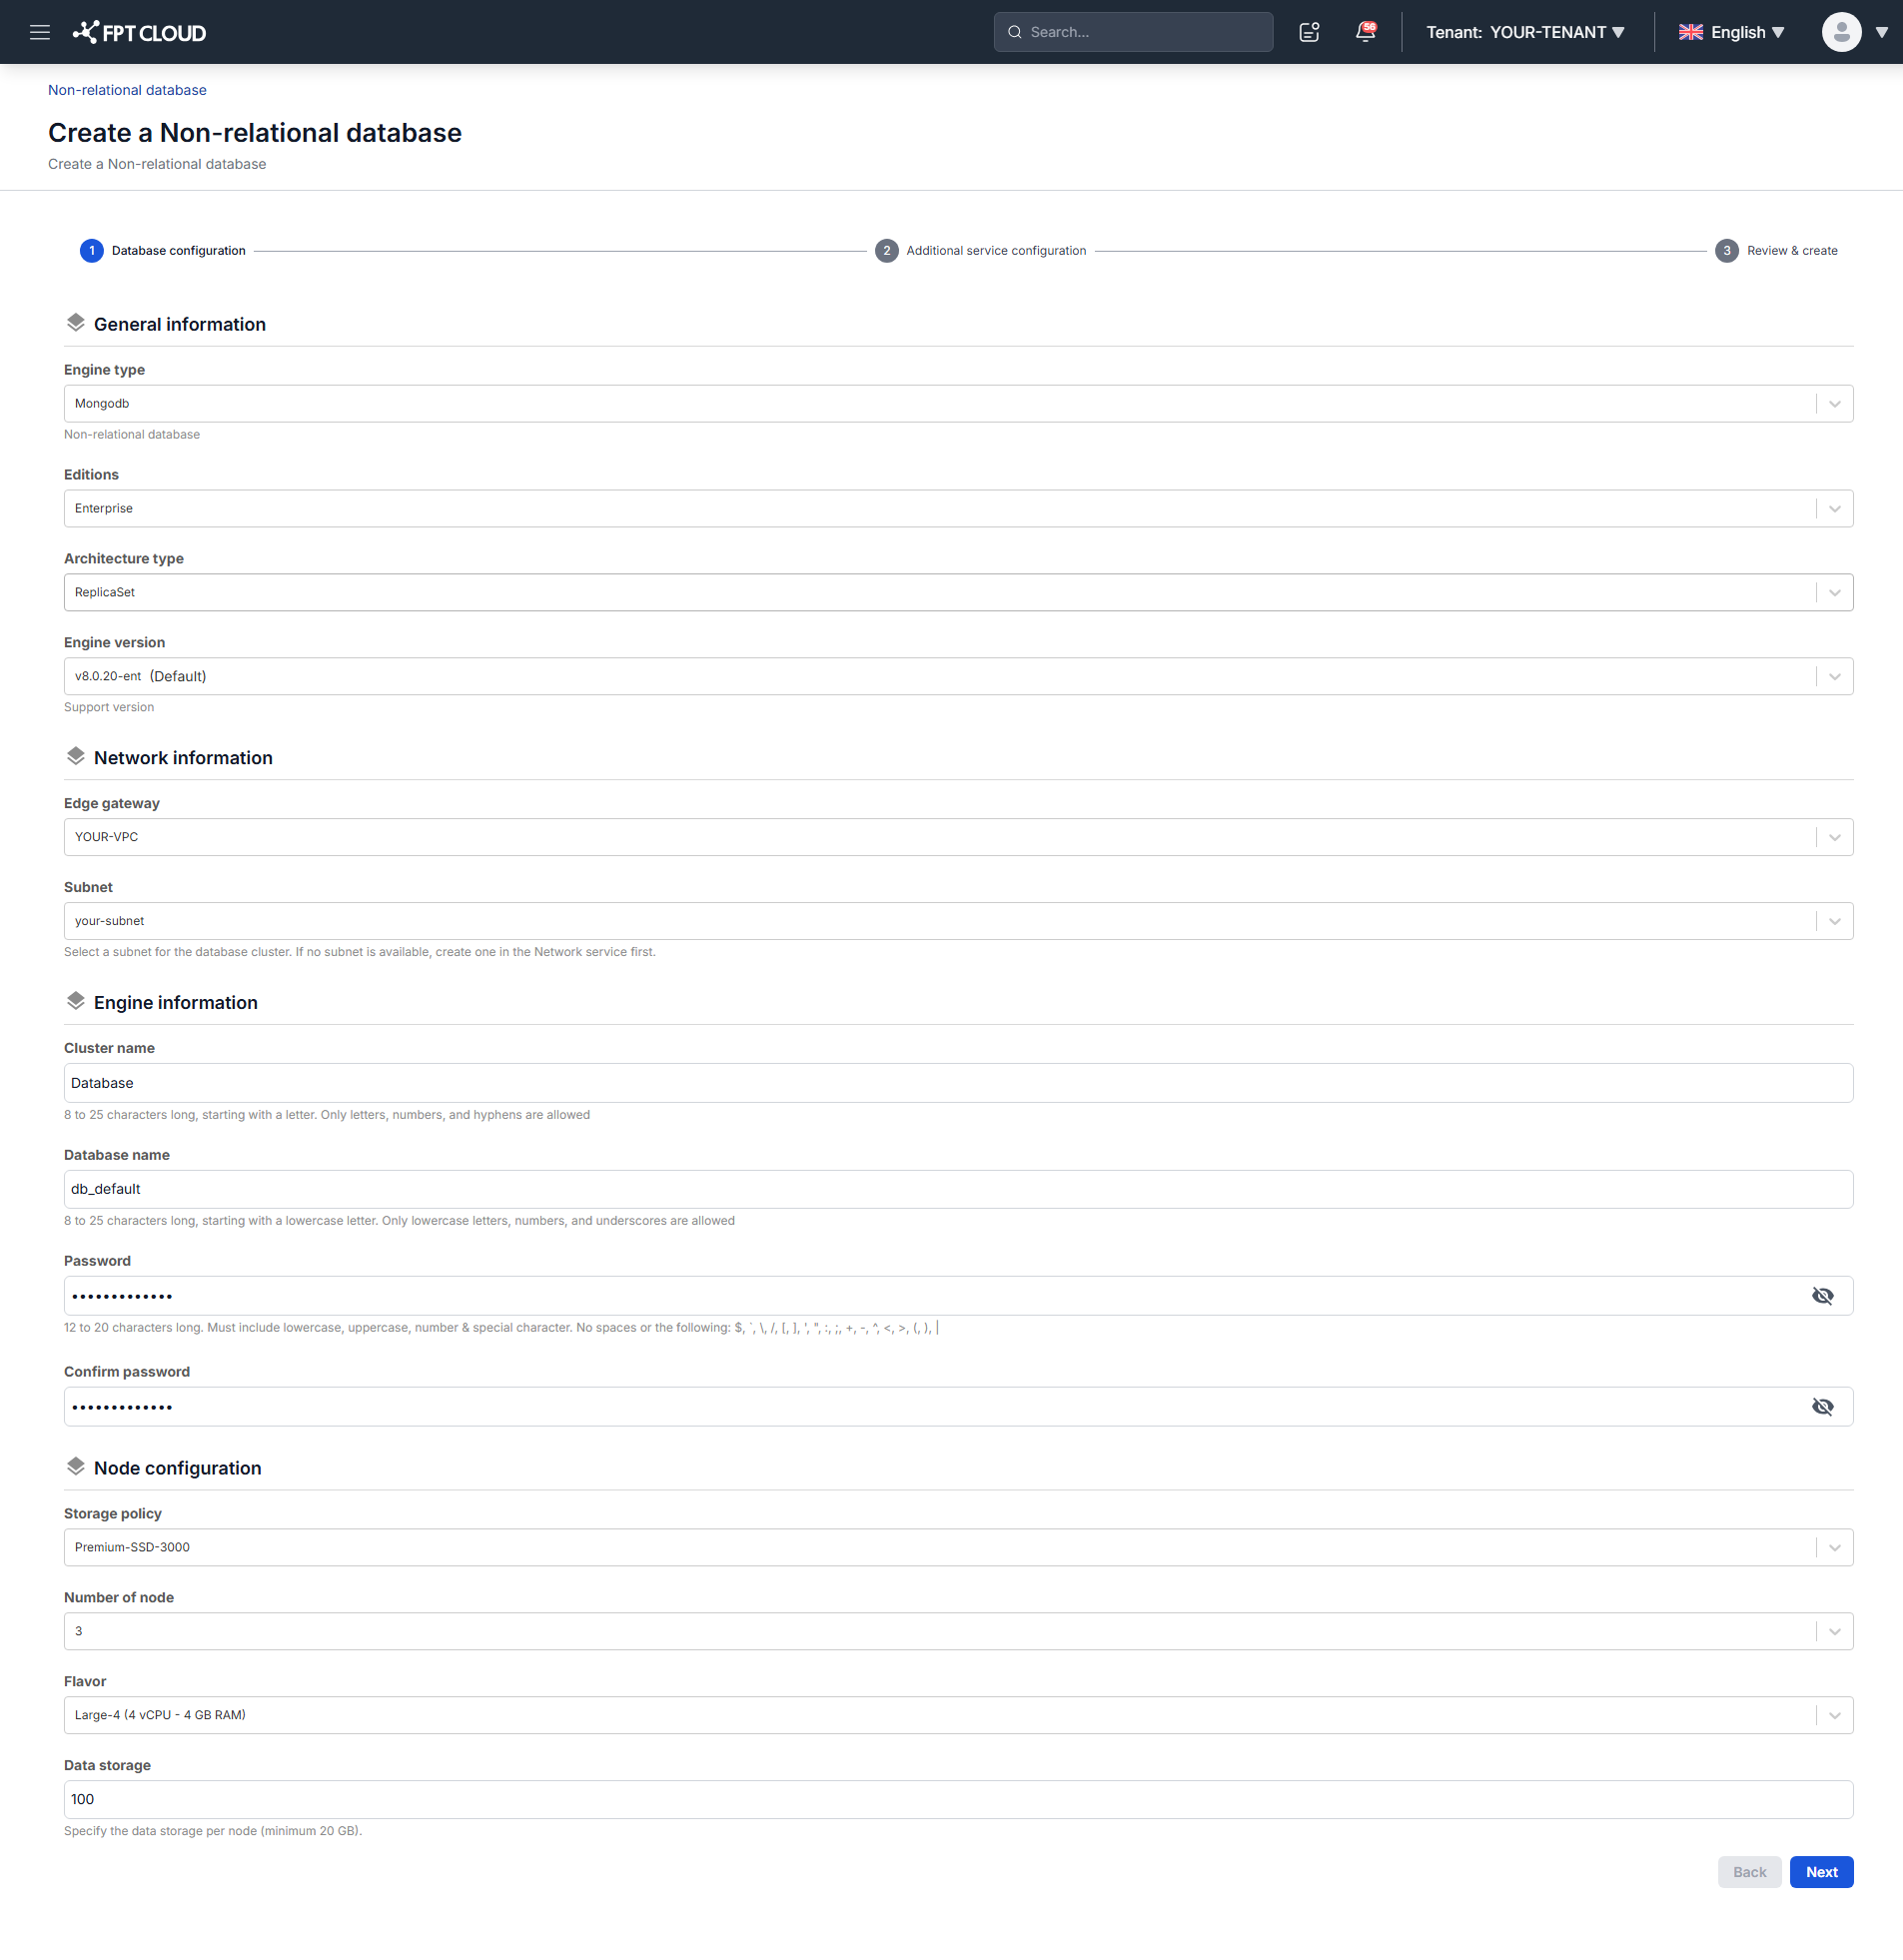
General information
| Field | Description |
|---|---|
| Engine Type | Select MongoDB. |
| Edition | Select Enterprise. |
| Architecture Type | Standalone for a one-node cluster, ReplicaSet for a replicated cluster, Sharded Cluster to partition data across shards. Cannot be changed later — see Choosing an architecture. |
| Engine Version | A supported version. See Database Engine Versions. |
Network information
| Field | Description |
|---|---|
| Edge Gateway | Routes network traffic between the cluster and other systems. |
| Network | The Network/Subnet the cluster deploys into. Defines access scope and network isolation. |
Engine information
| Field | Description |
|---|---|
| Cluster Name | 8–25 characters. Starts with a letter; letters, numbers, and hyphens only. |
| Database Name | 8–25 characters. Starts with a lowercase letter; lowercase letters, numbers, and underscores only. |
| Password / Confirm Password | 12–20 characters, including uppercase, lowercase, a number, and a special character. |
Spaces and these characters are rejected in the password:
/ \ " ' < > ? % ; : $ ! [ ] { } ( ) , & +
Node configuration
Storage Policy applies to the whole cluster whatever the architecture. It defines storage performance (IOPS) — use ≥ 4,000 IOPS for production.
The fields below it depend on the Architecture Type you selected.
Standalone and ReplicaSet
| Field | Description |
|---|---|
| Number Of Nodes | Node count, matching the chosen architecture. |
| Flavor | Compute resources per node — vCPU and RAM. |
| Data Disk Size (GB) | Data disk allocation. Minimum 20 GB. |
Sharded Cluster
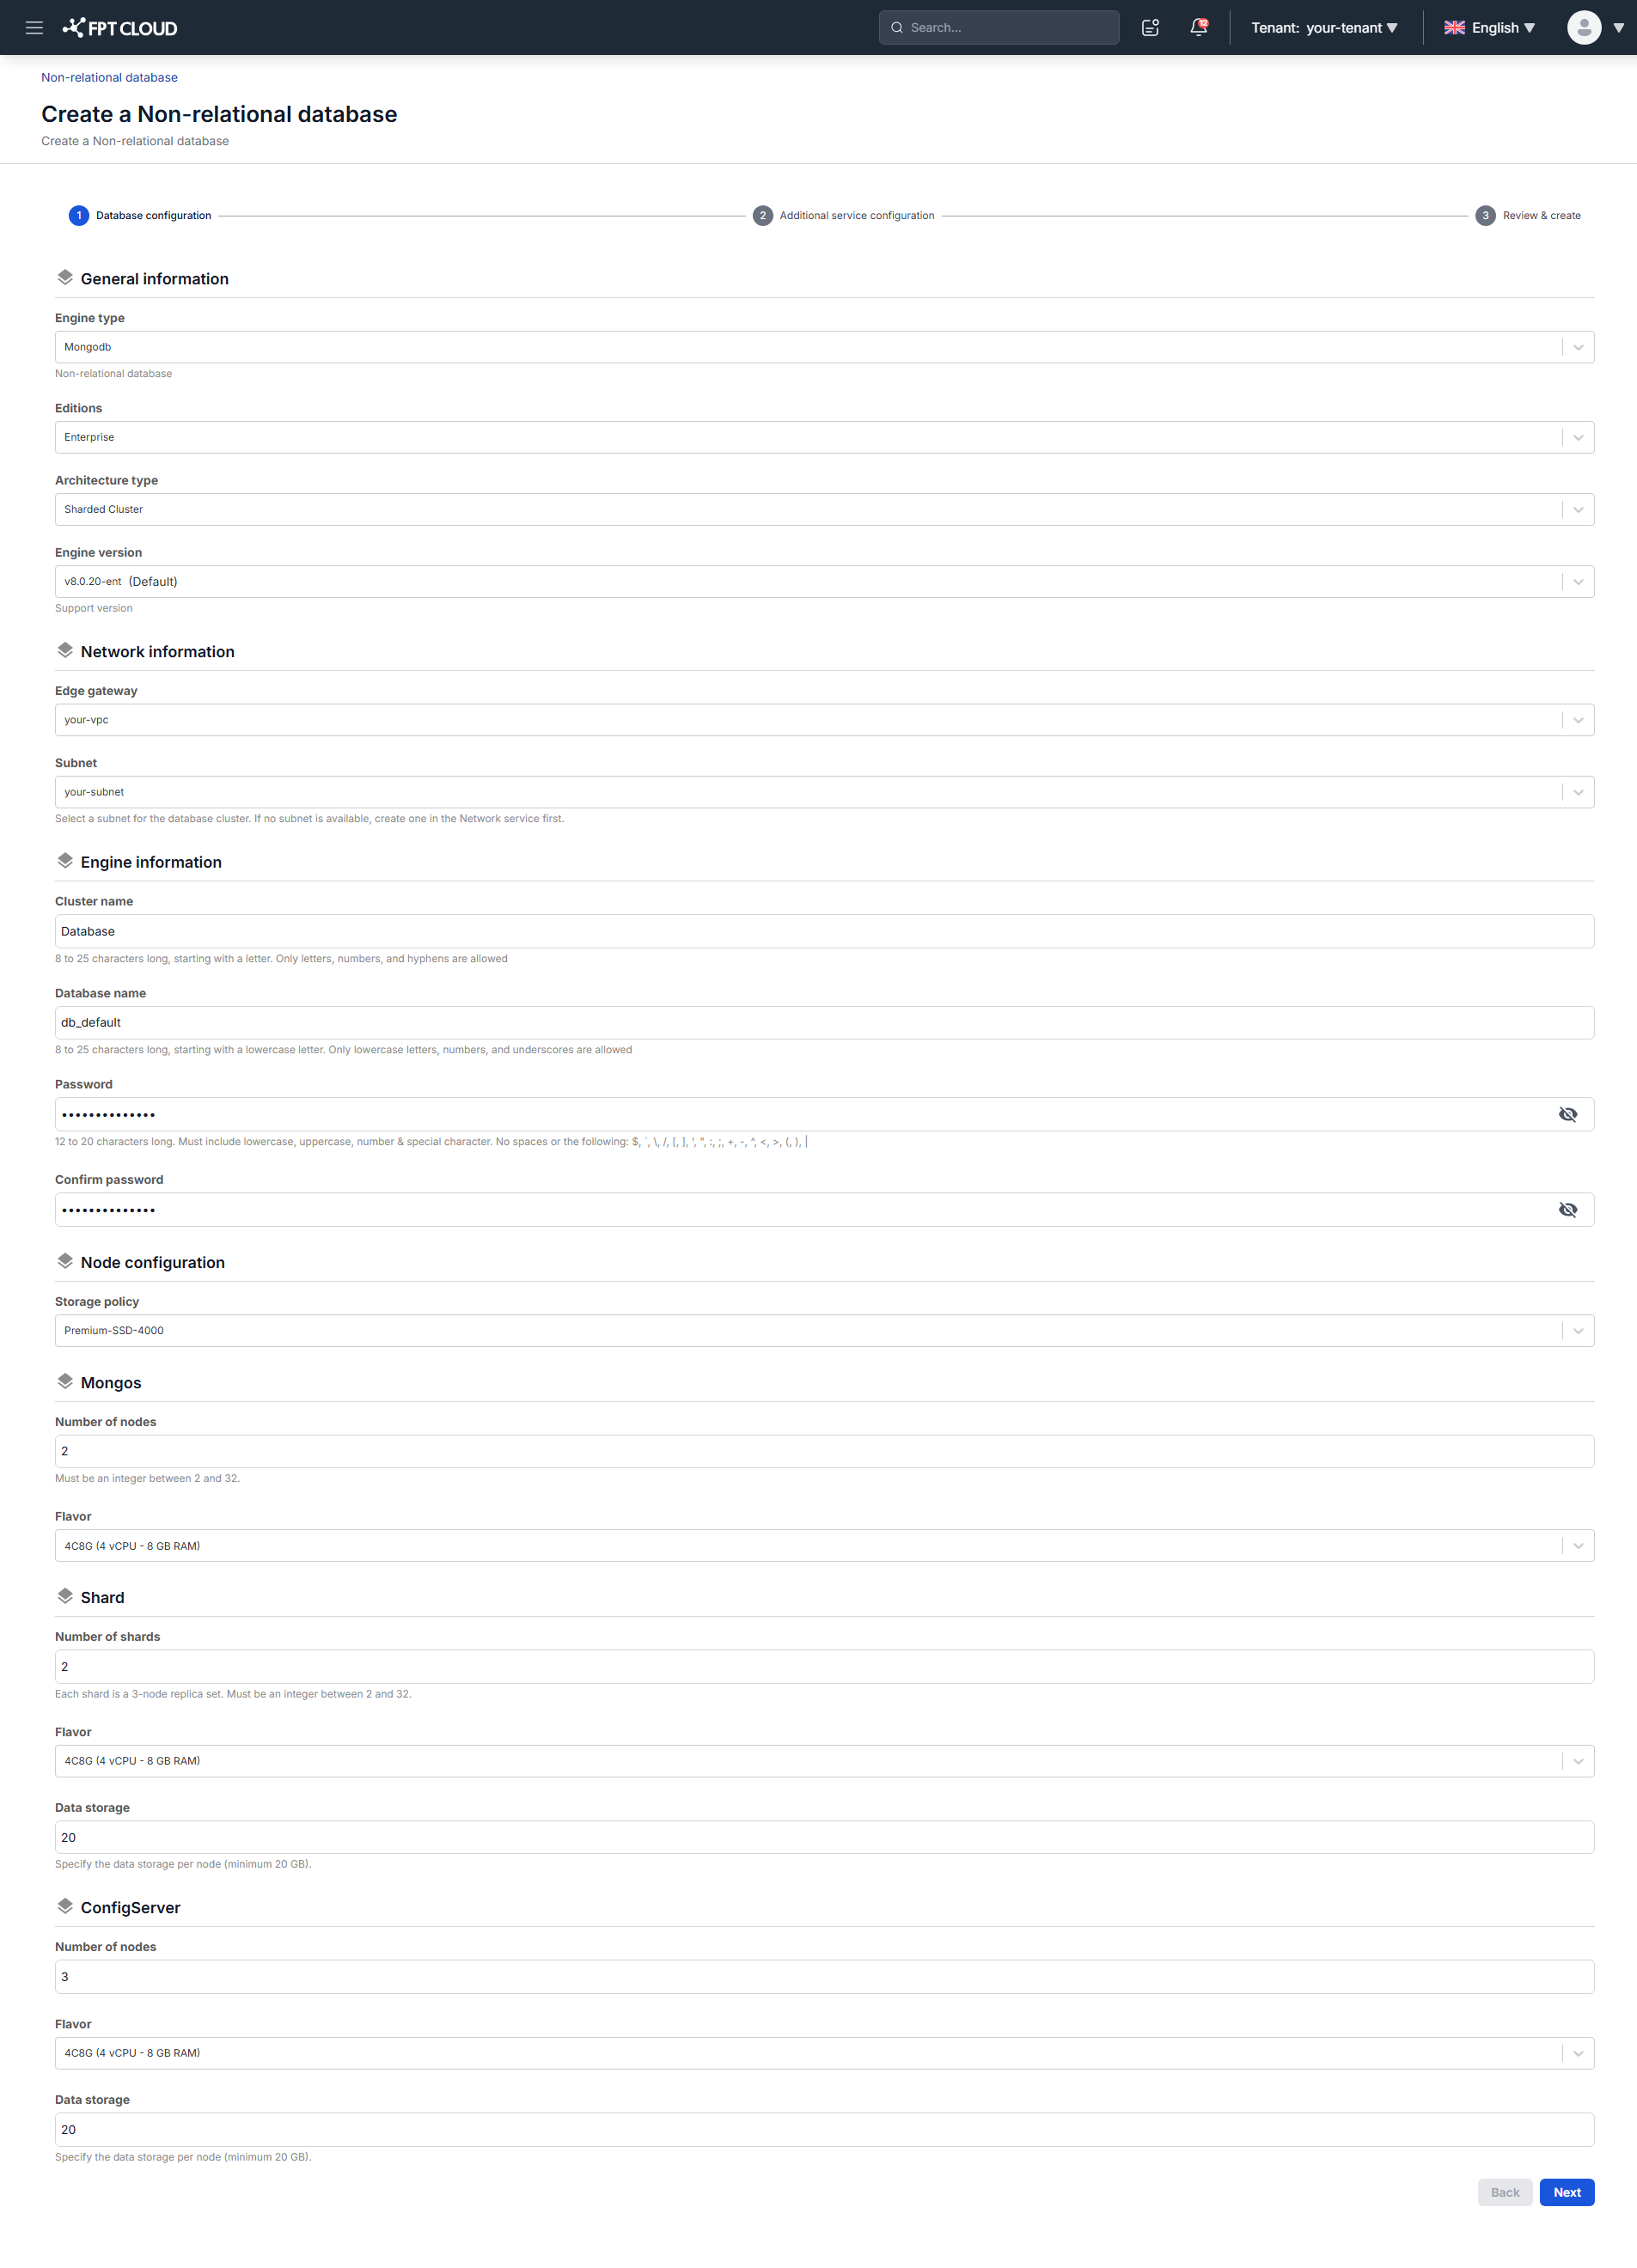
A Sharded Cluster is sized in three independent groups, each with its own node count and flavor. See What a Sharded Cluster is made of for what each role does.
Mongos — the query routers your clients connect to.
| Field | Description |
|---|---|
| Number Of Nodes | Router count. Integer between 2 and 32. |
| Flavor | vCPU and RAM per router. |
Mongos nodes hold no data, so there is no data storage field for this group.
Shard — the nodes that store the data.
| Field | Description |
|---|---|
| Number Of Shards | Shard count. Integer between 2 and 32. Each shard is deployed as a 3-node replica set, so the data node count is three times this number. |
| Flavor | vCPU and RAM per data node. |
| Data Storage | Data disk per node. Minimum 20 GB. |
ConfigServer — the replica set holding cluster metadata.
| Field | Description |
|---|---|
| Number Of Nodes | Fixed at 3 and not editable. |
| Flavor | vCPU and RAM per config server. |
| Data Storage | Data disk per node. Minimum 20 GB. |
The smallest Sharded Cluster the console will build is 11 nodes: 2 mongos, 2 shards × 3 data nodes, and 3 config servers. Size your quota accordingly before you start.
Click Next Step.
Step 2 — Additional services
Backup and PITR are enabled by default on MongoDB Enterprise clusters. This step configures the maintenance window and notification recipients.
Enable Additional Service turns the add-on services on or off as a group. Leaving it off creates the cluster without them; you can enable them afterwards.
Compute scaling
| Field | Description |
|---|---|
| CPU Threshold (%) | CPU usage that triggers scaling. |
| RAM Threshold (%) | Memory usage that triggers scaling. |
| Tracing Interval | Monitoring interval used to evaluate usage before scaling. |
| Current Flavor | The node's current compute flavor. |
| List Flavor Scaling | Target flavors the system may scale up to, sorted ascending. |
Storage scaling
| Field | Description |
|---|---|
| Current Storage (GB) | Currently allocated storage. |
| Storage Threshold (%) | Usage that triggers automatic scaling. |
| Storage Scale (%) | Percentage increase applied per scaling operation. |
Maintenance window
| Field | Description |
|---|---|
| Day of Week | Monday through Sunday. |
| Start Time | When maintenance may begin. Duration is 1 hour from this time. |
Notification recipients
Email addresses that receive backup and scaling notifications. Add more with the + button.
Click Next Step.
Step 3 — Review and create
Review every setting. Back returns you to edit; Create confirms.
The system checks resource availability, then begins deployment. You are returned to the cluster list with the new cluster at the top in Processing status.
Creation typically takes 5–7 minutes, after which the cluster reaches Running.
If provisioning fails, delete the failed cluster and provision again. A failed cluster cannot be recovered in place.