Create an API Gateway
An API Gateway is the foundation of FPT API Gateway: every Route, Service, Upstream, Consumer, and Plugin belongs to an API Gateway. Create one first, before you configure anything else.
Creating an API Gateway provisions real infrastructure (a node cluster and a Load Balancer) in the VPC you select and incurs costs.
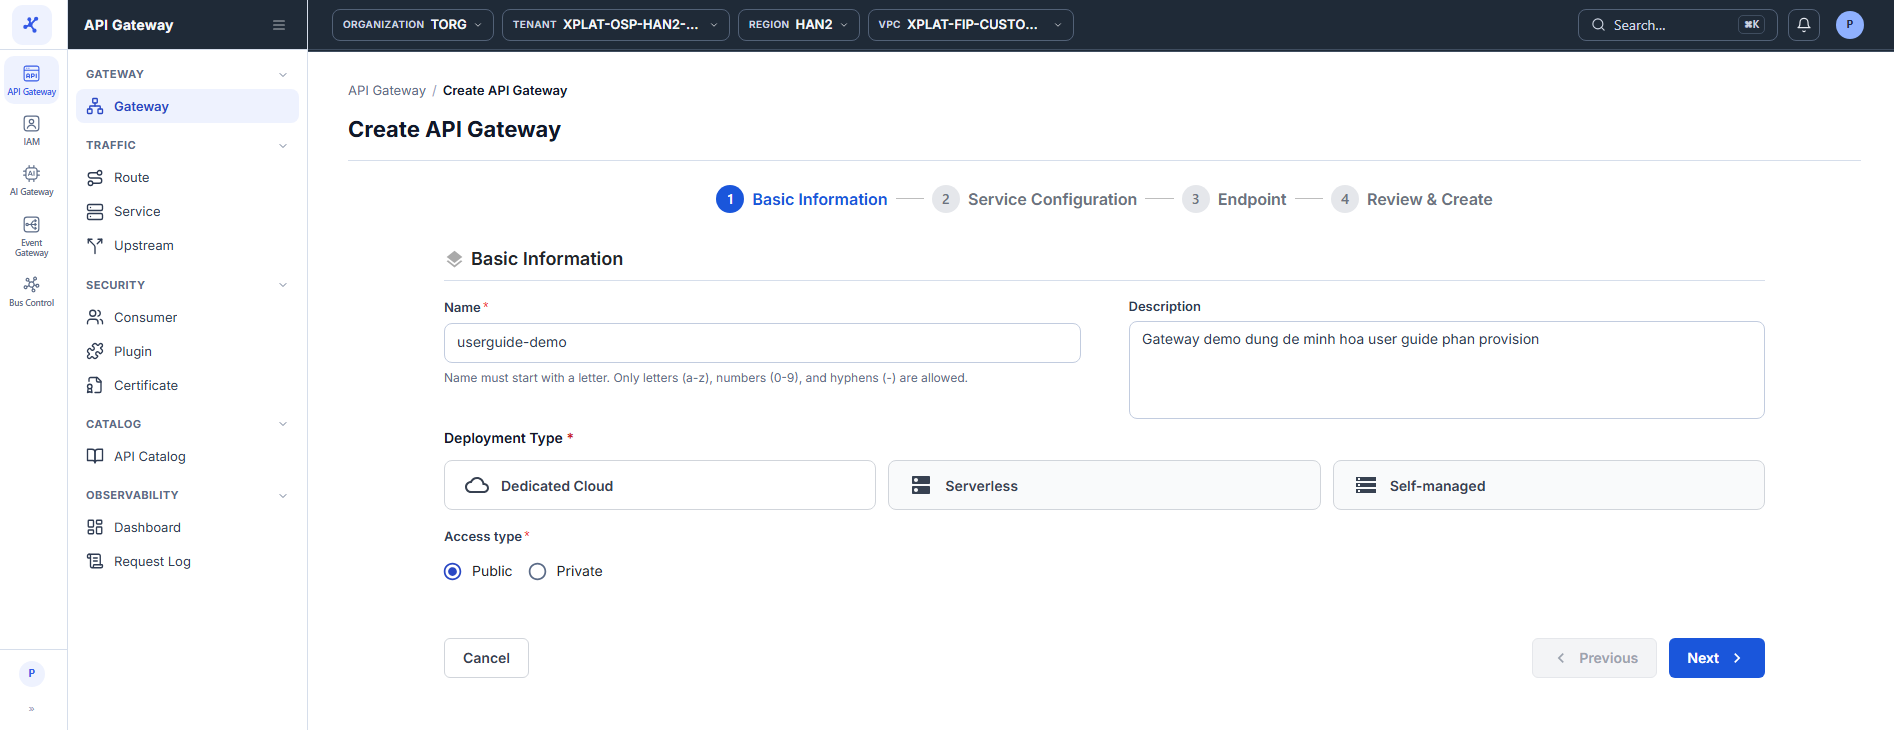
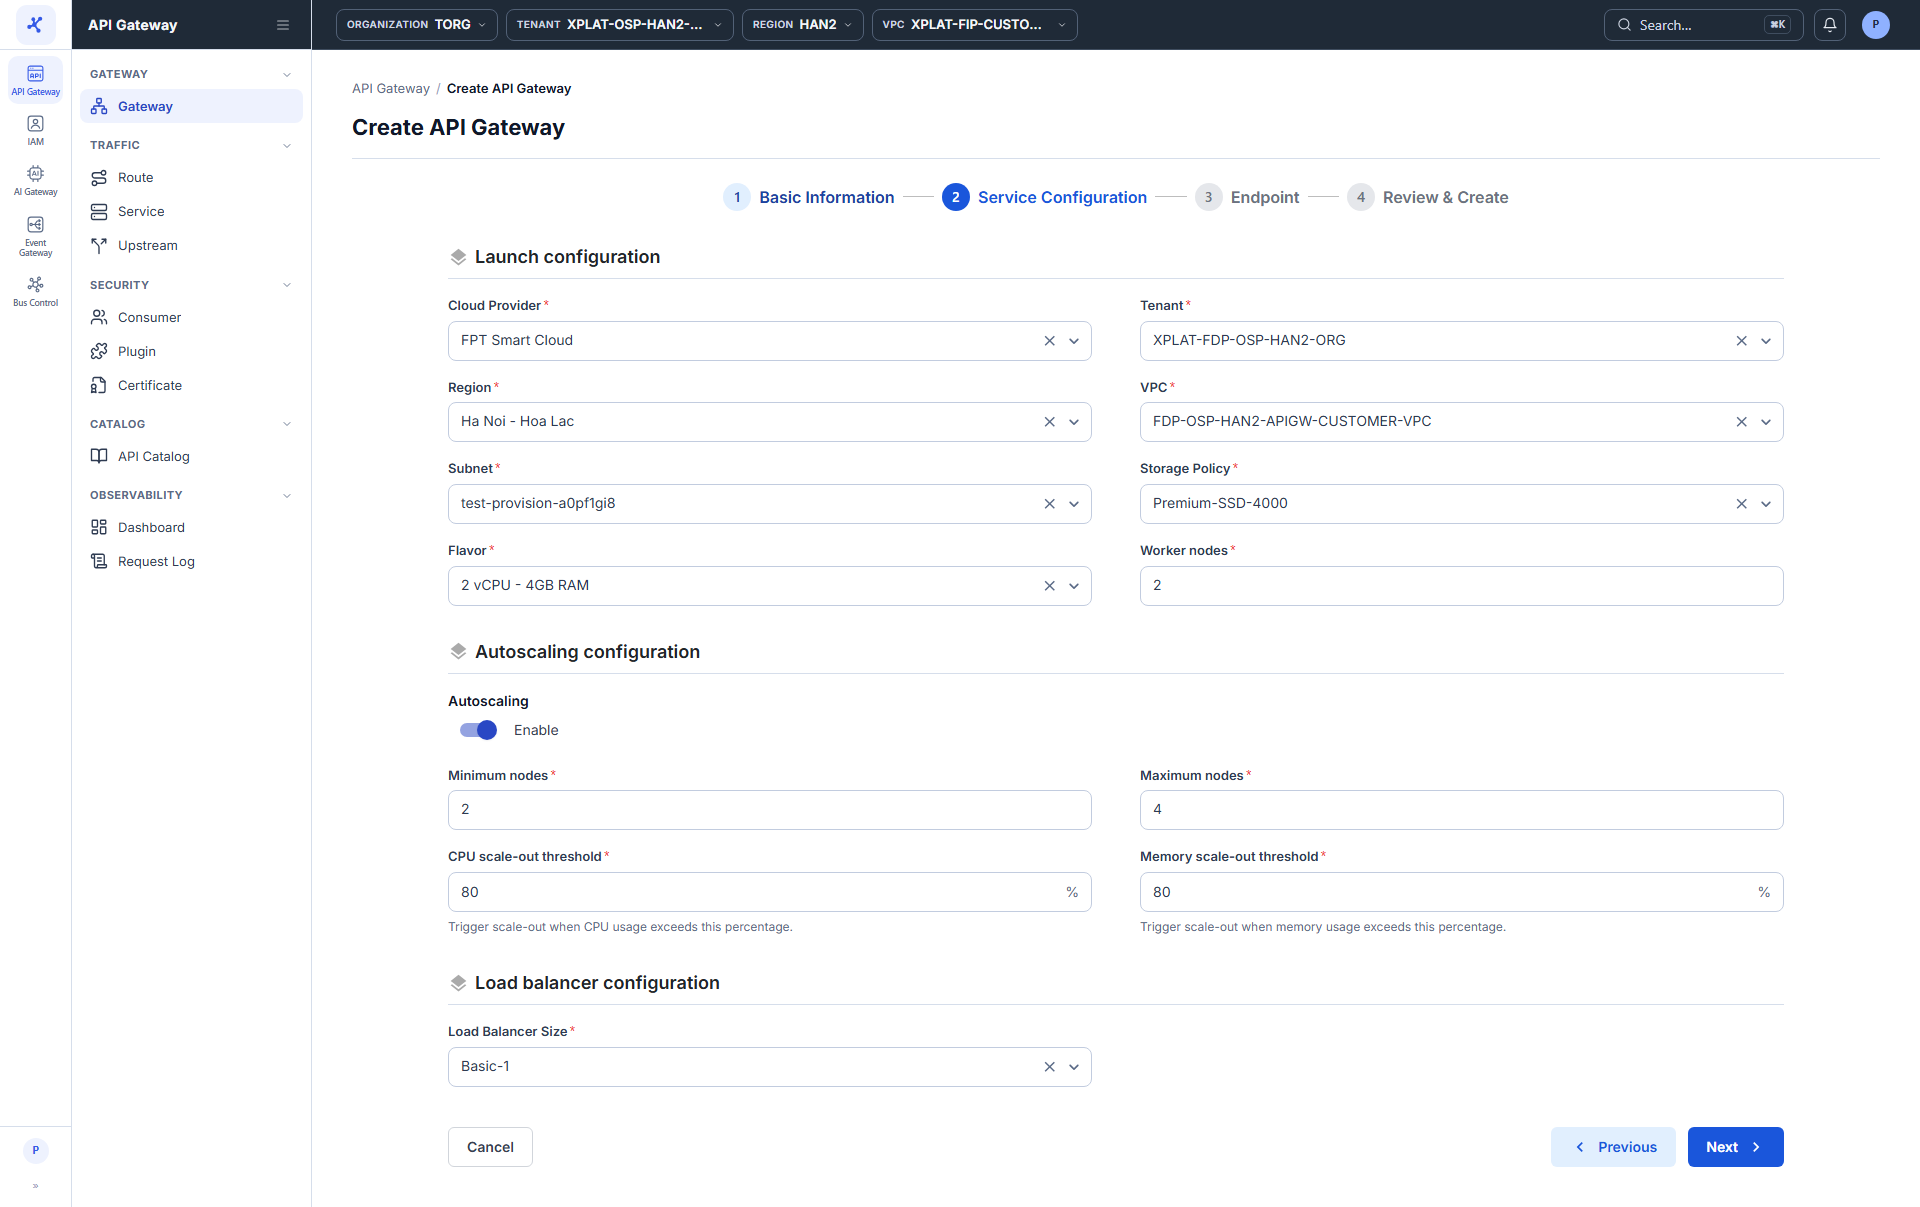
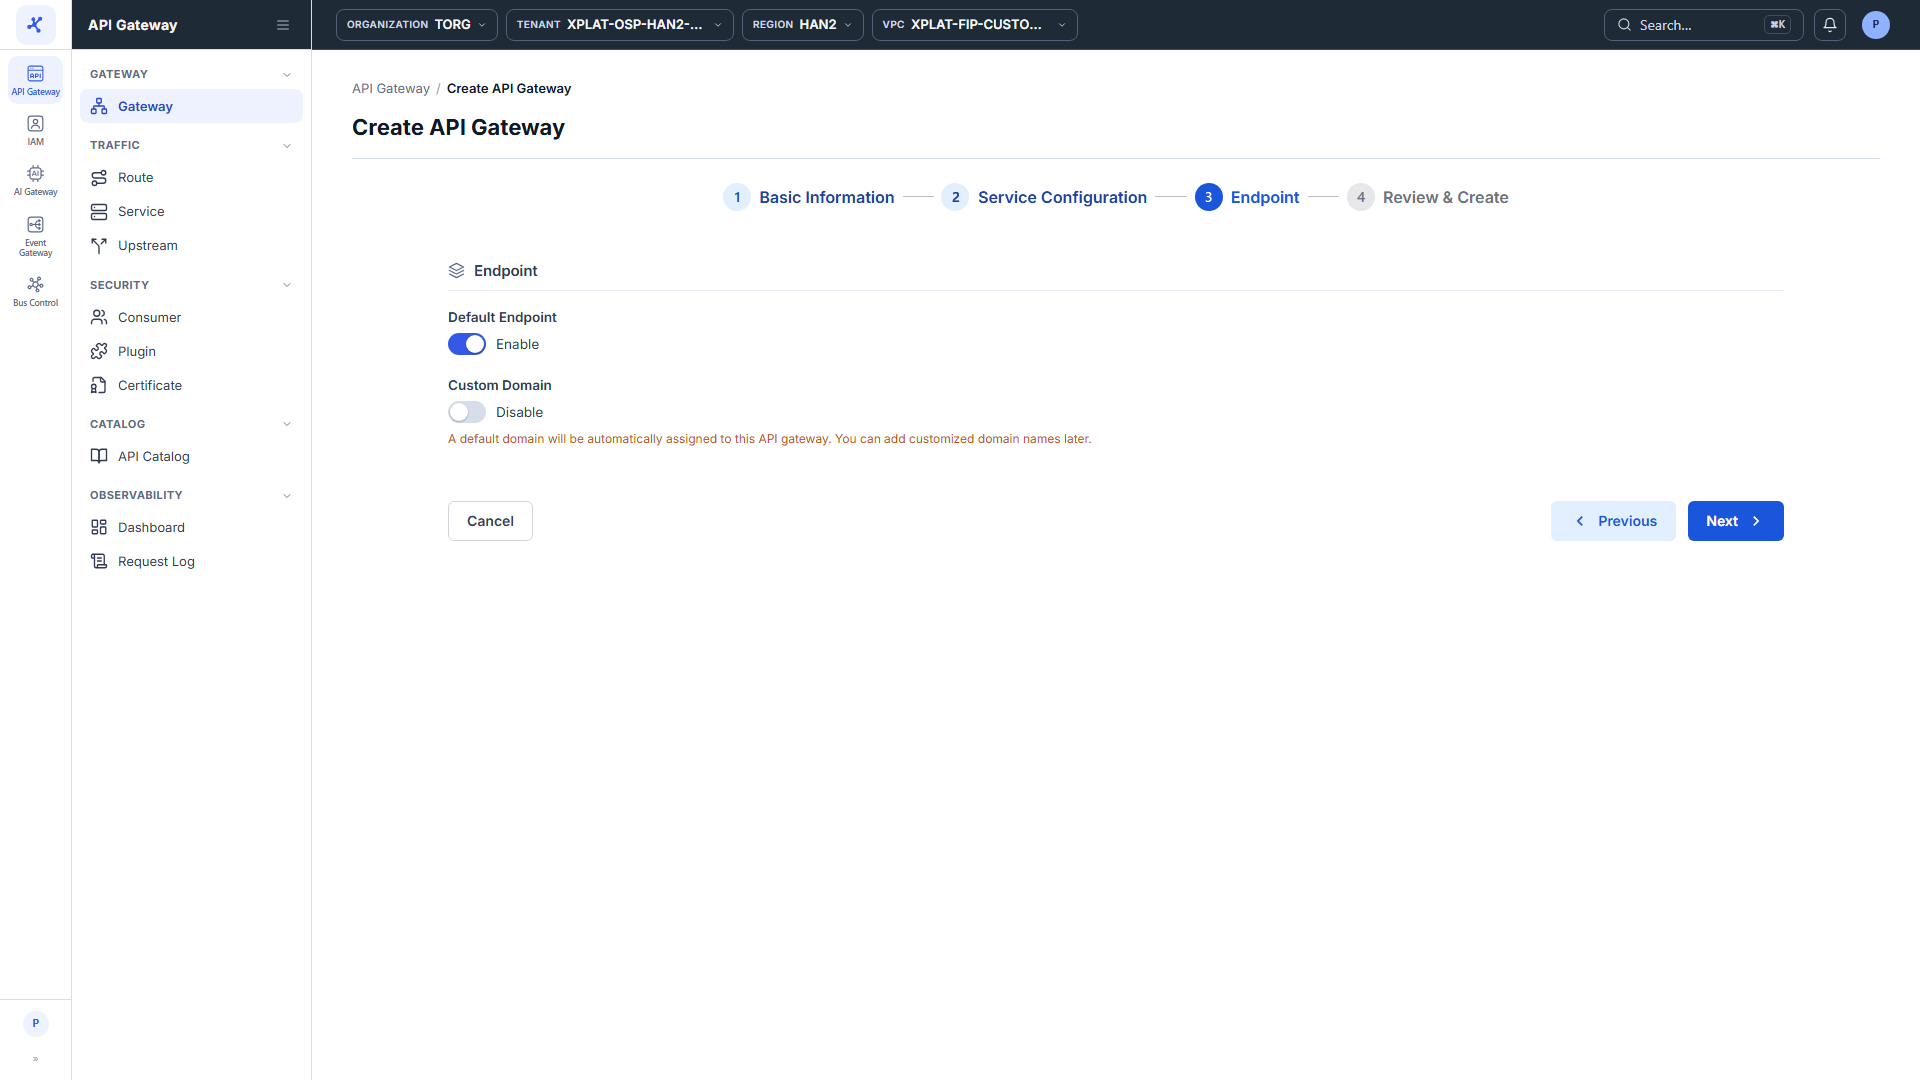
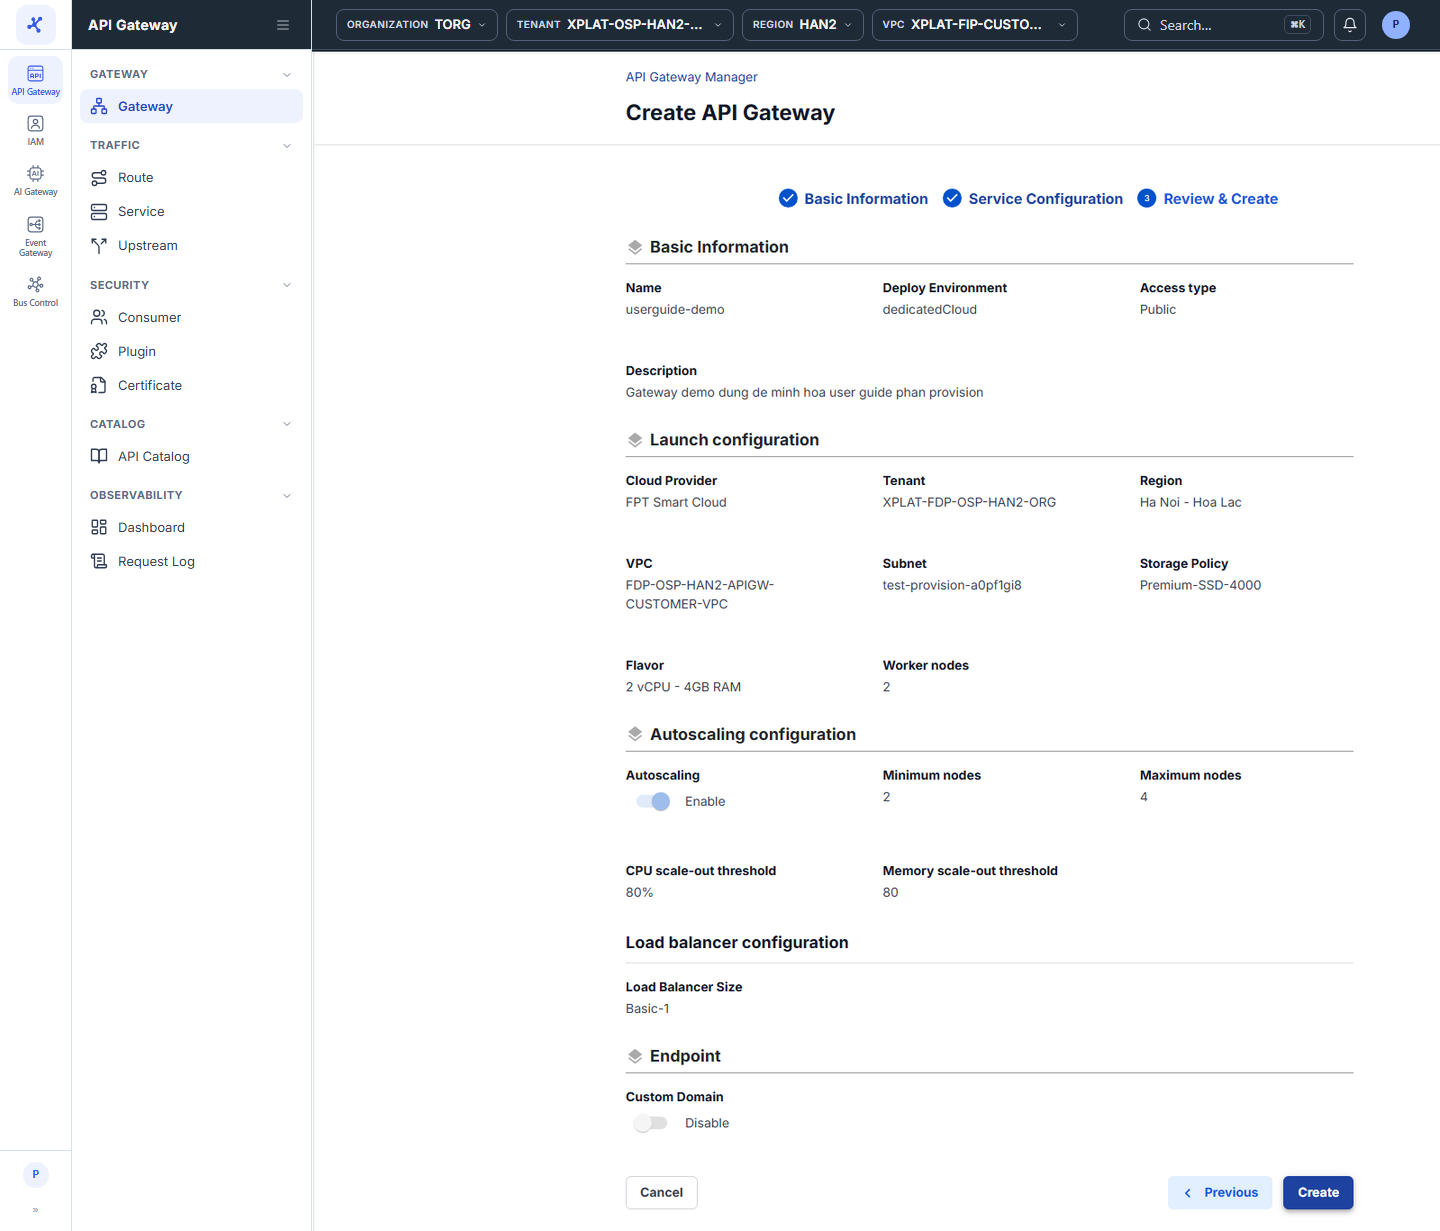
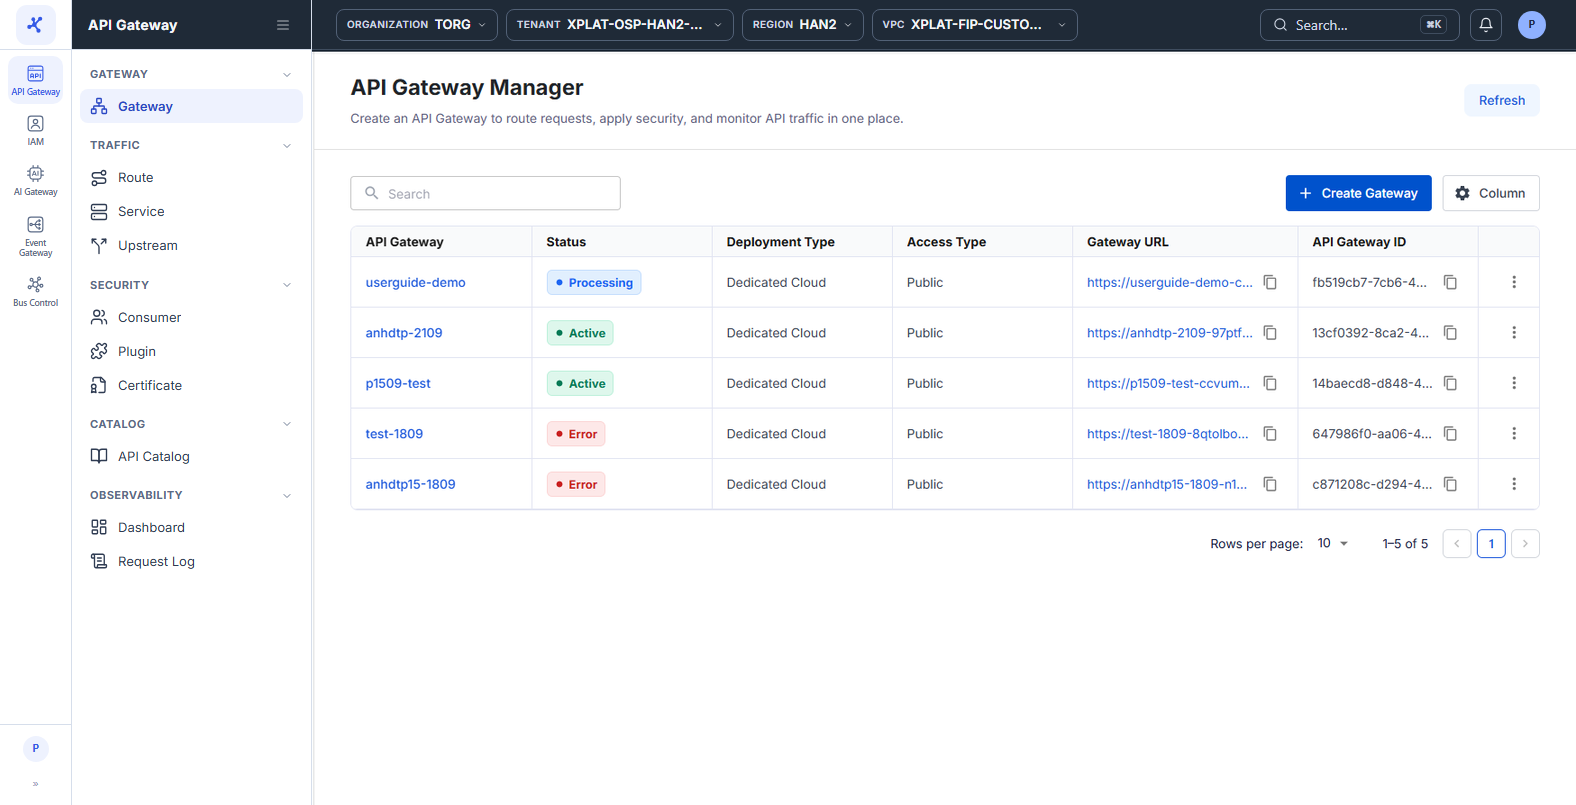
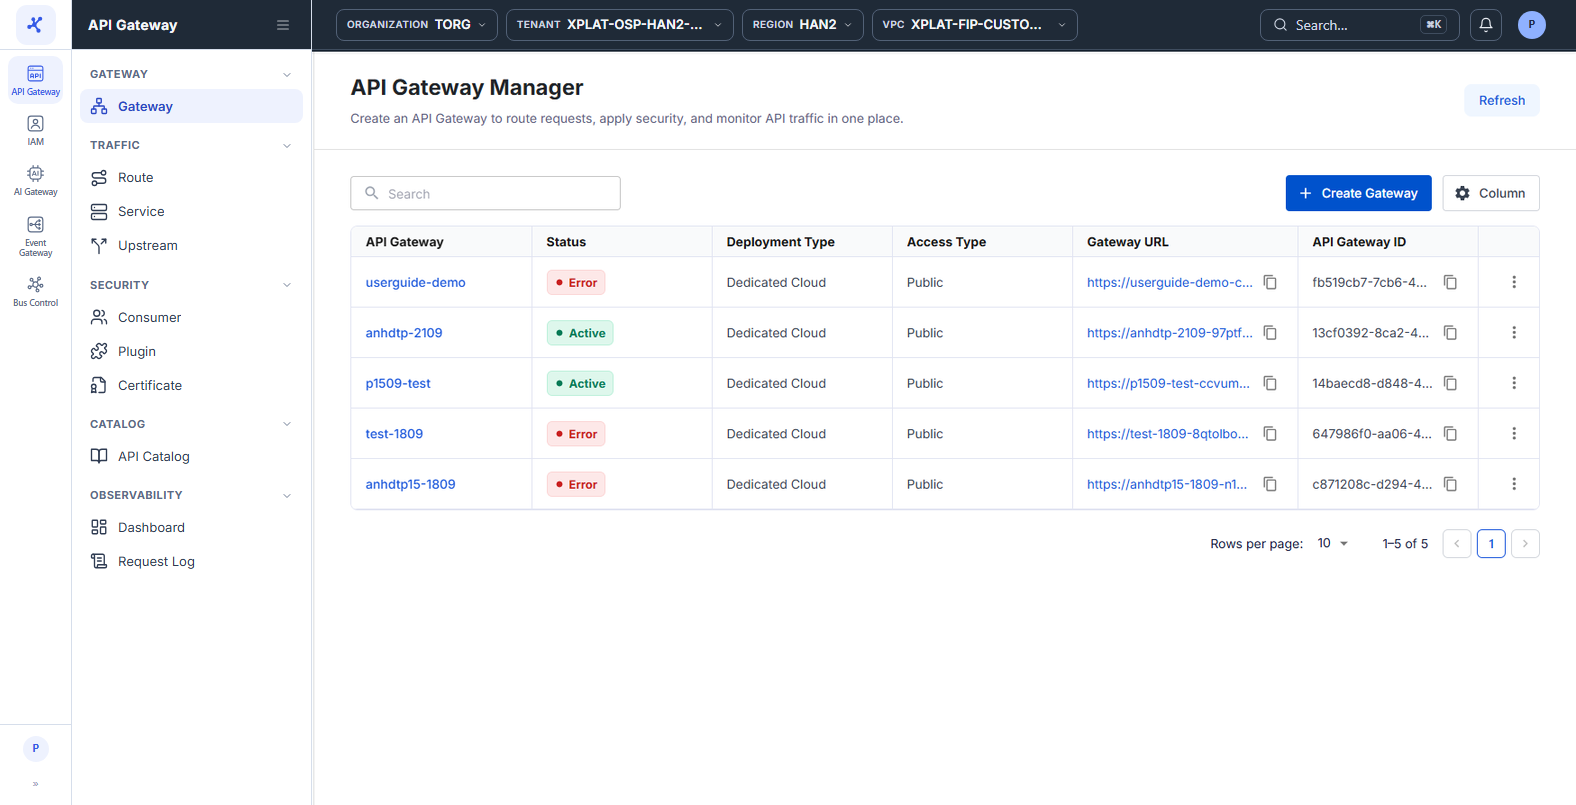
Click the image to zoom in.
Create an API Gateway
The creation screen is a 4-step wizard: Basic Information → Service Configuration → Endpoint → Review & Create. You move to the next step only when every required field (red *) in the current step is valid.
To create an API Gateway, follow these steps:
-
Select API Gateway → Gateway in the left menu, then click Create Gateway.
-
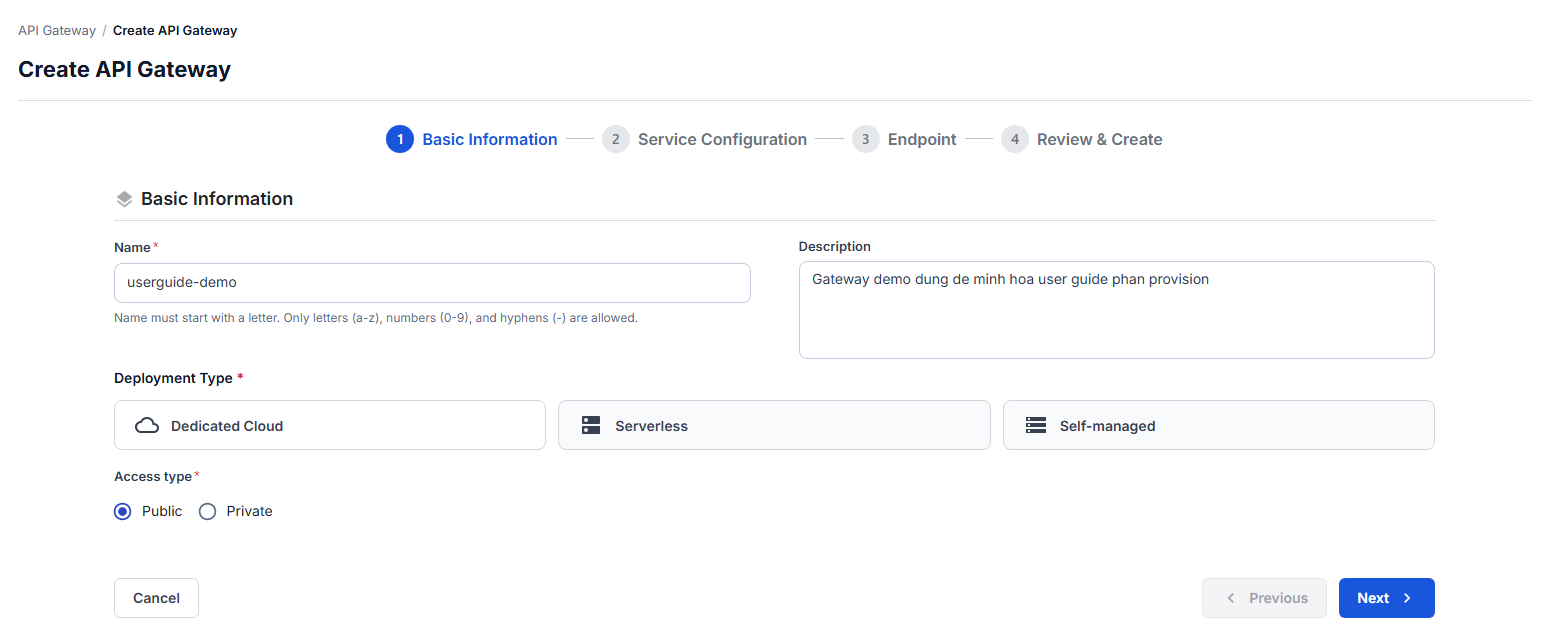
Enter the following information on the Basic Information step:
| Field | Required | Description |
|---|---|---|
| Name | Y | API Gateway name, shown in the list and in the API Gateway selector of the Route, Service, and Upstream screens. Up to 255 characters, starting with a letter, using only letters a-z, numbers 0-9, and -. Example: gateway-test-01. |
| Description | N | Purpose of the API Gateway, for example which system or environment it serves. Up to 500 characters. |
| Deployment Type | Y | Select Dedicated Cloud: API Gateway runs on your VPC infrastructure, and FPT deploys and operates it. Serverless and Self-managed are coming-soon features. |
| Access type | Y | Public (default): the API Gateway gets a public URL that can be called from the Internet. Private: accessible only within the same VPC. |
- Click Next, then enter the Launch configuration information on the Service Configuration step:
| Field | Required | Description |
|---|---|---|
| Cloud Provider | Y | Infrastructure provider. Pre-filled with FPT Smart Cloud. |
| Tenant | Y | Tenant on FPT Cloud Console that owns the resources. The list depends on the signed-in account. |
| Region | Y | Deployment region, which affects latency to end users. |
| VPC | Y | VPC that holds the API Gateway cluster. The list depends on the selected Tenant and Region. |
| Subnet | Y | Subnet in the VPC above, where the Worker nodes are placed. |
| Storage Policy | Y | Storage policy (IOPS level) for the Worker node disks. |
| Flavor | Y | Resources of each Worker node, for example 2 vCPU - 4GB RAM, 4 vCPU - 8GB RAM, 8 vCPU - 16GB RAM. The list shows only flavors that fit the quota of the VPC. |
| Worker nodes | Y | Number of nodes in the API Gateway cluster, from 1 to 10. |
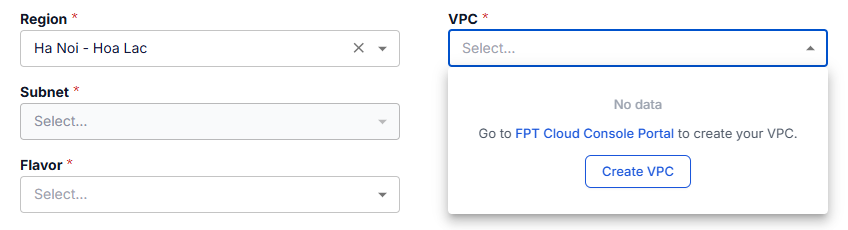
The Region → VPC → Subnet fields load in order. A field stays empty until the field before it is selected, and changing a field clears the fields after it.
If the Tenant / Region has no VPC, the VPC field shows No data with an FPT Cloud Console Portal link and a Create VPC button. Click either one to open FPT Cloud Console in a new tab, create a VPC, then come back and continue. The Subnet field shows a similar message when the VPC has no Subnet.
For development or low load, use 2 vCPU - 4GB RAM with 1 node. For production, use 4 vCPU - 8GB RAM or more with at least 2 nodes, because a single node has no redundancy if it fails.
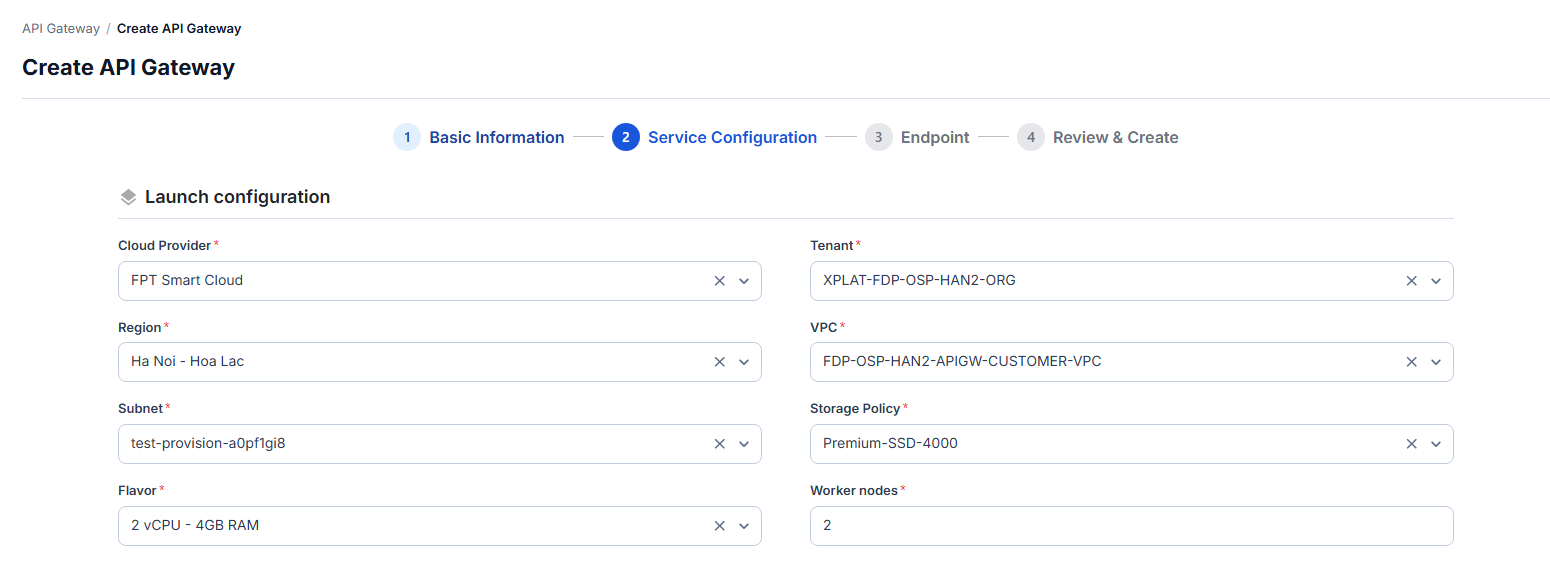
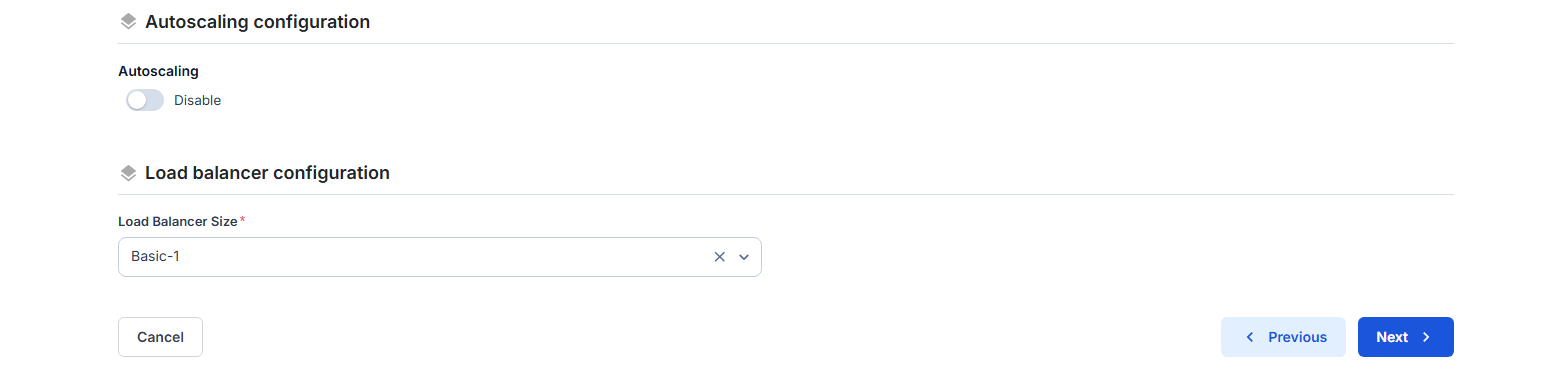
- Enter the Autoscaling configuration information so the cluster scales the number of nodes with the load:
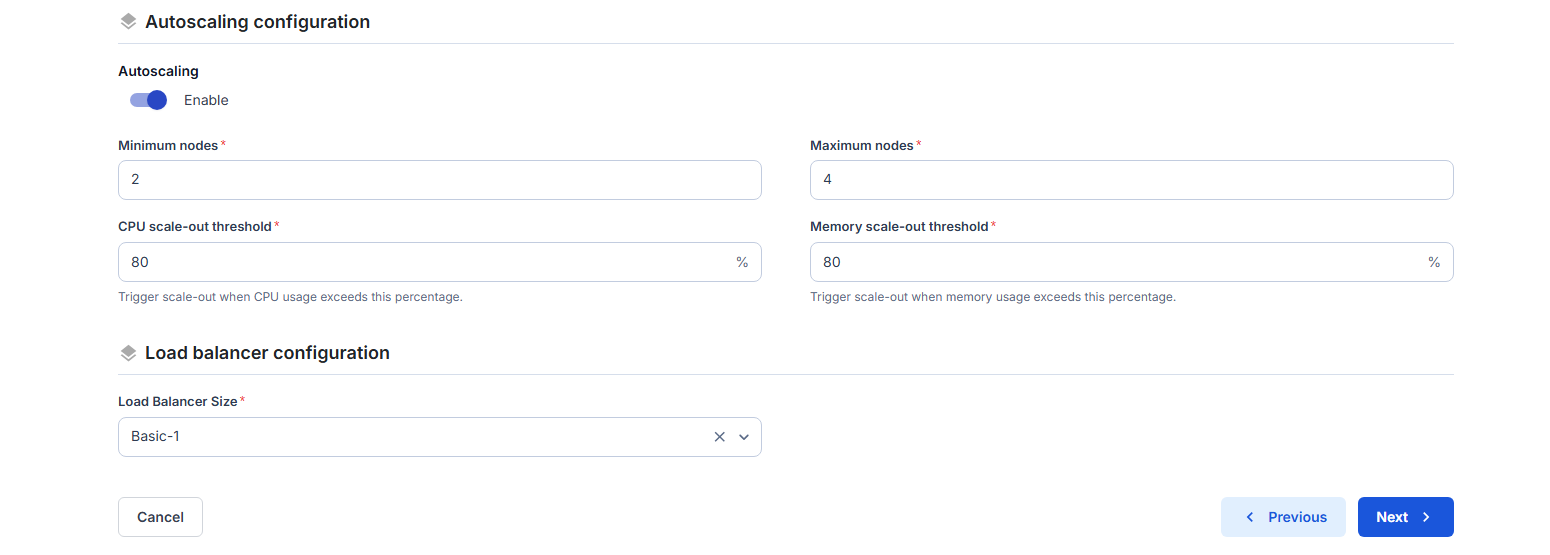
- Autoscaling = Enable (default): enter the following information.
| Field | Required | Description |
|---|---|---|
| Minimum nodes | Y | Minimum number of nodes the cluster always keeps, from 1 to 10. |
| Maximum nodes | Y | Maximum number of nodes the cluster can scale out to, from 1 to 10 and greater than or equal to Minimum nodes. |
| CPU scale-out threshold | Y | Average CPU percentage. Above this threshold, the system considers adding nodes. Default 80. |
| Memory scale-out threshold | Y | Average memory percentage. Above this threshold, the system considers adding nodes. Default 80. |
- Autoscaling = Disable: the 4 fields above are hidden and the cluster runs with exactly the number of Worker nodes you entered.
- Select the Load Balancer Size in Load balancer configuration:
Basic-1,Basic-2, orAdvanced-2. The size sets the number of concurrent connections and the throughput of the Load Balancer in front of the cluster. Choose a larger package when you expect high API traffic.
- Click Next, then choose the endpoints on the Endpoint step:
| Field | Required | Description |
|---|---|---|
| Default Endpoint | N | Domain that the system assigns to the API Gateway. On by default. |
| Custom Domain | N | Off by default: a default domain is assigned, and you can add a Custom Domain later. Turn it on to enter a Domain name and select a Certificate that covers it now. |
If you turn Default Endpoint off, you must turn Custom Domain on and enter a valid domain and certificate, because the custom domain becomes the only endpoint of the API Gateway.
- Click Next to go to the Review & Create step. Review all the information, grouped into Basic Information, Launch configuration, Autoscaling configuration, Load balancer configuration, and Endpoint. To change something, click Previous to go back to that step.
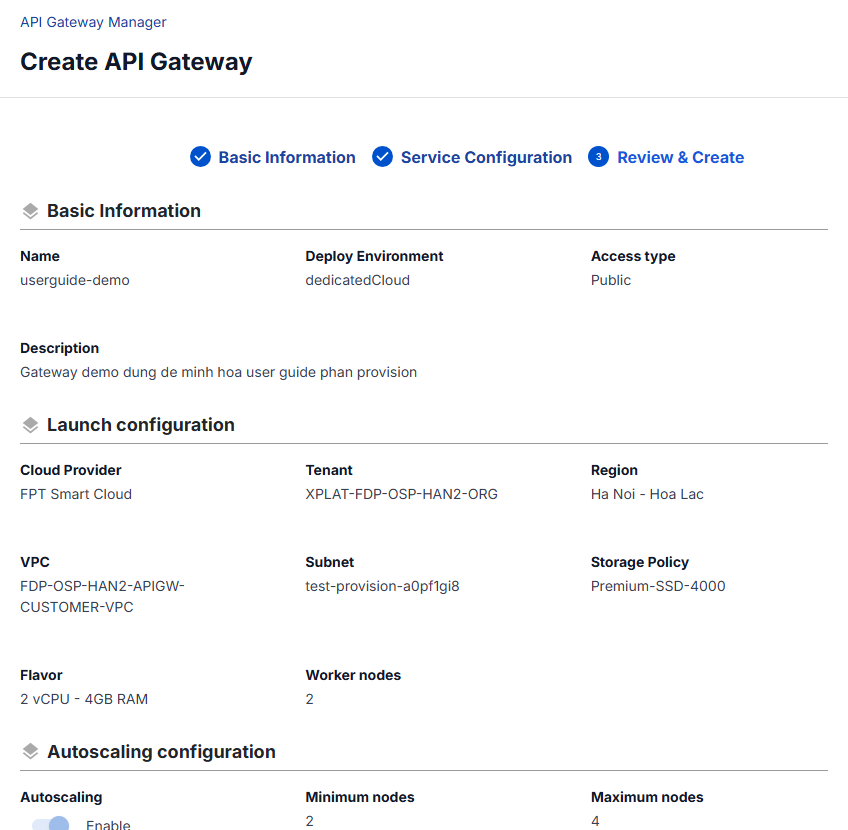
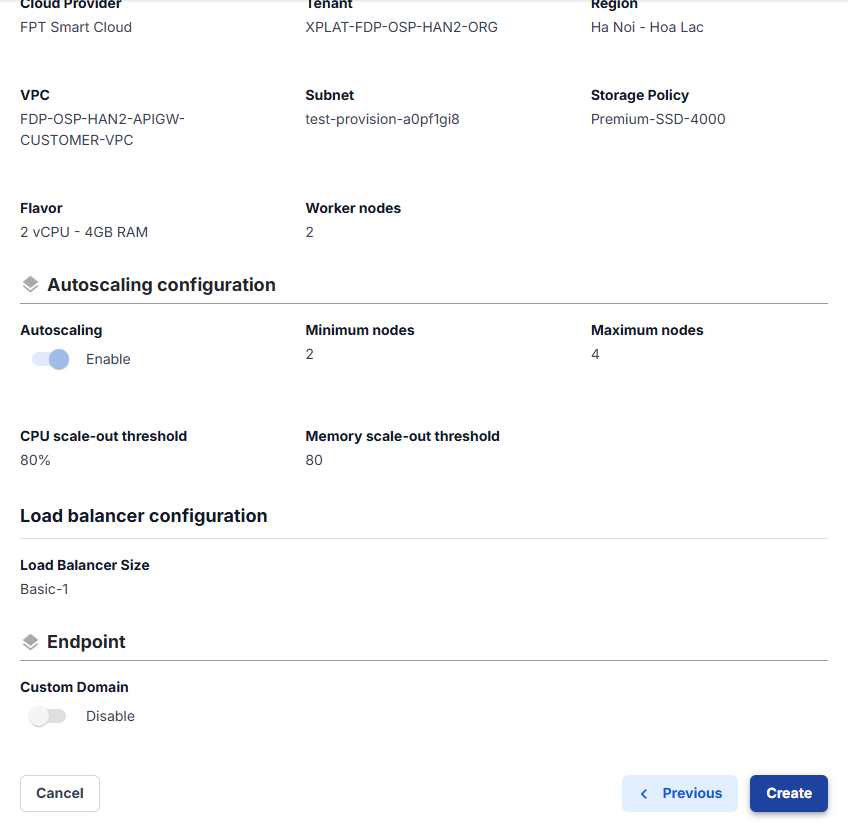
Check Tenant, Region, VPC, and Subnet carefully before you create the API Gateway. These values cannot be changed after the cluster is created. If they are wrong, you must delete the API Gateway and create it again.
- Click Create to finish.
The message Create API Gateway successfully appears, and the new API Gateway appears at the top of the API Gateway Manager list with the Processing status.
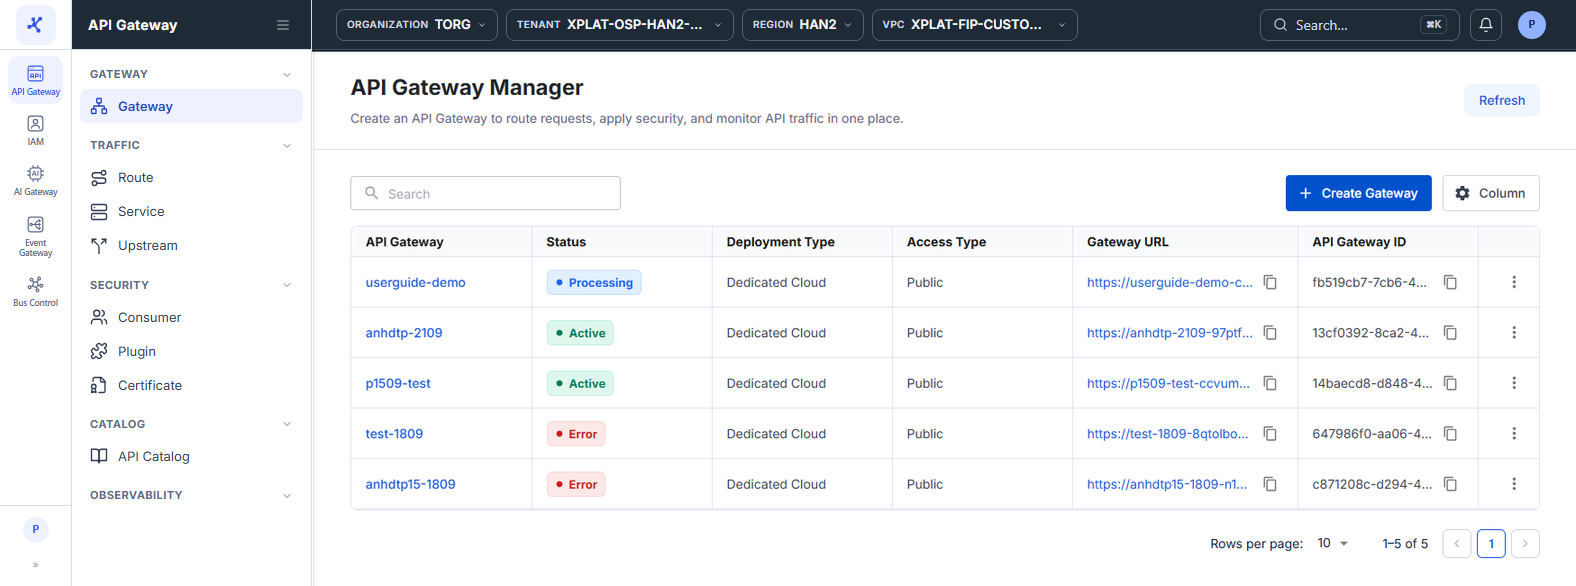
At any step, you can leave with Cancel or the API Gateway link at the top of the screen. The data you entered is not saved.
Track the status after creation
Provisioning runs in the background (building the cluster, deploying the API Gateway application, and assigning a domain) and can take up to several hours.
| Status | Meaning |
|---|---|
| Processing | The API Gateway is being provisioned and cannot be used yet. The Gateway URL column already has a URL, but it does not serve traffic yet. |
| Active | Provisioning succeeded. The Gateway URL works, and you can select the API Gateway on the Route, Service, Upstream, Consumer, and Plugin screens. |
| Error | Provisioning failed, and the API Gateway does not serve traffic. |
The status refreshes periodically. Click Refresh to update it right away.
Common issues
| Error | Cause | Solution |
|---|---|---|
| Name is required | Name is empty | Enter an API Gateway name. |
| Please select a deployment type | Deployment Type is not selected | Select Dedicated Cloud. |
| Name has invalid characters | The name does not start with a letter, or contains characters other than a-z, 0-9, and - | Change the name to follow the rule in Step 2. |
| Name must be at most 255 characters long | The name is longer than 255 characters | Shorten the name. |
| Description must be at most 500 characters long | The description is longer than 500 characters | Shorten the description. |
| Worker nodes must be at least 1 / Worker nodes must be at most 10 | Worker nodes is outside the 1–10 range | Enter a number from 1 to 10. |
| Minimum nodes must be at least 1 / must be at most 10 (same for Maximum nodes) | The value is outside the 1–10 range | Enter a number from 1 to 10. |
| Maximum nodes must be greater than Minimum nodes | Maximum nodes is smaller than Minimum nodes | Increase Maximum nodes or lower Minimum nodes. |
| Something went wrong. Please try again later | Timeout or system error when you click Create. The form keeps your data | Click Create again after a moment. |
| The API Gateway changes to Error | Provisioning failed on the infrastructure side. The list does not show the reason | Delete the API Gateway and create it again. If it is still Error, contact support to check the VPC, Subnet, and Storage Policy quotas. |