Resize a Load Balancer
The Resize feature lets you change your Load Balancer package to match your usage needs — both operationally and financially:
- Improve performance: Ensure your application always has enough resources to handle traffic.
- Increase availability: Maintain service availability even during traffic spikes.
- Reduce costs: Avoid paying for unused resources by selecting a package that matches your actual usage.
Step 1: In the Load Balancer list, click the three-dot menu for the Load Balancer you want to resize, then select Resize.
Step 2: A dialog appears showing the available Load Balancer packages. Select the package that fits your requirements.
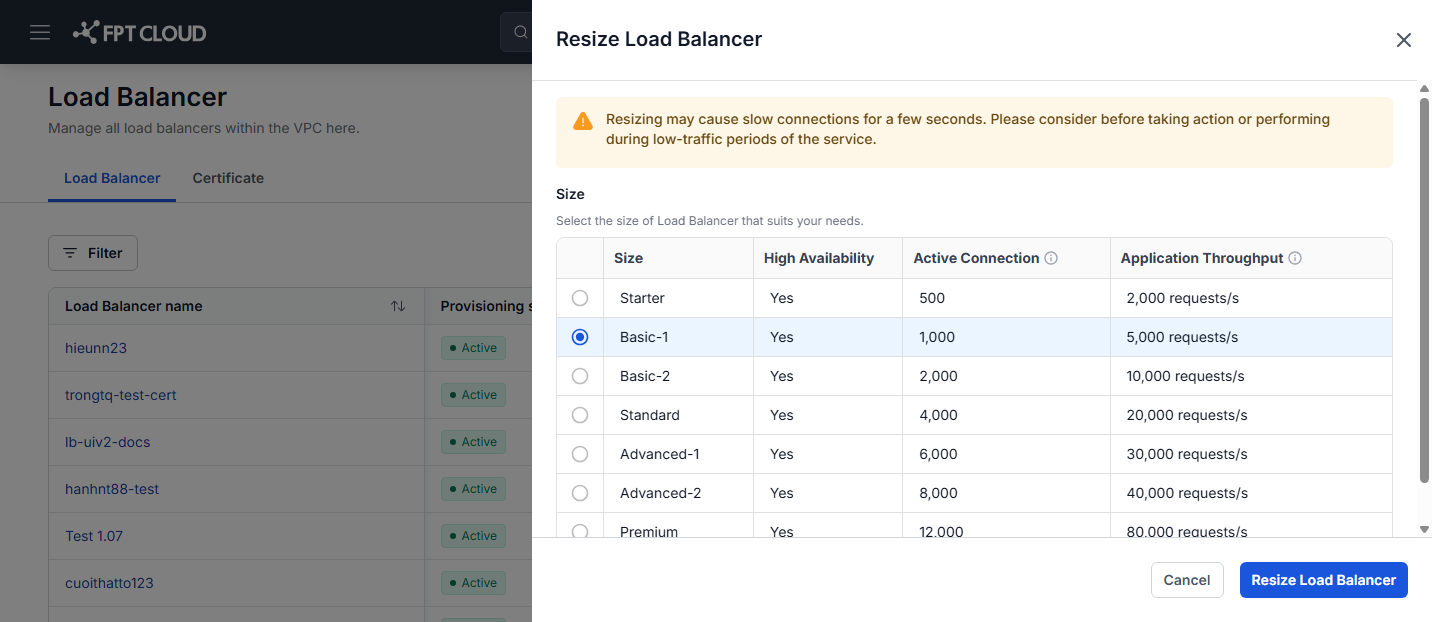
Step 3: Click Resize Load Balancer to confirm, or Cancel to discard.
- Before resizing, ensure the VPC has sufficient quota for the new package size.
- The resize process takes some time. Your Load Balancer will experience a brief interruption during this period and will resume normal operation once complete.
- In more detail: during the resize, there is a window of about 5 seconds in which traffic has to reconnect, so the LB may be intermittent. For a Load Balancer with many pools or members, it takes 1 to 5 minutes to stabilize completely.
- After a successful resize, check the actual metrics in the Monitoring tab to confirm the new package meets your real-world requirements.
Resize automatically with Native Alert
Instead of watching the charts and resizing by hand, you can let the Load Balancer resize itself when it gets busy. Create a Native Alert on the Active connection metric and give it the Auto-resize action: once the connection count crosses your threshold, the system moves the Load Balancer up one package tier, for example from Basic-1 to Basic-2.
Before you start, make sure a recipient already exists. The Notify to field in Step 7 only accepts recipients that were created beforehand.
Step 1: Select Monitoring → Native alert, open the Resource alert tab, then click Create alarm.
Step 2: Enter a Name, then set Type to Load Balancer.
Step 3: Under Configure condition, set Metric type to a load metric, for example Active connection.
The Action field only appears for the three load metrics: Active connection, Total packet In/Out per second, and Drop packet In/Out per second. The other metrics can still notify you, but they cannot resize the Load Balancer, because a bigger package does not fix an unhealthy backend.
Step 4: Fill in the rest of the condition — Operator, Threshold, Alert interval, and Repeat time.
Step 5: Under Apply to, choose the Load Balancers this rule covers.
Step 6: Set Action to Auto-resize. The default is None, which only sends a notification.
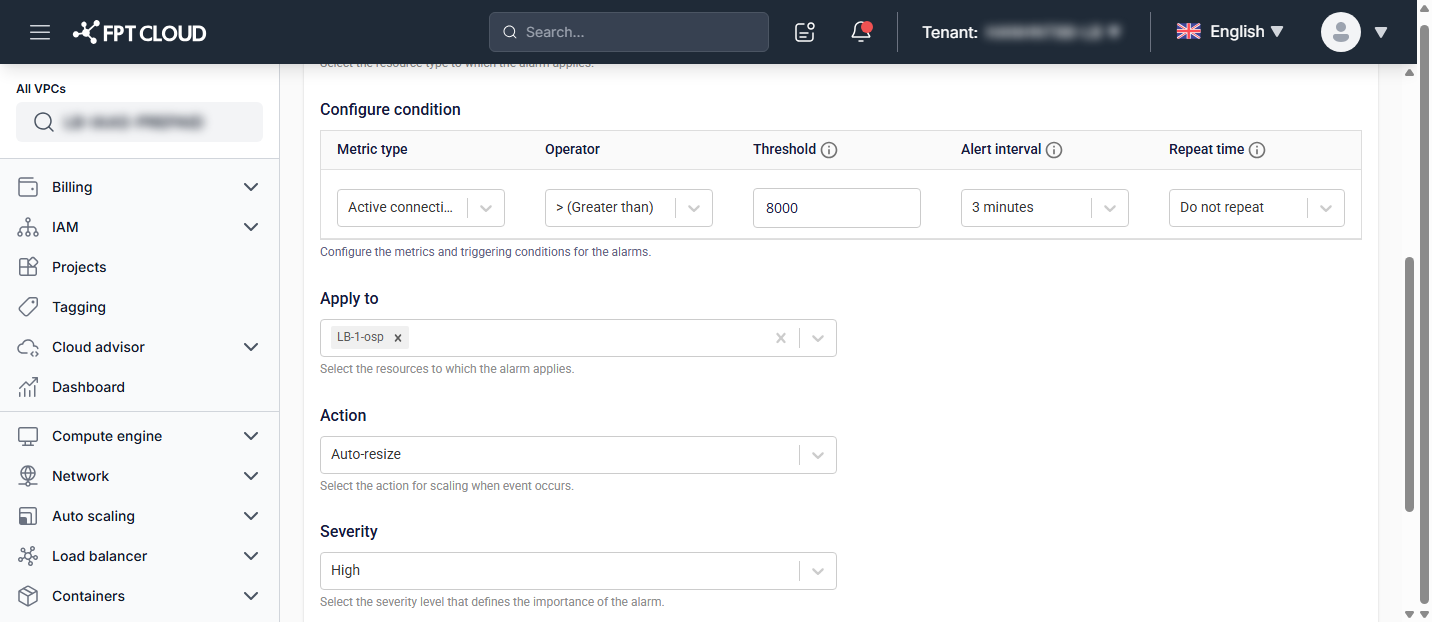
Step 7: Set Severity, pick a recipient under Notify to, then click Create.
- An automatic resize interrupts the Load Balancer briefly, exactly like a manual one. An alert that fires repeatedly therefore interrupts service repeatedly. Set Threshold from the real traffic you see in the Monitoring tab, and use Repeat time to keep the rule from firing back to back.
- With Auto-resize, the system automatically upgrades the package when the trigger fires, even if the VPC has no remaining quota. You will be billed for the upgraded package from the next billing cycle.
See Set up Load Balancer alerts with Native Alert for the rest of Native Alert: creating recipients, the full metric list, alert states, and history.