Domain management
The Domains screen is the home page of FPT Cloud WAF — a centralized view of all domains protected in your tenant. FSP Admins can monitor protection status, TLS certificate health, search and filter, add new domains, and delete domains no longer in use.
View the domain list
- From the sidebar, select Cloud WAF → Domains. The domain table appears.
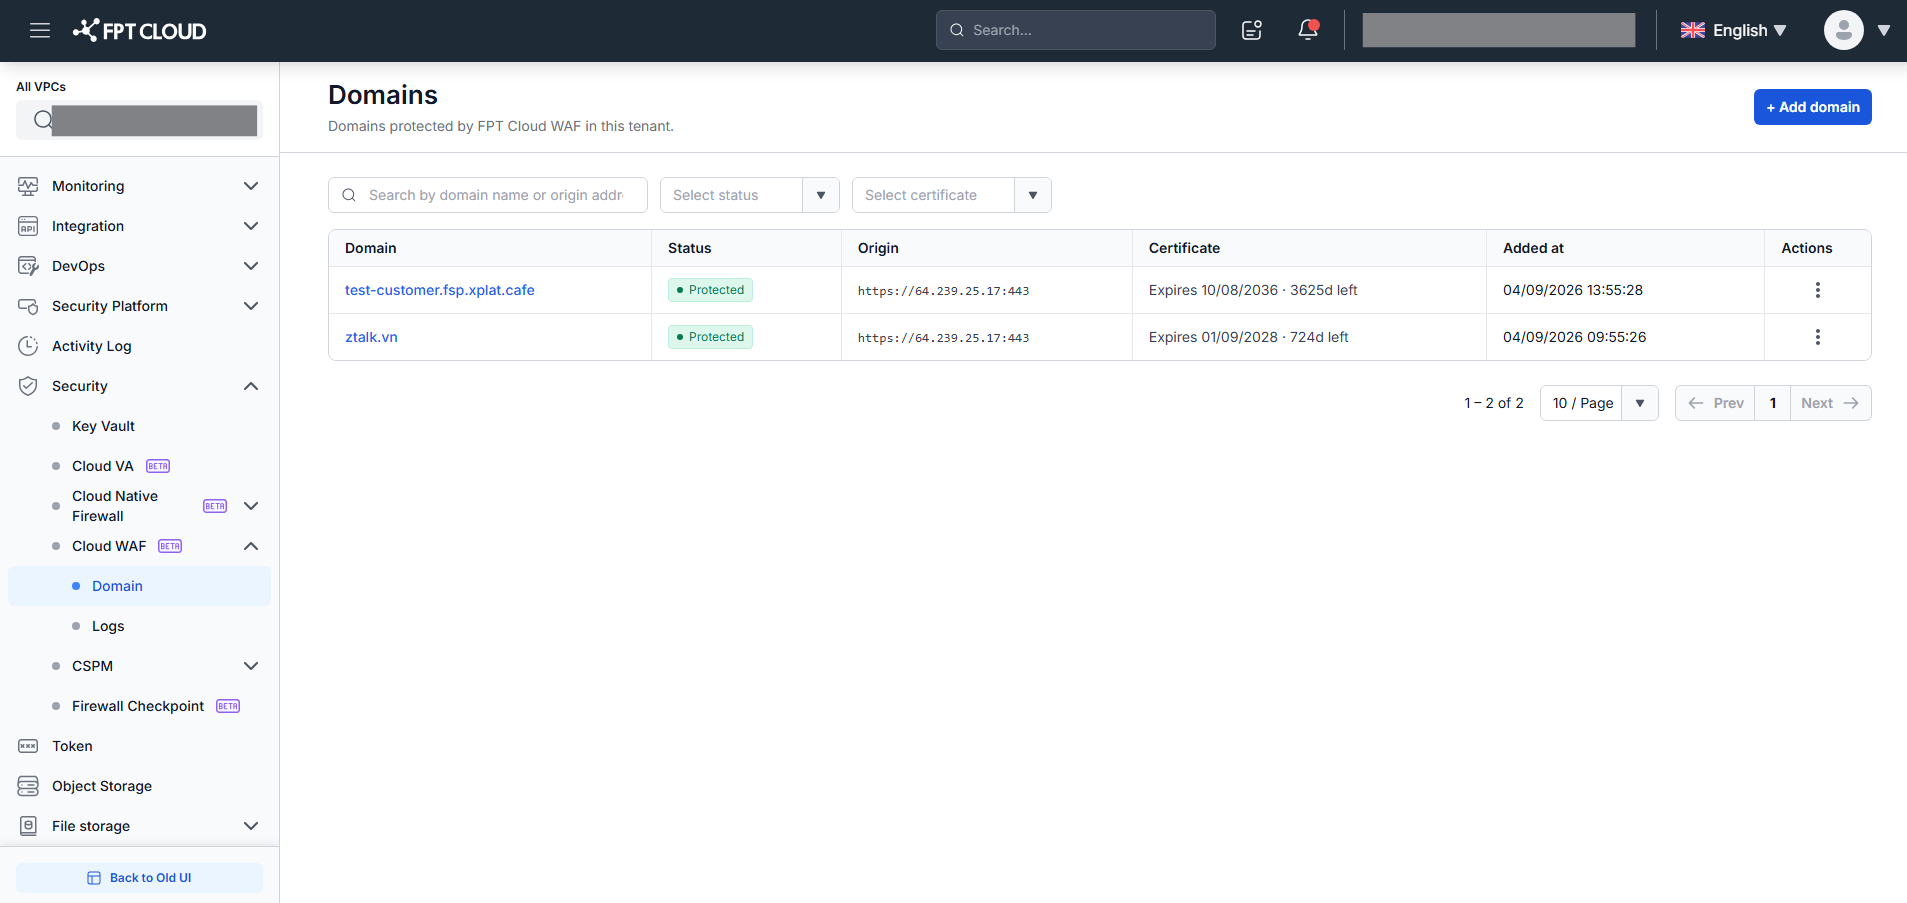
The list is sorted by most recently added (newest first) with these columns:
| Column | Description |
|---|---|
| Domain | Domain name as a link — click to open Domain Details |
| Status | Protection state: Protected (green badge) / Unprotected (red badge + ⓘ icon) |
| Origin | Origin server address |
| Certificate | TLS certificate expiry date and days remaining |
| Added At | When the domain was added (DD/MM/YYYY HH:MM:SS) |
| Actions | Context menu (⋮ icon) |
-
Monitor the Status column:
- Protected (green) — WAF is active and certificate is valid. Traffic is inspected per configured policy.
- Unprotected (red + ⓘ) — Domain is not protected. Hover the ⓘ icon to see why:
- "Certificate expired" — Update the certificate in Domain Details.
- "WAF is disabled" — Re-enable the WAF toggle in Domain Details.
- If both apply, the tooltip shows "WAF is disabled".
-
Monitor the Certificate column — shown in 3 states:
- Normal: "Expires DD/MM/YYYY · N days left" (more than 30 days)
- Near-expiry (amber ⚠): "Expires DD/MM/YYYY · N days left" (0–30 days) — plan renewal
- Expired (red ✗): "Expired · DD/MM/YYYY" — domain becomes Unprotected, update immediately
-
Search and filter:
- Search box — type domain name or origin address to filter in real time (no Enter required, case-insensitive). Click × to clear.
- Select status — filter by
ProtectedorUnprotected. Click × to remove filter. - Select certificate — filter by
ValidorExpired. Click × to remove filter. - Combining search + filters applies AND logic. No matches → "No records found".
Add a domain
The Add Domain wizard onboards a new domain to FPT Cloud WAF in 3 steps. Once complete, the domain reaches Protected status and all traffic is routed through WAF before reaching your origin.
Step 1: From the Domains screen, click "+ Add Domain" (top right). The wizard opens at Step 1 — Domain & Origin.
Step 1 — Domain & Origin
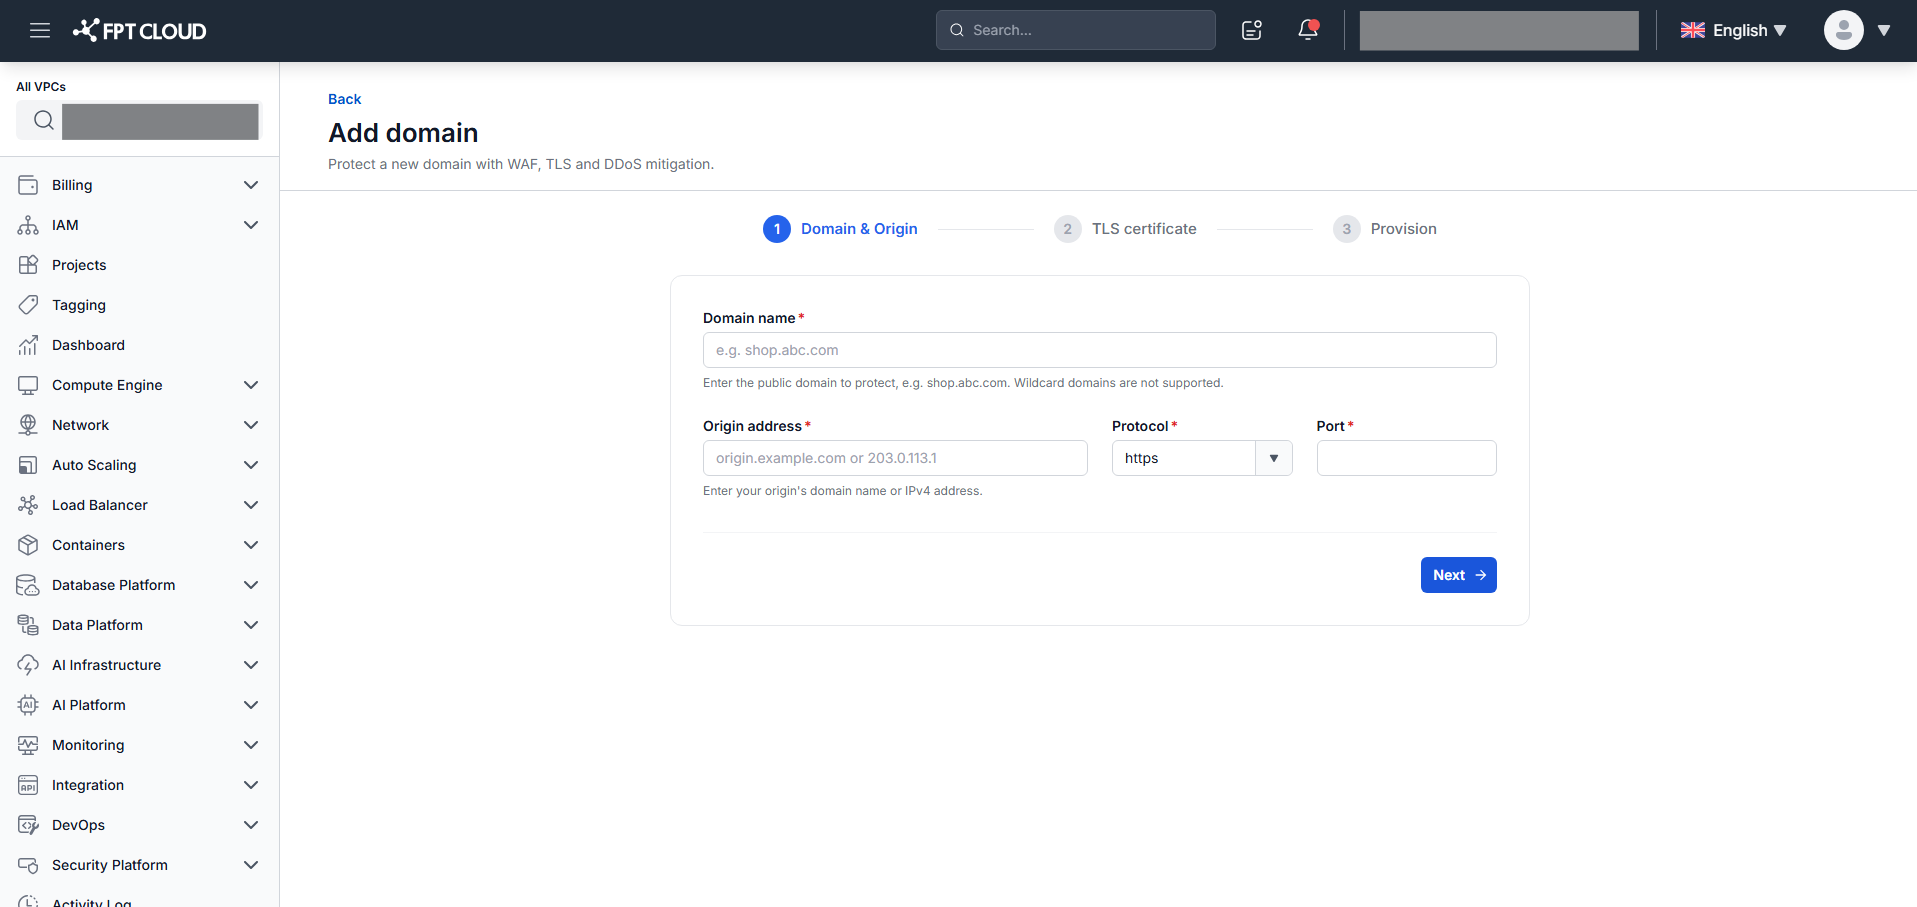
Step 2: Fill in the domain and origin details:
- Domain name — the public domain to protect (e.g.,
shop.abc.com). No wildcard domains (*.abc.com). If already added → error "This domain is already added." - Origin address — your origin server (domain name or IPv4 including RFC1918 private ranges). No loopback (
127.0.0.x) or IPv6. - Protocol — connection between WAF and origin:
https(default) orhttp. - Port — port to reach origin (1–65535).
https+ port80→ validation error "Invalid port for HTTPS."
Step 3: Click "Next". The system validates all fields. Errors appear inline — correct them and the error hides. When all valid, the wizard moves to Step 2.
Step 2 — TLS Certificate
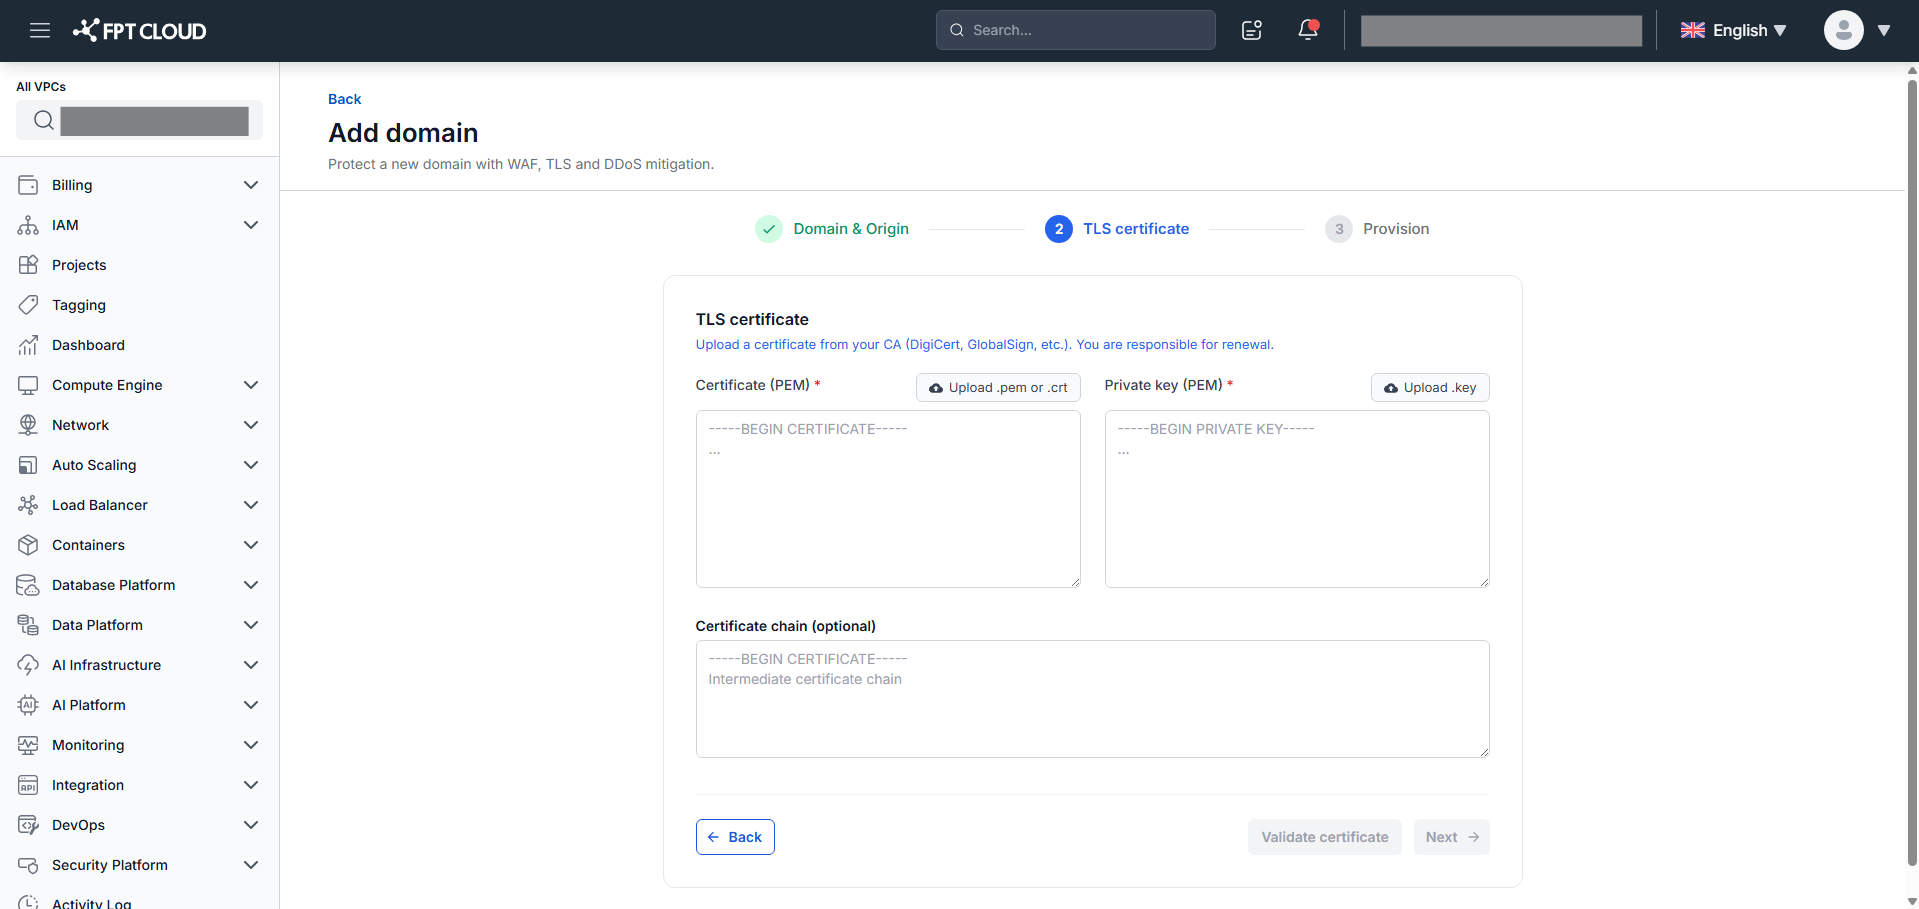
Step 4: Provide TLS certificate details:
| Field | Paste | Upload file |
|---|---|---|
| Certificate (PEM) (required) | Paste PEM content starting with -----BEGIN CERTIFICATE----- | Click "Upload .pem or .crt" |
| Private Key (PEM) (required) | Paste PEM content starting with -----BEGIN PRIVATE KEY----- | Click "Upload .key" |
| Certificate Chain (optional) | Paste intermediate certificate chain | — |
Each field accepts only one input method — pasting text disables the Upload button, and uploading a file disables the text area. Click "Remove File" to reset a file upload.
Step 5: After entering both Certificate and Private Key, click "Validate Certificate". The system parses the certificate and shows the Certificate Metadata Panel:
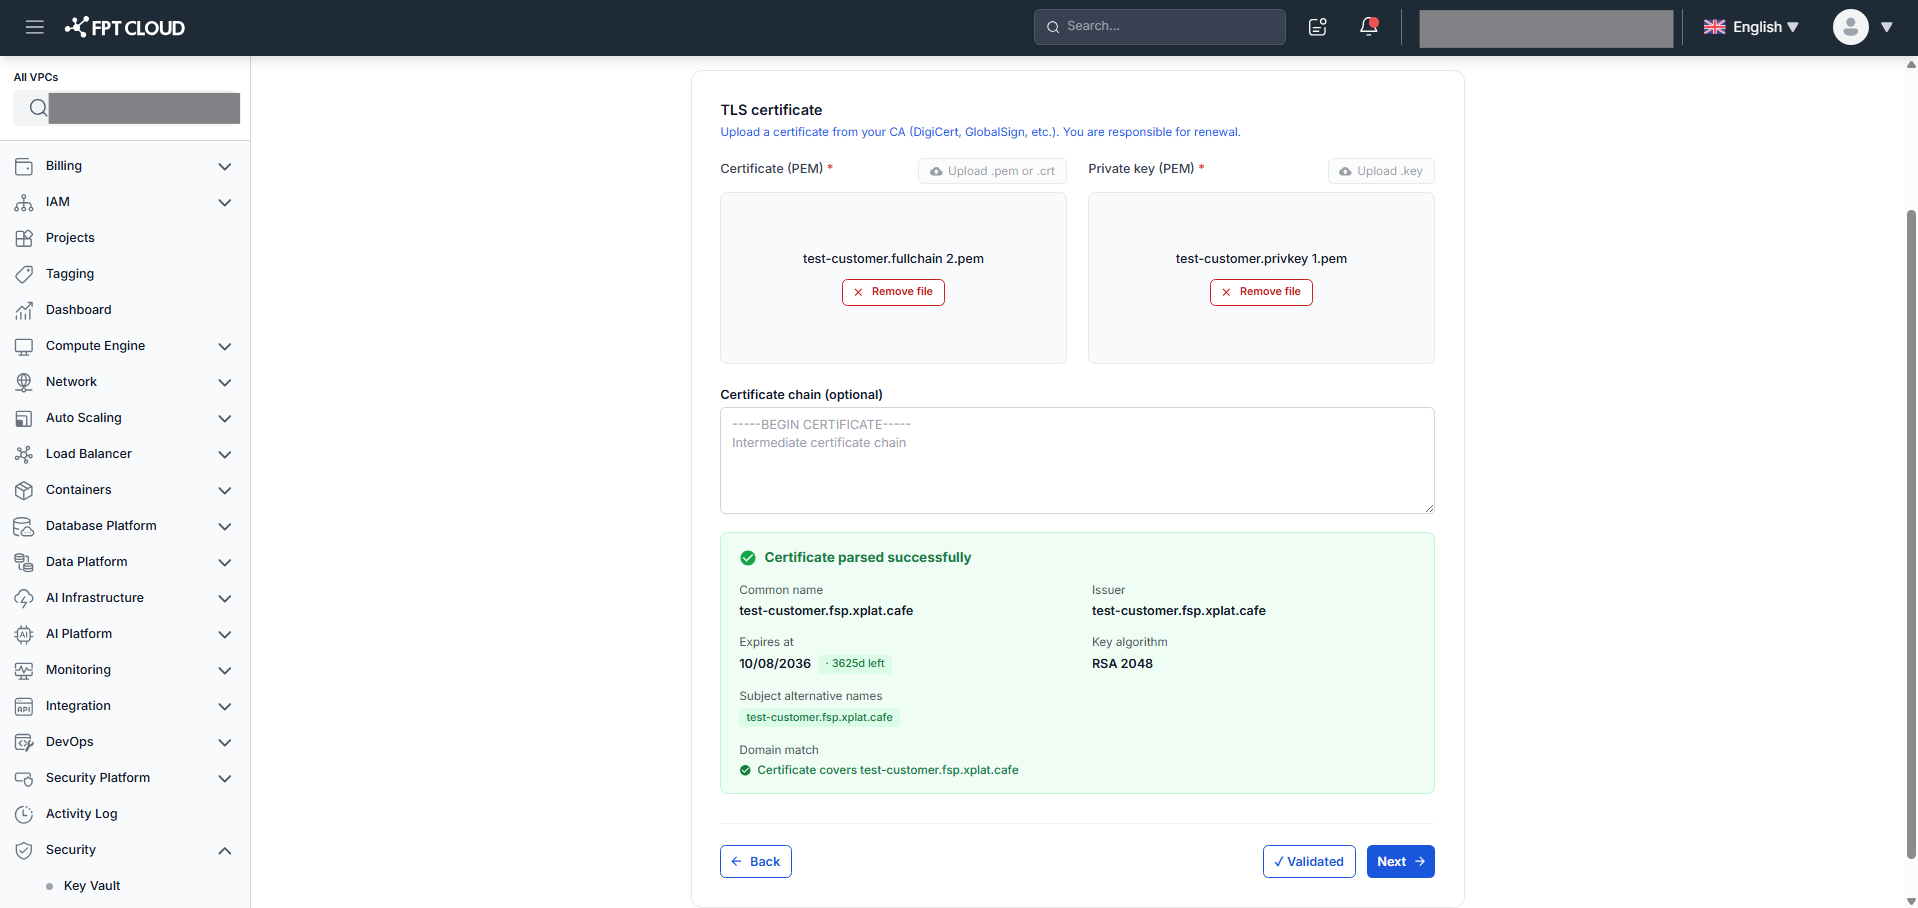
The panel shows: Common name · Issuer · Expires at · Key algorithm · Subject alternative names · Domain match result.
- "Next" is enabled only when the certificate is not expired AND Domain match = ✓.
- If you edit or remove the certificate after validating, the Metadata Panel hides and "Next" disables — validate again.
Step 6: When the certificate is valid, click "Next" → Step 3.
Step 3 — Provision
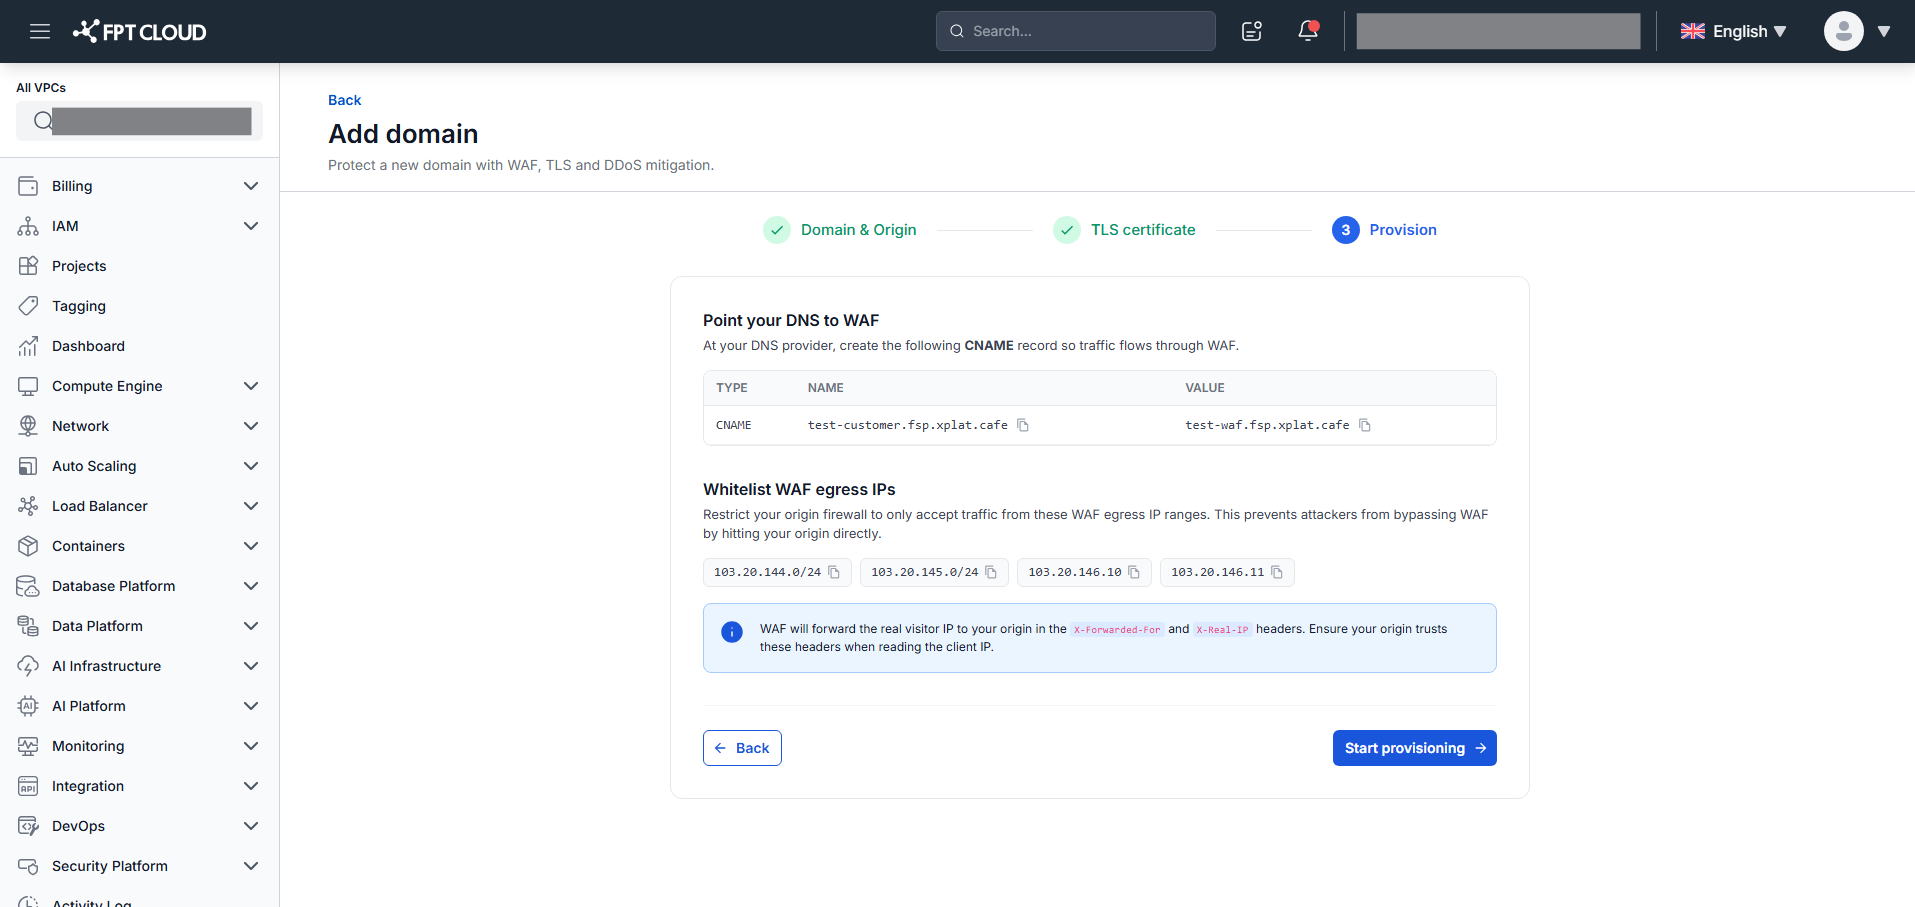
Step 7: Configure your DNS and origin firewall with the displayed values:
Part 1 — Point your DNS to WAF:
Create a CNAME record at your DNS provider:
- Type:
CNAME - Name: your domain (e.g.,
shop.abc.com) - Value: the WAF edge endpoint provided by FPT Cloud
Click Copy next to each value to copy it.
Part 2 — Whitelist WAF egress IPs:
Add the listed WAF egress IPs/CIDRs to your origin firewall/security group. This prevents attackers from bypassing WAF by targeting your origin directly.
WAF forwards the real visitor IP to your origin via X-Forwarded-For and X-Real-IP headers. Configure your origin to read the client IP from these headers — not from the direct remote IP.
Step 8: After configuring DNS and whitelisting IPs (allow a few minutes for DNS propagation), click "Start Provisioning". A loading modal appears — do not close the browser during provisioning.
Provisioning successful:
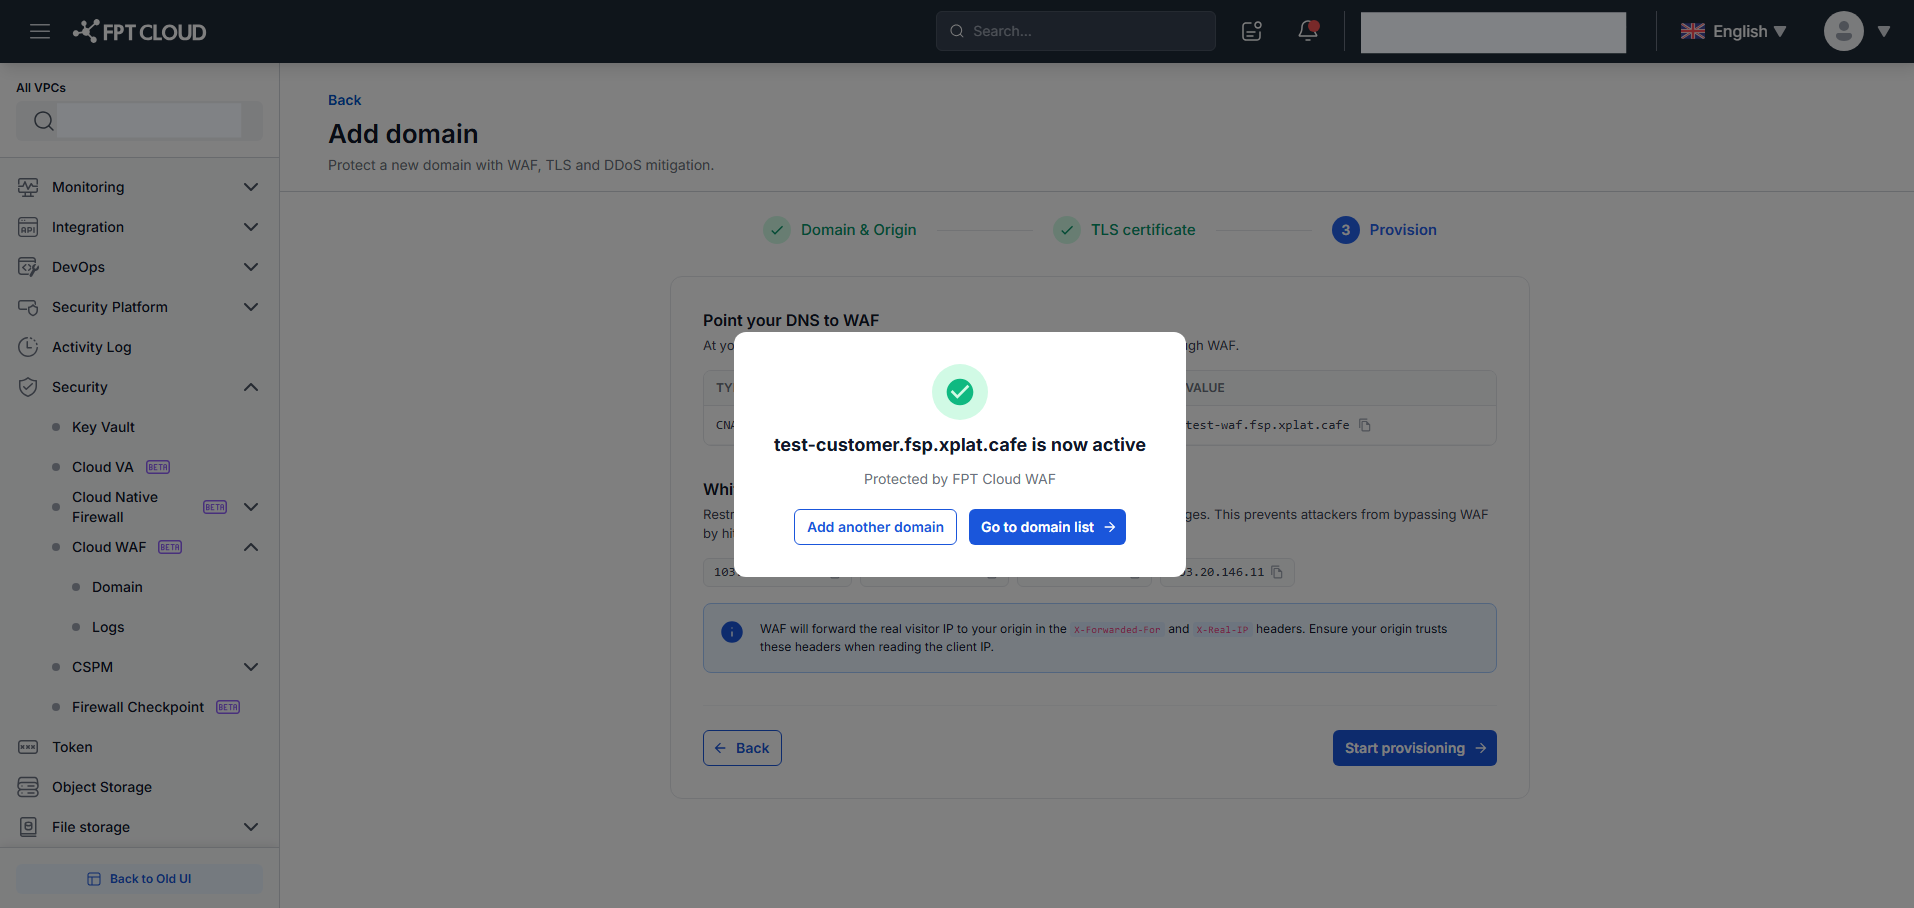
A dialog confirms "{domain} is now active — Protected by FPT Cloud WAF". Choose:
- "Go To Domain List" — return to the list; the new domain appears with Protected status.
- "Add Another Domain" — reset the wizard to Step 1.
Provisioning failed:
A dialog shows the specific reason (e.g., "Origin health check failed...") with 3 remediation suggestions. Click "Retry Provisioning" to try again without going back to Step 1/2.
Clicking Back on any step returns to the previous step while keeping entered data.
Delete a domain
- In the domain list, click the ⋮ (Actions) icon on the domain row → select "Delete" (red text). A Delete Confirmation dialog appears.
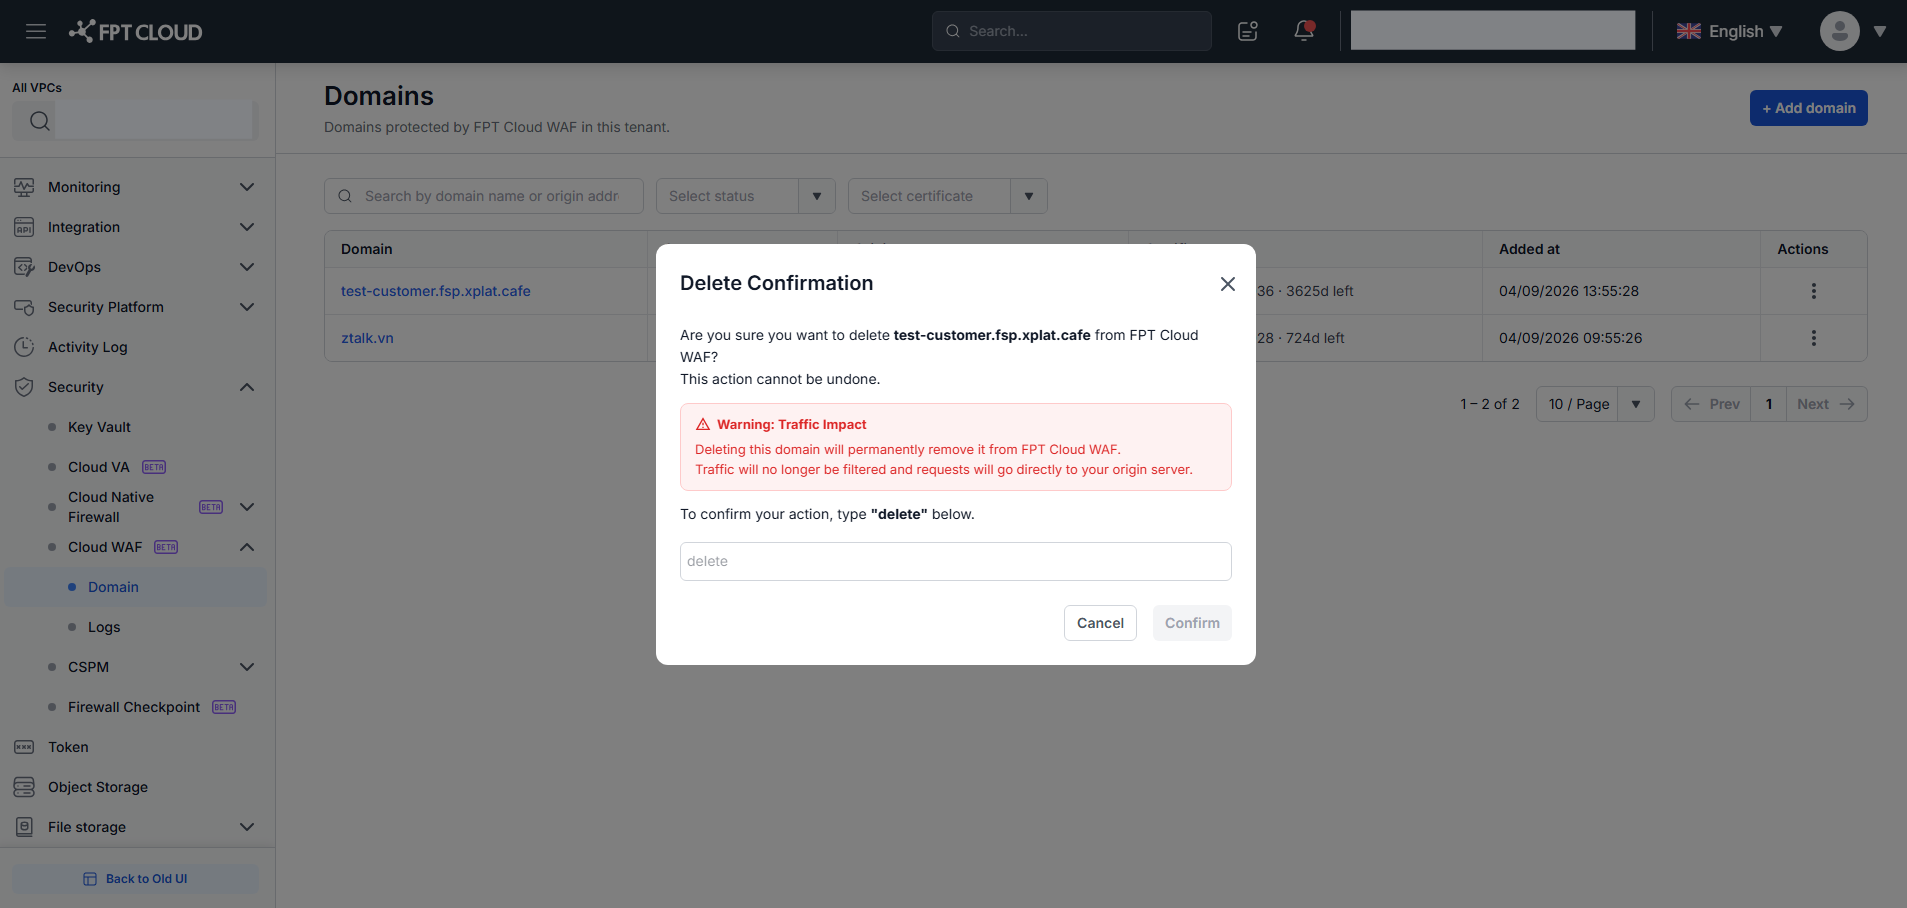
- Read the Warning: Traffic Impact — after deletion, traffic to this domain is no longer inspected by WAF and goes directly to the origin.
- Type exactly
delete(lowercase, no extra spaces) in the confirmation field. The "Confirm" button activates. - Click "Confirm" → domain is removed from the list and a confirmation toast appears. Click "Cancel" to close without deleting.
The system is case-sensitive — DELETE, Delete, or any variation is rejected.
What's next
- Domain Details — manage WAF toggle, origin health, and certificate.
- Security Policies — configure IP Rules, Rate Limiting, and WAF/OWASP rules.