OpenID Connect plugin
OpenID Connect plugin(技術名 openid-connect、Authentication グループ)は、Keycloak、Auth0、Google、Okta などの外部 Identity Provider(IdP)を通じた OAuth 2.0 / OpenID Connect(OIDC)フローで、Route と Service を保護します。
plugin には 2 つのモードがあり、bearer_only 属性で選択します。
| モード | bearer_only | 動作 |
|---|---|---|
| Authorization Code | false(デフォルト) | API Gateway がユーザーを IdP のサインインページにリダイレクトし、アプリケーションに戻して、セッションを自ら管理します。Web アプリケーションに適しています。 |
| Bearer token | true | すべての request に有効なアクセストークンが必要で、サインインのリダイレクトはありません。セッション状態を持たない API やマイクロサービスに適しています。 |
ユースケース
- 組織にすでに IdP があり、API Gateway の背後にある Web アプリケーションにアクセスする前に、IdP アカウントでのサインインをユーザーに求める。
- IdP が発行したアクセストークンのみを受け付ける、マイクロサービスやパートナー向けの API。
- アクセストークンに必要な scope が含まれている場合にのみ呼び出せる API。
先に IdP から 3 つの値を用意してください: client_id、client_secret、discovery URL(例: https://your-idp.example.com/.well-known/openid-configuration)。
OpenID Connect plugin を作成する
OpenID Connect plugin を作成するには、次の手順を実行します。
-
左側のメニューで API Gateway → Plugin を選択し、右上で API Gateway を選択して New plugin をクリックし、Add plugin ポップアップで OpenID Connect を選択します。Route / Service の Plugins タブから追加することもできます。Plugin の追加を参照してください。
-
Basic Information セクションで Display Name を入力します。Basic Informationを参照してください。
-
Configuration セクションを選択します。フォームには 5 つの必須属性と Quick Start Templates ブロックが表示されます。
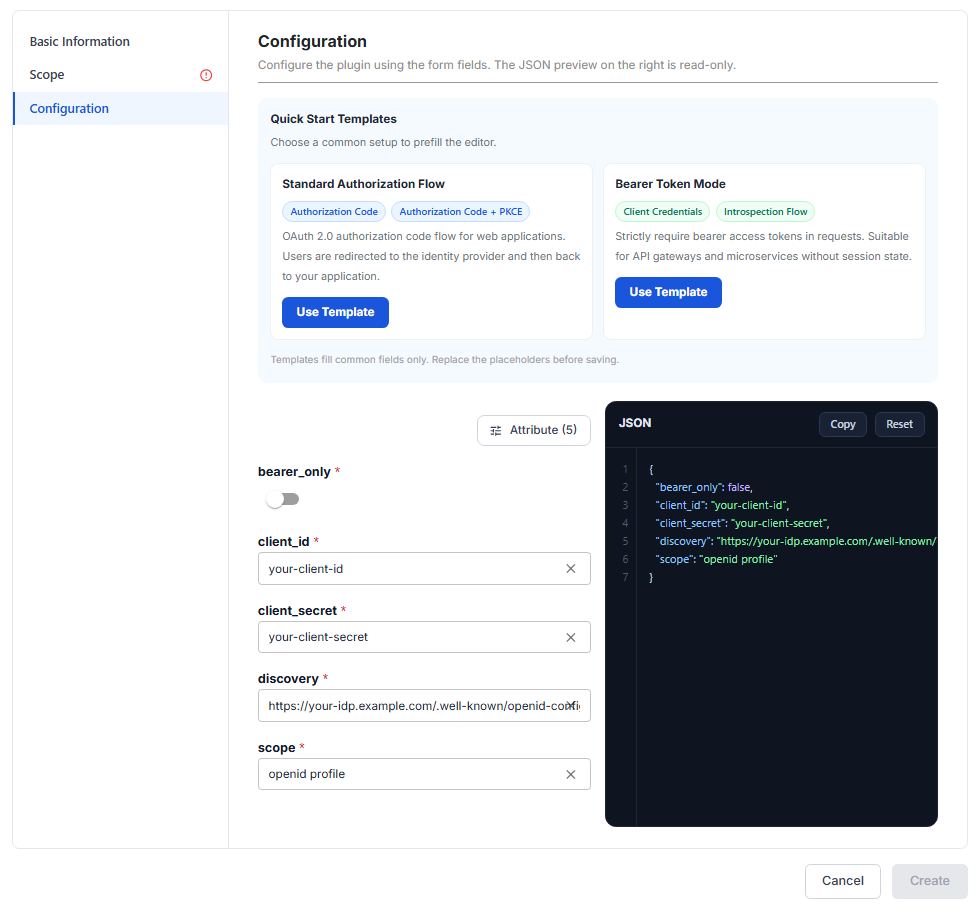
| 属性 | 必須 | 説明 |
|---|---|---|
| bearer_only | Y | false(デフォルト): Authorization Code モードで、ユーザーを IdP にリダイレクトしてサインインさせます。true: 有効な bearer アクセストークンをすでに持つ request のみを受け付けます。 |
| client_id | Y | IdP に登録した API Gateway の OAuth 2.0 Client ID です。 |
| client_secret | Y | API Gateway が token / introspection endpoint で IdP に対して認証するために使う OAuth 2.0 Client Secret です。 |
| discovery | Y | IdP がエンドポイント(authorization、token、userinfo、jwks など)を公開している OIDC Discovery ドキュメント(.well-known/openid-configuration)の URL です。 |
| scope | Y | 要求する OIDC の scope で、IdP が返すユーザー情報を決めます。ユーザーを識別する sub クレームを取得するために、openid を含める必要があります。 |
必要に応じて、Attribute (N) をクリックして他の属性を追加します。
| 属性 | 必須 | 説明 |
|---|---|---|
| session | N | bearer_only が false の場合に、セッション cookie を暗号化する鍵(16 文字以上)である secret を持つオブジェクトです。 |
| redirect_uri | N | サインイン成功後に IdP がリダイレクトする URI で、Route のサブパスにすることをおすすめします。デフォルトは /callback です。 |
| logout_path | N | API Gateway 上の path です。この path への request で、現在の OIDC セッションからサインアウトします。 |
| token_endpoint_auth_method | N | 認可コードをトークンと交換するために token endpoint を呼び出すときの、API Gateway の認証方法です(例: client_secret_basic、client_secret_post)。 |
| use_jwks | N | IdP の JSON Web Key Set(JWKS)を使ってトークンの署名を検証します。 |
| required_scopes | N | アクセストークンに含まれている必要がある scope で、bearer_only が true の場合に introspection とともに使います。scope が不足している request は 403 で拒否されます。 |
| introspection_endpoint | N | アクセストークンの確認に使う introspection endpoint(RFC 7662)の URL です。空のままにすると discovery から取得します。 |
| introspection_endpoint_auth_method | N | introspection endpoint を呼び出すときの、API Gateway の認証方法です。 |
| ssl_verify | N | IdP の SSL 証明書を検証します。 |
| leeway | N | トークンの有効期限を確認するときに、IdP と API Gateway の時刻のずれを許容する秒数です。 |
Quick Start Templates を使う(任意): カードの Use Template をクリックすると、設定をすばやく入力できます。
| テンプレート | 使用する場面 | 追加される属性 |
|---|---|---|
| Standard Authorization Flow(Authorization Code、Authorization Code + PKCE) | Web アプリケーション: ユーザーが IdP でサインインしてアプリケーションに戻ります。 | session、redirect_uri、logout_path、token_endpoint_auth_method、use_jwks |
| Bearer Token Mode(Client Credentials、Introspection Flow) | すべての request にアクセストークンが必要な、セッション状態を持たない API / マイクロサービス。 | bearer_only = true、required_scopes、introspection_endpoint、introspection_endpoint_auth_method、token_endpoint_auth_method、use_jwks。session、redirect_uri、logout_path は削除されます。 |
テンプレートはプレースホルダーの値(your-client-id、your-client-secret、https://your-idp.example.com/...)を入力するだけです。Create をクリックする前に、IdP の実際の値に置き換えてください。
-
Scope セクションを選択し、Global または Scoped を選んで、保護する Route / Service を割り当てます。Scopeを参照してください。
-
Create をクリックします。Plugin created successfully というメッセージが表示されます。一覧の Enabled 列と、Scoped を選択した場合は Route / Service の Plugins タブを確認してください。
設定例
5 つの必須属性によるデフォルトの設定:
{
  "bearer_only": false,
  "client_id": "your-client-id",
  "client_secret": "your-client-secret",
  "discovery": "https://your-idp.example.com/.well-known/openid-configuration",
  "scope": "openid profile"
}
Standard Authorization Flow テンプレートを使った後:
{
  "bearer_only": false,
  "client_id": "your-client-id",
  "client_secret": "your-client-secret",
  "discovery": "https://your-idp.example.com/.well-known/openid-configuration",
  "scope": "openid profile",
  "session": {
    "secret": "change-me-session-secret"
  },
  "redirect_uri": "/callback",
  "logout_path": "/logout",
  "token_endpoint_auth_method": "client_secret_basic",
  "use_jwks": true
}
Bearer Token Mode テンプレートを使った後:
{
  "bearer_only": true,
  "client_id": "your-client-id",
  "client_secret": "your-client-secret",
  "discovery": "https://your-idp.example.com/.well-known/openid-configuration",
  "scope": "openid",
  "required_scopes": [],
  "introspection_endpoint": "https://your-idp.example.com/oauth2/introspect",
  "introspection_endpoint_auth_method": "client_secret_basic",
  "token_endpoint_auth_method": "client_secret_basic",
  "use_jwks": true
}
introspection の path は IdP ごとに異なります。IdP の discovery ドキュメントで公開されている introspection_endpoint の値をそのまま使うか、このフィールドを削除して API Gateway に discovery から取得させてください。
動作を確認する
ユーザーが保護された Route / Service にアクセスすると:
bearer_onlyがfalseの場合: アプリケーションに到達する前に、ブラウザーが IdP のサインインページにリダイレクトされます。bearer_onlyがtrueの場合: 有効なアクセストークンのない request は401で拒否されます。